Bridal foot mehndi can change the whole feel of your wedding look because it connects your outfit, jewelry, heels, and wedding photos in one polished way. The most loved ideas right now lean toward florals, anklet-style bands, Arabic linework, jaali details, mirror symmetry, and minimal negative space, so there is room for both heavy bridal patterns and lighter syles that feel easier to wear. The best design is not always the heaviest one. Sometimes a clean layout with strong placement looks better in photos and feels more comfortable during a long event. The list below gives you 27 foot mehndi ideas that work for different bridal moods, from classic and full-coverage to modern and airy. Each one is easy to discuss with your mehndi artist, and many can also be practiced at home in a simpler version if you want to test shapes before your bridal appointment.
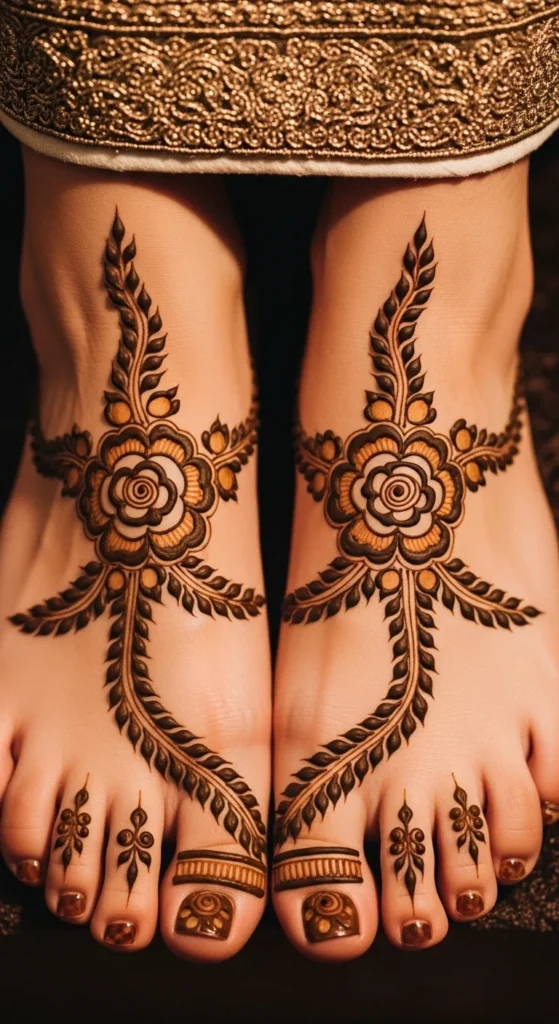
1. Floral Vine Trail from Toes to Ankles
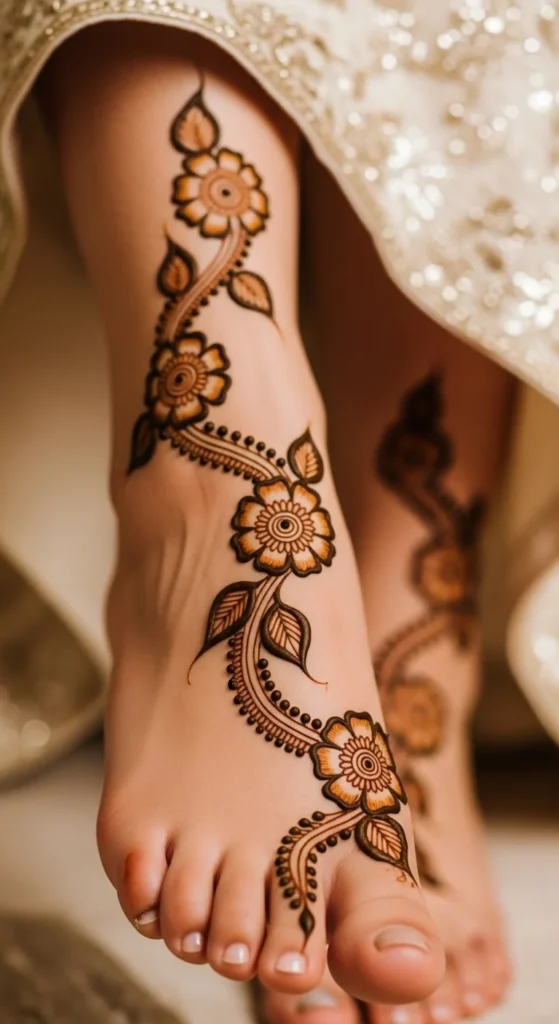
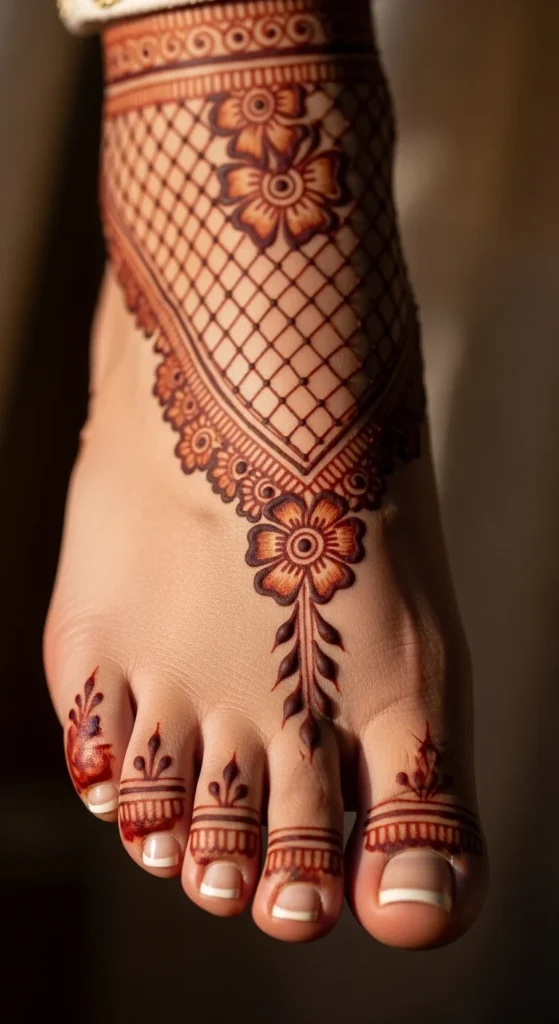
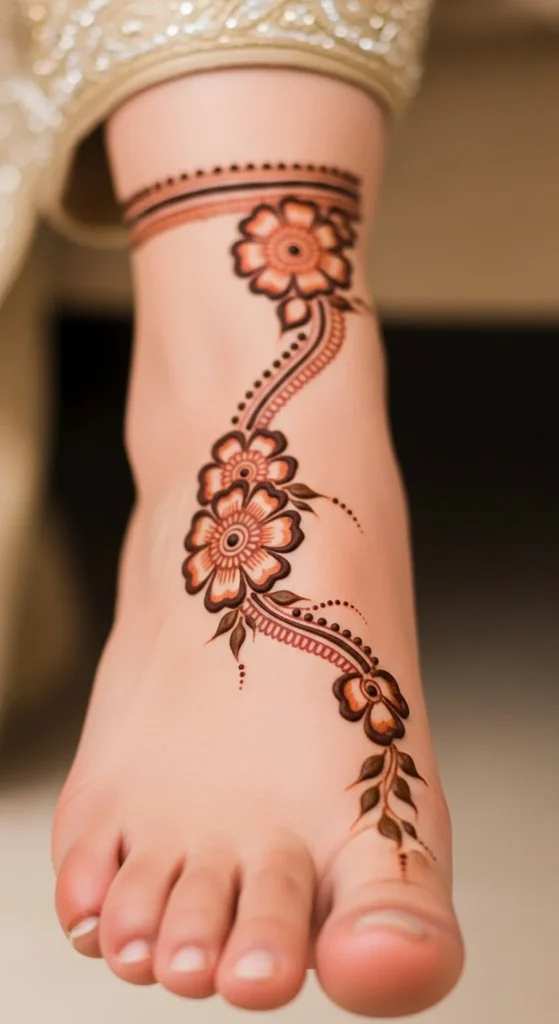
A floral vine trail is a safe and beautiful choice if you want something timeless without making the entire foot look packed. The design usually starts with small flowers near the toes, then travels upward with curved leaves and thin trailing stems toward the ankle. That upward movement looks lovely in sandals and wedding photos because it follows the natural shape of the foot instead of fighting it. This style works well for brides who want a romantic look and still want their payal or toe rings to stay visible. A budget-friendly idea is to keep one main flower on the center of the foot and let the vine do the rest, rather than filling every inch with detail. If you are trying it at home for practice, sketch the vine path with an eyeliner pencil first, then trace with henna once the layout feels right. Floral motifs are one of the most common directions in bridal foot mehndi, which is why this design stays popular year after year.
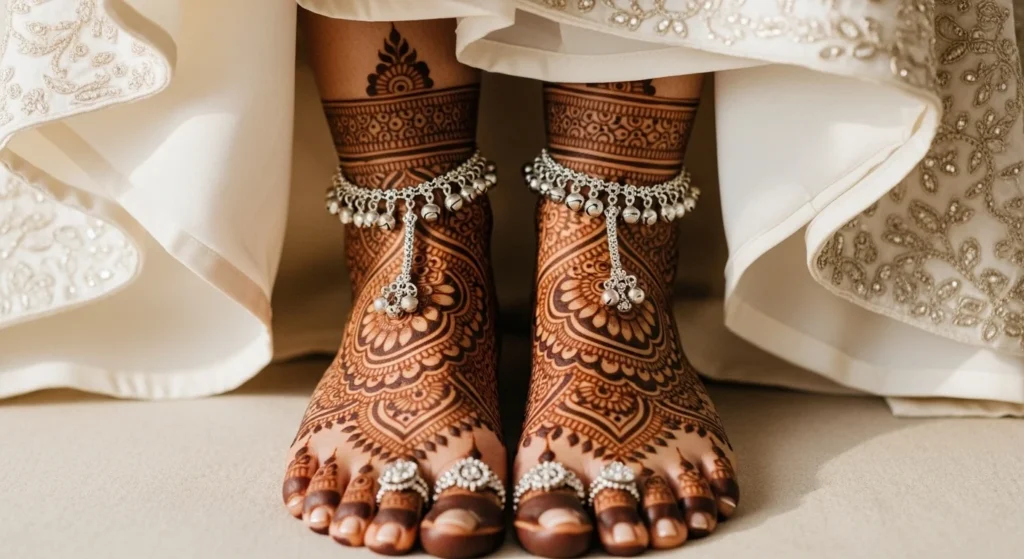
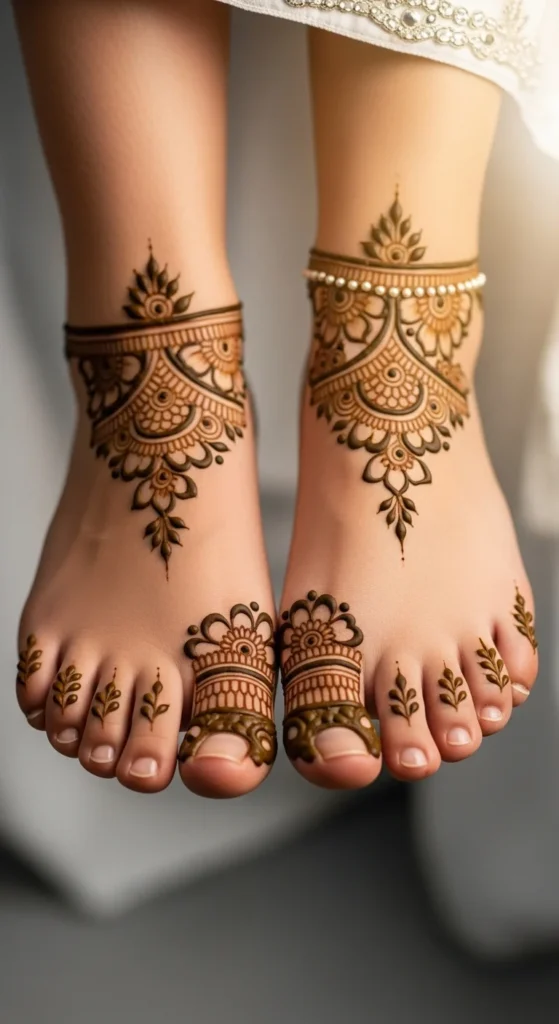
2. Anklet-Style Mehndi Bands

Anklet-style mehndi bands are perfect for brides who love jewelry-inspired details. Instead of covering the whole foot, this design places a strong decorative band around the ankle, often with tiny drops, chains, petals, or bead-like dots hanging downward. It creates the look of a payal made from henna, and that makes it especially useful if you want your actual ankle jewelry to feel coordinated rather than crowded. You can pair this with light detailing on the toes and a small motif on the center of the foot for balance. This style is also a smart choice if you have a smaller mehndi budget, because the artist can spend time making one strong focal area instead of doing full heavy coverage. If you want to test the idea yourself, draw one clean band first and build tiny details under it rather than trying to fill the whole ankle in one go. Anklet-inspired bridal foot designs are one of the rising favorites in recent trend collections because they feel polished, bridal, and photo-friendly at the same time.
3. Bold Arabic Swirl Design
Bold Arabic mehndi works beautifully on feet because the thicker lines stay visible from a distance and photograph very well under wedding lighting. This design usually mixes large curved flowers, leafy swirls, and dramatic spacing between motifs, which gives the foot a strong decorative look without making everything feel too tight. If your bridal outfit already has heavy embroidery, Arabic mehndi can be a smart choice because it gives visual impact while still leaving some breathing room. It is also easier to finish than very tiny detailed work, which helps if you have a short mehndi session or low tolerance for sitting still. A realistic DIY version is to practice one large flower, one curved leaf branch, and one toe pattern, then repeat the same idea across both feet. Keep the thick lines smooth and slow rather than rushing for detail. Arabic-inspired bridal foot designs continue to stay popular because the style feels bold, clean, and easy to spot in full-length wedding shots.
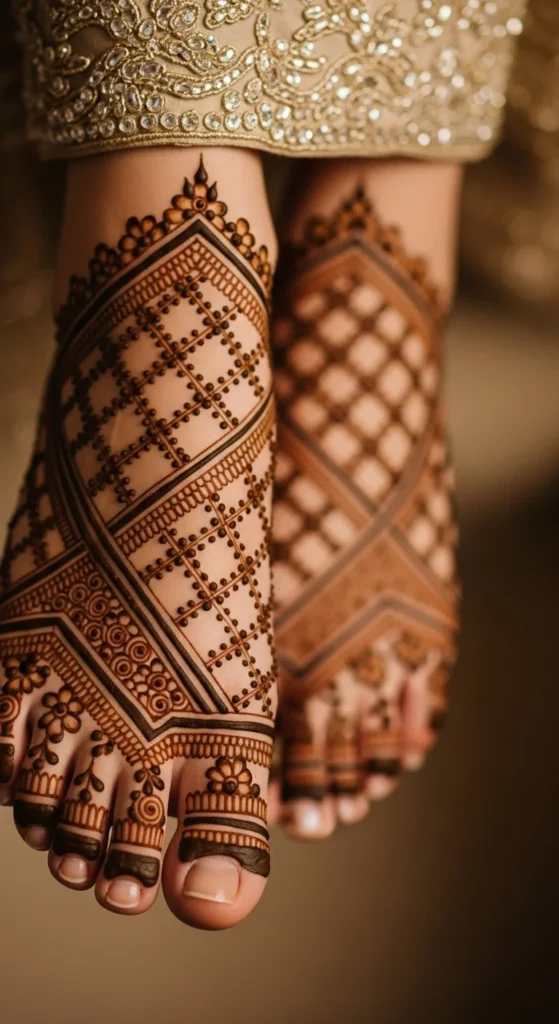
4. Jaali Net Pattern on the Top of the Foot
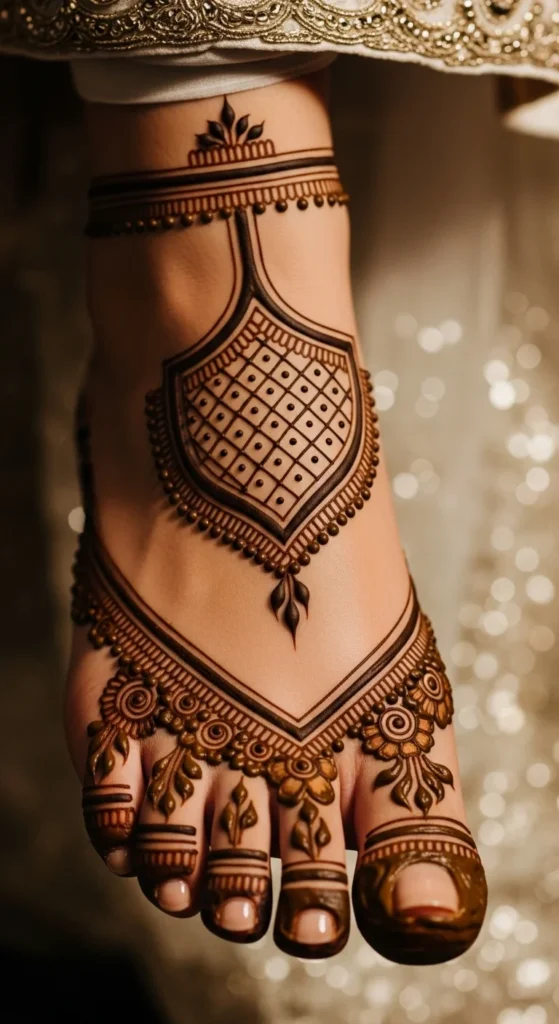
A jaali pattern gives your bridal foot mehndi a very dressed-up feel because it creates a lace-like look across the skin. The design often uses a floral border near the toes or ankle, then fills the middle with net work made from crossing diagonal lines, dots, or tiny petal shapes. This style looks especially nice with open sandals because the pattern sits flat and clear on the upper foot. If you want the result to stay elegant rather than messy, ask for jaali only in one main section and let the surrounding spaces stay lighter. That contrast helps the pattern stand out. At home, you can practice jaali with a pen on paper first by drawing repeated diamonds until your spacing becomes more even. Then try the same motion with henna on a plastic sheet before moving to skin. Paisley and jaali combinations remain a classic bridal pairing because they feel detailed and traditional without losing structure.
5. Paisley Toe Cluster Design
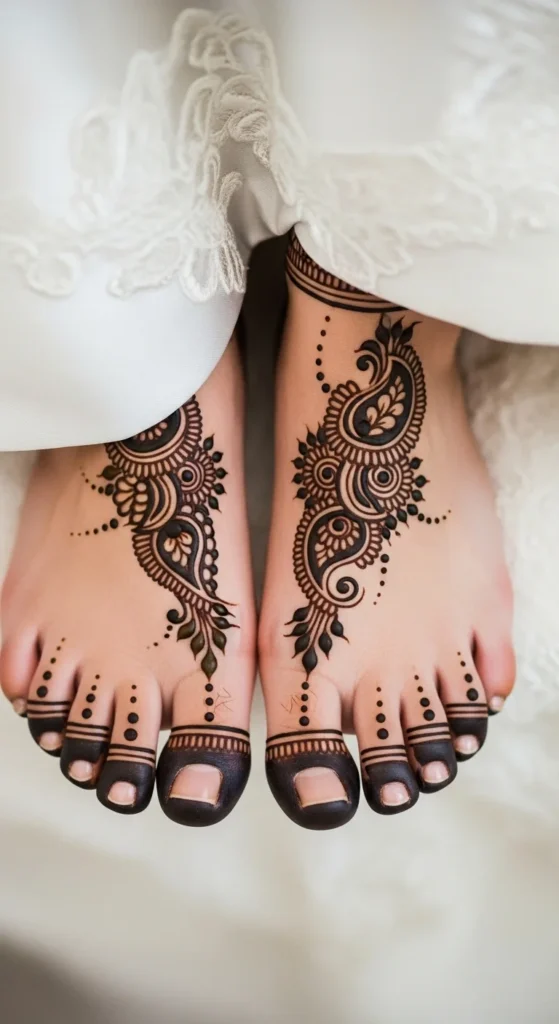
If you want something that feels bridal but not too heavy, paisley toe clusters are a lovely middle ground. The idea is simple. Each toe gets its own small pattern, often with paisleys, dots, curved leaves, and little fillers, while the main foot stays lighter or features one central motif. This layout keeps the toes beautifully dressed, which matters a lot in close-up bridal shots, especially if you plan to wear toe rings or open footwear. Paisleys work well here because their curved shape naturally follows the line of the toes. You do not need ten different motifs either. Repeating two or three shapes across all toes can make the design look more polished. A budget-friendly way to get this style from an artist is to skip full-foot detailing and focus on the toes, center, and ankle only. For home practice, try drawing paisleys with a pencil first and fill the inside with dots rather than tiny lines. That keeps the look neat and beginner-friendly while still giving it bridal character.
6. Minimal Negative Space Bridal Style
Minimal negative space mehndi is ideal for brides who want a cleaner look that still feels wedding-ready. Instead of filling the entire foot, the design uses open skin areas as part of the layout. That contrast makes the henna work look sharper and gives jewelry more room to shine. You might see one floral branch running diagonally across the foot, a small anklet motif, and detailed toes with the rest left open. This works especially well for modern bridal outfits, lighter lehengas, or intimate weddings where you want a softer overall styling. It can also save both time and money, since less coverage usually means a shorter session. If you are trying a DIY version, start with one side trail and keep the other side clear. Resist the urge to keep adding details just because the space feels empty. The empty space is the design. Minimalist foot mehndi has been gaining attention because it feels elegant, quick to apply, and easy to pair with bridal accessories.
7. Centered Mandala with Fine Toe Details
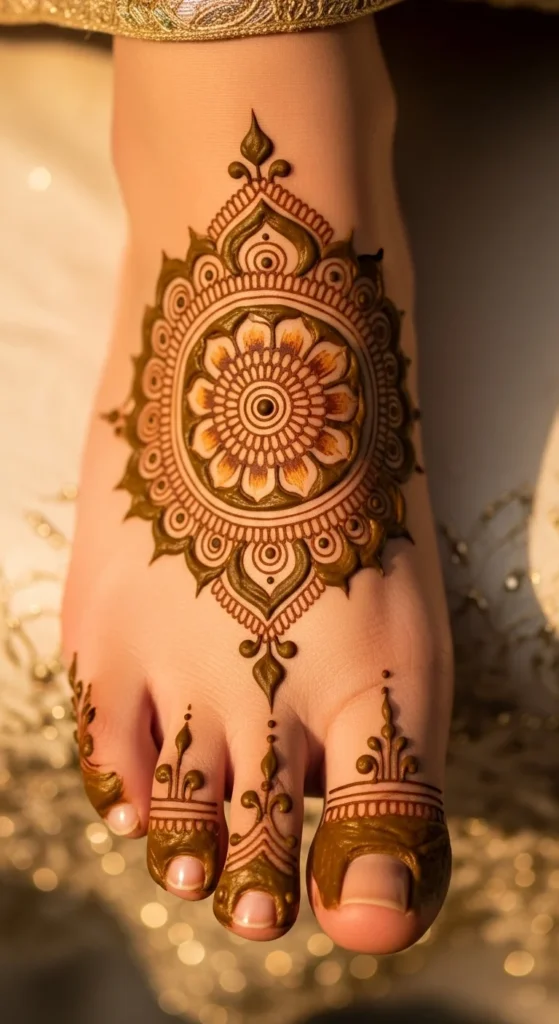
A centered mandala is a strong choice when you want one clear focal point on each foot. The circular motif sits on the upper foot and draws the eye immediately, while the toes carry smaller repeating details to tie everything together. This layout feels balanced and calm, which is useful if your bridal look already has rich embroidery or statement jewelry. The mandala can be simple or dense depending on your taste, but the round center usually looks best when the outer rings stay crisp and even. If you want the design to feel fuller without becoming too dark, add dot trails and tiny petals between the center and toes. That fills the space in a soft way. For a home practice version, draw a coin-sized circle with eyeliner first and build the pattern outward layer by layer. Mandala-centered foot mehndi remains a favorite because it gives a strong bridal finish while still leaving room for elegant spacing around the design.
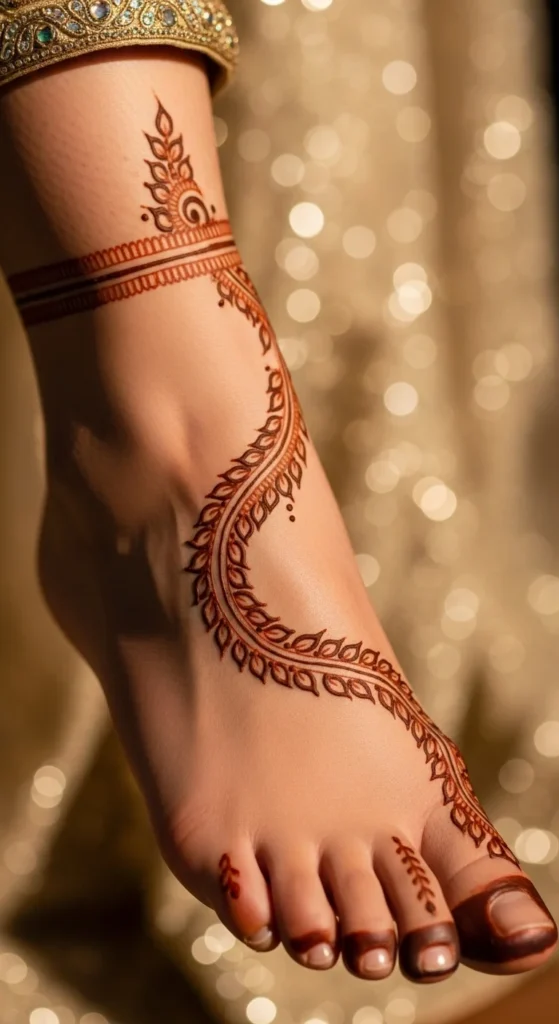
8. Side-Swept Diagonal Trail

A diagonal mehndi layout can make the foot look longer and more graceful because the design moves from one corner to another instead of sitting flat in the center. It usually starts near the big toe or outer toes, then runs across the foot toward the opposite ankle with flowers, leaves, paisleys, or dotted strings. This style is helpful if you want a slimming visual line or if you like asymmetry in your bridal styling. It also works well with open heels because the diagonal trail stays visible from many angles. A practical way to keep this look neat is to place one larger motif near the middle and use smaller details at both ends. That keeps the eye moving naturally. If you are doing a low-cost bridal mehndi package, this is a smart option because it looks rich without needing wall-to-wall coverage. At home, you can test the placement by drawing a soft diagonal guide line with a washable pencil first, then building around that path with your henna cone.
9. Toe Ring Accent Mehndi
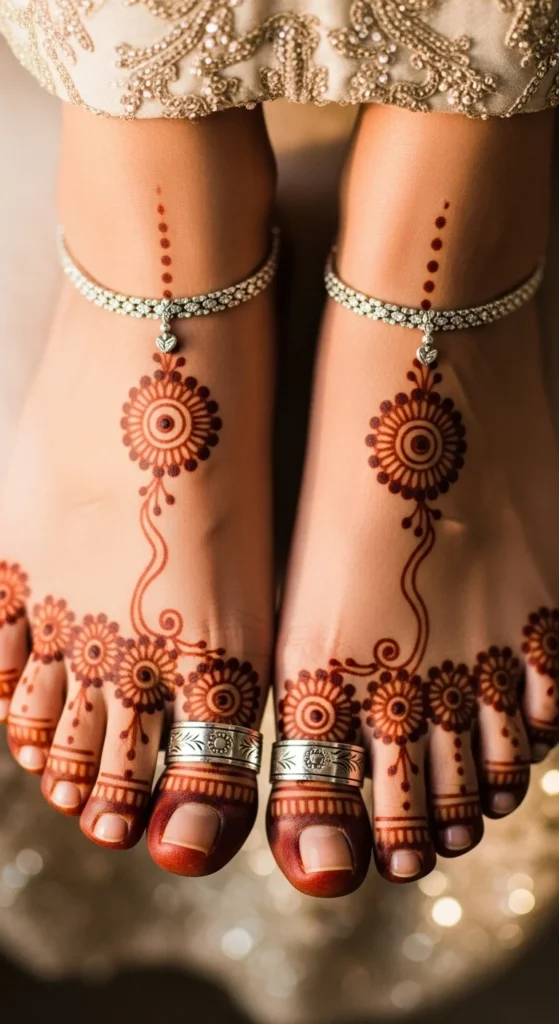
Toe ring accent mehndi is a wonderful pick if you already know you will wear bichiya or decorative toe rings on the wedding day. The design focuses on framing the jewelry rather than hiding it. Small circles, floral cuffs, dotted chains, and curved leaves are placed around the base of each toe so the rings feel more dressed, not lost. The rest of the foot can stay light or hold one soft central motif. This style works best when the mehndi artist avoids overly thick filling on the toes, because heavy coverage can compete with the jewelry. It is also a nice solution for brides who want the mehndi to feel bridal but not too overwhelming. A simple home-practice version is to draw a half-moon band under each toe and connect it with dots or tiny leaves. Keep the lines clean and the spaces even. Toe-ring-focused designs are often recommended in bridal inspiration sets because they pair so well with payals, sandals, and close-up foot photographs.
10. Crescent Moon Floral Layout
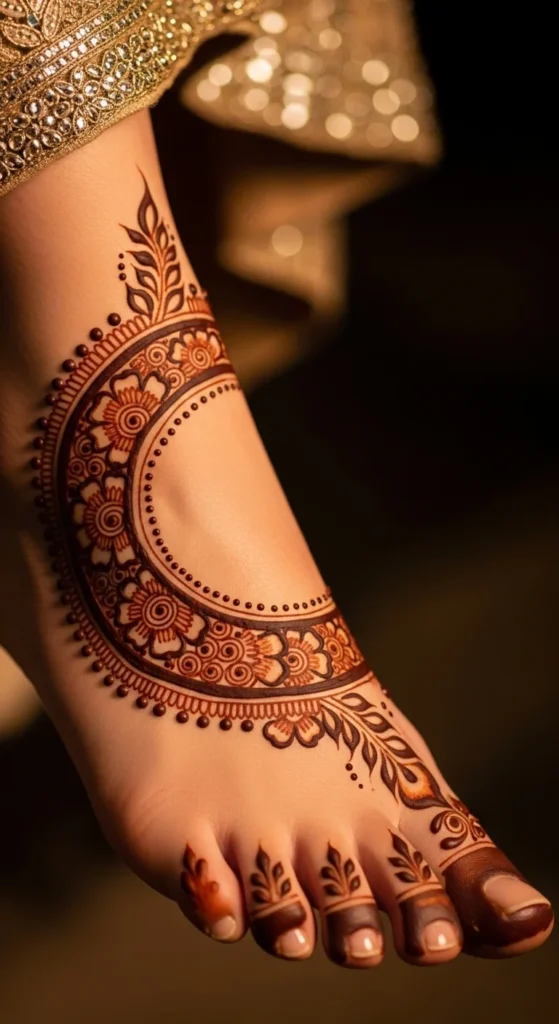
A crescent-shaped floral layout gives you a soft curved composition that feels romantic and slightly different from the usual straight trail. The design follows a moon-like arc across the foot, often starting near the toes and curving toward the ankle with clustered flowers and leaf fillers. This shape works well because feet already have natural curves, so the mehndi sits comfortably rather than looking forced. Brides who want a feminine look with visible skin space often enjoy this option. It also suits smaller feet because the curve adds movement without packing in too many motifs. If your mehndi budget is limited, ask for one rich crescent on each foot and detailed toes. That alone can look complete. For DIY practice, lightly mark the moon curve with a makeup pencil, then place one flower at each end and build the connecting trail between them. Using three flower sizes usually keeps the layout more natural than repeating the exact same motif all the way through. This style feels soft, bridal, and easy to customize.
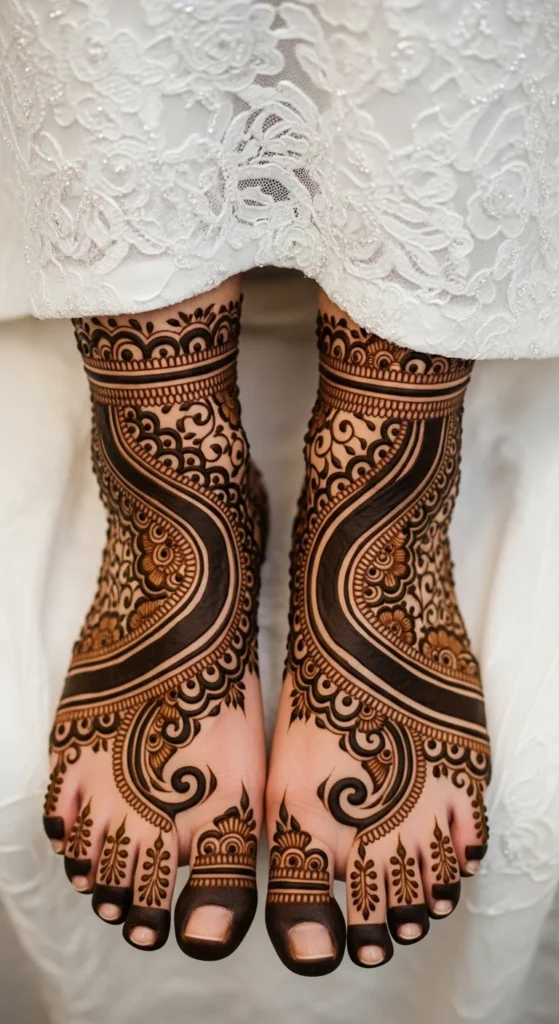
11. Full Pakistani Bridal Coverage

If you love a rich and traditional wedding look, full Pakistani-style foot mehndi gives that complete dressed feeling from toes to above the ankles. The design often includes layered florals, paisleys, mesh work, shaded fillers, and detailed side spaces so the feet look fully adorned. This is a strong choice for brides who want the mehndi to stand out in every photo, even with a heavily embroidered dress. Since this kind of work takes longer, a practical move is to choose one foot as the reference and let the other mirror it rather than asking for two totally different patterns. That keeps the layout organized. If you are worried about budget, you can ask the artist to keep the extension just above the ankle instead of moving far up the leg. That still gives the heavy bridal feel with less time and cost. Pakistani bridal foot mehndi remains one of the most loved directions for brides who want strong detail and a fully festive finish.
12. Leafy Side Trail with Open Center
A leafy side trail is perfect for brides who want a design that feels airy but still dressed enough for a wedding. Instead of placing the main motif in the middle, the mehndi runs along one side of the foot using leaves, curved stems, and small floral accents. The center stays open, which gives the whole look more lightness. This style is very useful if you plan to wear a statement sandal or if your payal is already ornate. The open center lets those details stay visible. A good way to make this design feel bridal is to add tiny clustered dots and one larger flower near the ankle or outer foot. That gives the trail a clear focal point. If you want to practice it yourself, draw one sweeping stem first, then add leaf pairs along the sides rather than trying to build flower shapes everywhere. This kind of layout usually looks cleaner when the same leaf style repeats. It is a smart choice when you want something stylish, pretty, and less time-consuming than a full-coverage bridal pattern.
13. Lotus Bloom Bridal Design
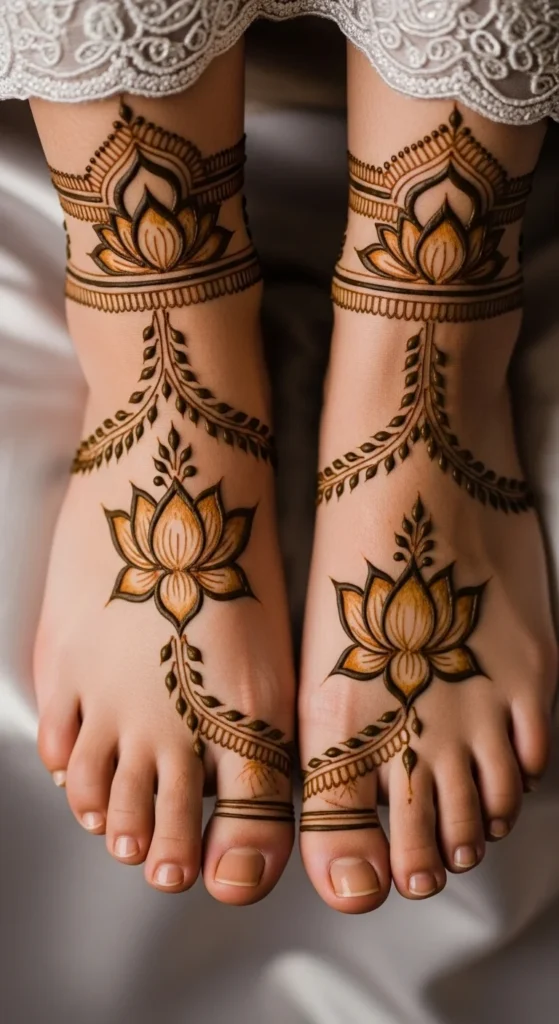
Lotus motifs bring a soft traditional feeling to bridal mehndi and work beautifully on feet because the petals spread naturally across the upper foot. A lotus can sit in the center, near the ankle, or along the side, depending on the overall layout. Many brides choose lotus work because it feels classic and bridal without looking dated. You can pair one main lotus with toe detailing, leaf trails, or a light mesh background. The nice part about lotus designs is that they can be adjusted for any budget. A simple lotus outline with a few petals looks elegant on its own, while a fuller version with shading and fillers feels richer. For home practice, start with a center oval and build petals outward in layers rather than trying to draw the whole flower at once. Using a mirror reference photo also helps with balance. Lotus motifs appear often in current bridal inspiration because they carry a familiar wedding feel and pair easily with both Indian and Pakistani styling.
14. Rose Garland Foot Pattern
Rose garland mehndi gives a more soft and decorative look than geometric styles. The design uses rose heads connected by leafy stems, dotted strings, or tiny buds, creating the feel of a flower garland wrapping across the foot. This is a lovely option if your bridal outfit has floral embroidery or if you want a gentler mehndi pattern that still feels full. Roses can be drawn large and spaced out for an airy finish, or smaller and closer together for a more covered look. One useful idea is to place the biggest rose near the ankle and use smaller ones toward the toes. That size change helps the layout feel intentional. If you are practicing with a cone at home, focus on drawing one rose shape well before repeating it. A simple spiral center with curved petals around it often works better than trying to make each rose too realistic. This style also suits brides who want matching hand and foot mehndi themes, since rose motifs translate easily across both.
15. Peacock Feather Inspired Mehndi

Peacock-inspired foot mehndi feels festive and a little regal without requiring full heavy coverage everywhere. The feather shape brings curves, small teardrops, and eye-like details that sit nicely on the top or side of the foot. You can use one large peacock feather as the hero motif and then add paisleys, leaves, and dots around it for balance. This is a smart design if you want something more detailed than plain florals but still recognizable and bridal. It looks especially good on brides wearing richly colored outfits like deep green, maroon, or royal blue because the theme feels naturally festive. A realistic tip is to keep the peacock feather on one main area rather than trying to place many feathers all over the foot. One clear focal motif almost always photographs better. At home, practice the feather spine first, then add side curves and dot work slowly. Even a simplified version can look rich if the outer shape stays clean. This style brings movement and tradition without making the foot look too busy.
16. Geometric Grid with Soft Floral Touches
A geometric grid design is a nice option for brides who want a more modern layout while still keeping some bridal softness. The base often uses squares, diamonds, or repeated line sections across the upper foot, and then small flowers or dots are added at corners so the pattern does not feel too stiff. This mix works well for contemporary bridal styling and pairs nicely with cleaner outfit cuts or modern footwear. The biggest advantage of a grid layout is structure. It gives the artist a clear map, which often makes the final pattern look more polished. If you want the result to stay bridal, keep one floral or paisley element in the center or near the ankle so the grid does not feel too plain. A practical DIY idea is to practice the grid first with a ruler on paper, then freehand it once your spacing improves. Geometric foot mehndi has gained interest because it brings a fresh visual style while still working well with traditional toe and ankle detailing.
17. Decorated Heel with Light Upper Foot Work
Most bridal mehndi puts all the attention on the top of the foot, so a decorated heel can feel like a smart twist. This design works well if you know your feet will be photographed from the back while sitting, walking, or during shoe shots. The heel can carry a floral motif, a circular mandala, or a curved vine pattern, while the top of the foot stays lighter with toe work or a small side trail. This layout is practical because it gives detail where many brides forget to place it. It also suits bridal sandals that expose the back of the foot. If you want to keep things budget-friendly, ask for a detailed heel on both feet and lighter work elsewhere. That will still look thoughtful and complete. At home, practice the heel design by sketching a half-circle layout first since the heel area is rounded and can feel tricky. This kind of placement helps your mehndi feel more custom rather than copied directly from the usual front-foot patterns.
18. Double Payal Band Layout
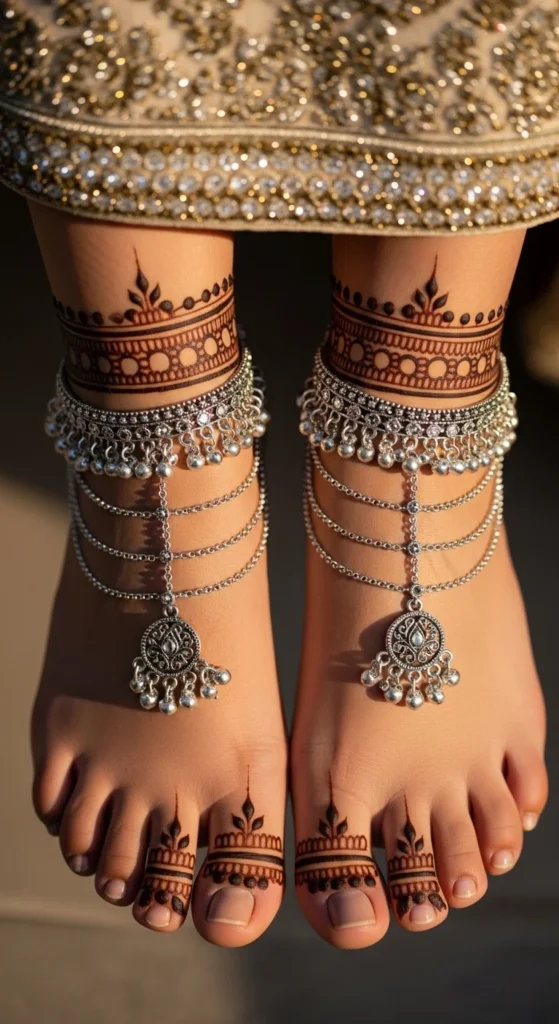
A double payal band layout gives a layered jewelry look and works especially well for brides who enjoy ornate ankle styling. The design places two separate henna bands around the ankle, usually one slightly above the other, with tiny hanging drops, chains, or dot strings between them. You can connect the lower band to the foot with a floral trail or leave it separate for a cleaner look. This style feels festive and dressed even when the main foot area stays fairly open. That makes it useful for brides who want detail around the ankle without paying for full heavy coverage. It also pairs beautifully with real payals if the artist leaves a bit of breathing room between the henna bands and the metal jewelry. For a simple DIY test, draw two soft curved bracelet lines around the ankle and add tiny dangling shapes below the lower one. Repeating the same drop or leaf shape helps the design stay neat. Anklet-driven bridal patterns continue to get attention because they frame the foot in a very elegant way.
19. Shaded Floral Mesh Design
If you want a bridal foot design that looks rich without becoming too dark, shaded floral mesh is a great choice. The pattern usually starts with flowers and leaves, then soft shading is added inside petals or around mesh sections to create depth. This makes the henna look more dimensional, especially in close-up photos. The trick is not to shade everything. Too much darkness can flatten the design. A better approach is to place shading only inside the bigger flowers or along one side of selected leaves. That gives contrast while keeping the foot readable. This style looks best when paired with neat toe detailing and a clear edge around the main pattern. If you are testing ideas at home, use a pen on paper to practice where darker fill should sit before trying it with real henna. Shaded mehndi has become more common in recent bridal inspiration because it gives a fuller, richer appearance while still letting the main motifs stay visible.
20. Mirror Symmetry Bridal Pair
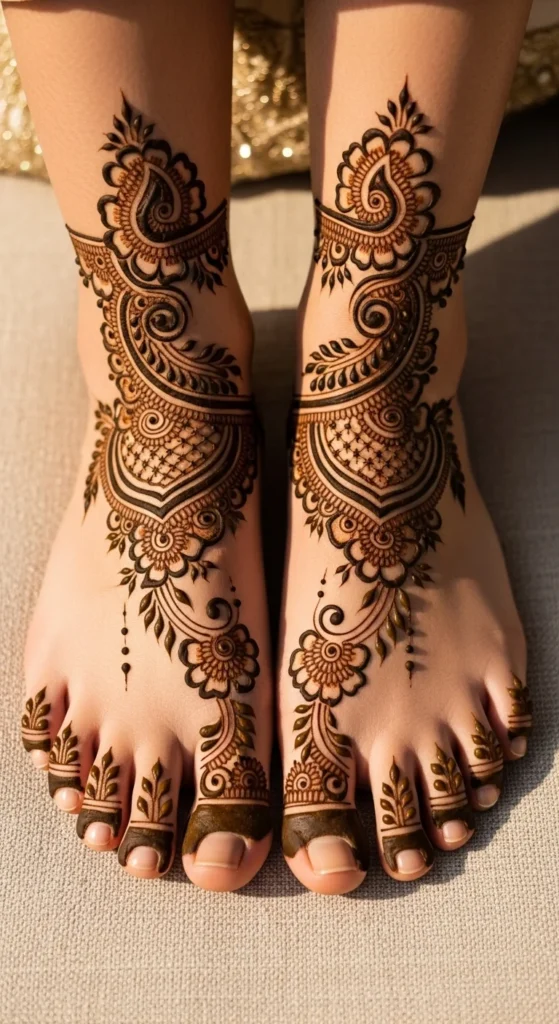
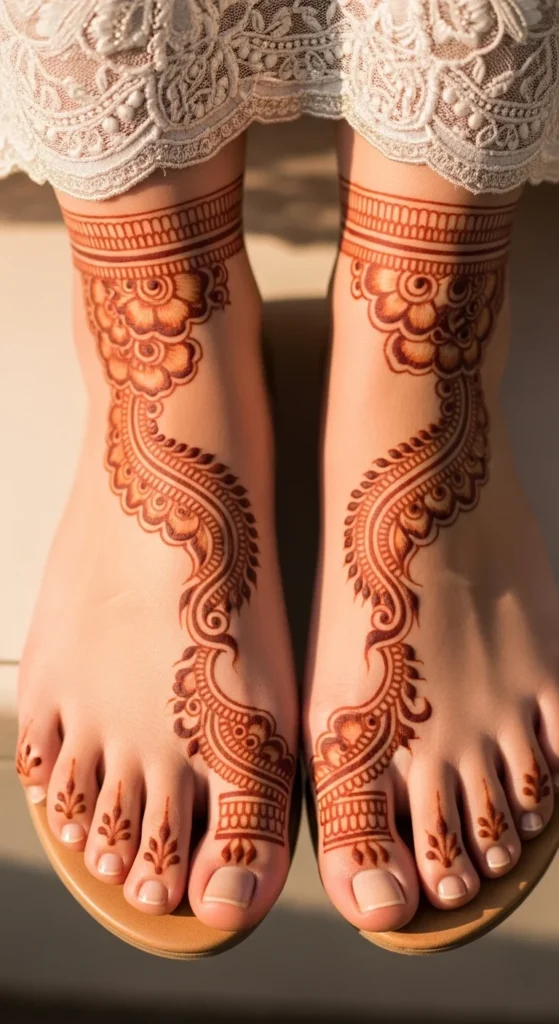
Mirror symmetry is one of the easiest ways to make bridal foot mehndi look polished. When both feet reflect each other, the full look feels balanced and intentional in photographs. This does not mean every line must be identical. It just means the main motifs, flow, and placement should feel paired. A common version is one central motif on each foot, matching toe work, and mirrored ankle details. This approach is especially useful for brides who want traditional bridal mehndi because symmetry naturally gives that dressed, complete feeling. It also helps if your lehenga, heels, and jewelry are already quite detailed, because the mehndi adds order instead of visual noise. If you are planning the design with an artist, save one reference image and ask them to mirror the structure rather than copy random elements from five different pictures. Symmetrical bridal feet remain a strong favorite because the balanced look works beautifully in sitting poses, ceremony shots, and close-up wedding photography.
21. Hidden Initials in the Pattern
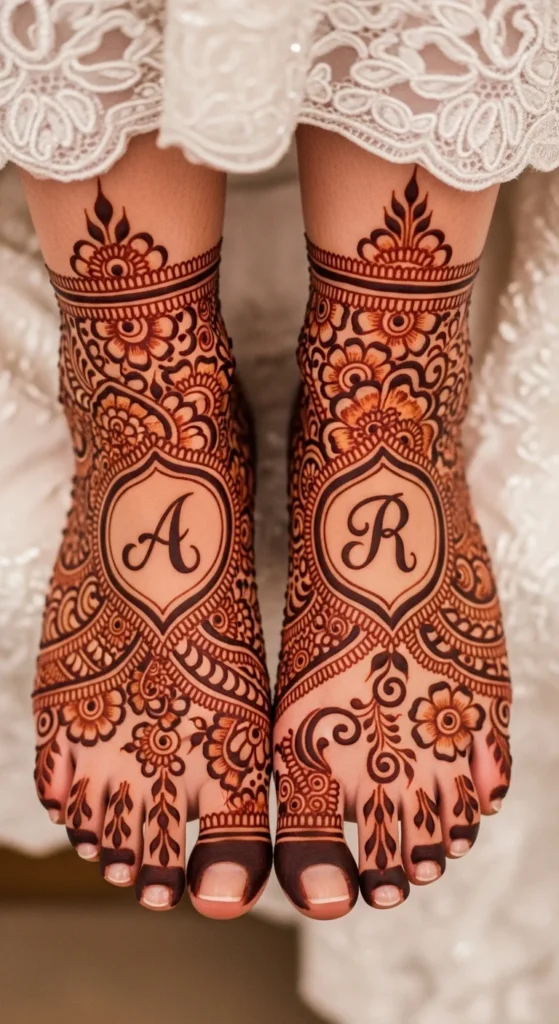
Hidden initials add a personal touch without changing the whole style of the design. The letters can be tucked inside a flower, placed along a vine, or worked into a paisley curve so they are visible only when someone looks closely. This makes the mehndi feel special and custom while still keeping the overall bridal layout traditional. Initials work best when they are small and placed in one clear area, such as near the ankle or along the side of the foot. If they are repeated too many times, they can look forced. A practical idea is to choose one foot for the initials and let the other stay fully decorative. That way the design keeps its bridal rhythm. If you want to test this at home, write the letters in a thin pen on paper and practice hiding them inside floral shapes before trying them with henna. Personal details like initials are becoming more common in bridal mehndi because they make the design feel meaningful without needing a totally custom illustration.
22. Elephant Motif Bridal Accent
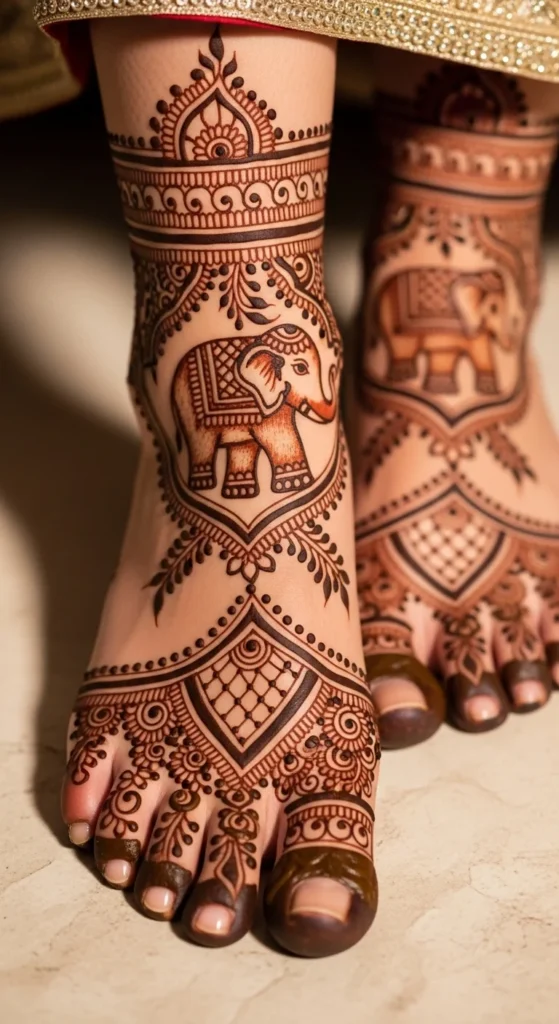
An elephant motif can give bridal mehndi a traditional celebratory feel, especially when used as a single accent near the ankle or side of the foot. The key is to keep it stylized rather than overly detailed. A clean elephant outline with a decorated blanket, a curved trunk, and floral fillers around it usually works better than trying to make the whole animal too realistic. This kind of motif suits brides who want a design that feels rooted in wedding symbolism and festive storytelling. Pair it with floral toes or a paisley trail so the overall pattern still feels soft and wearable. If you are worried about budget or application time, ask the artist to place the elephant on just one main section of each foot and keep the rest of the layout simpler. For home practice, sketch the silhouette first and build decoration inside it later. Elephant motifs continue to appear in bridal inspiration because they bring strong traditional character while still fitting beautifully into modern wedding mehndi layouts.
23. Arch Motifs with Tiny Dot Chains

Arch motifs can make your foot mehndi feel delicate and structured at the same time. The design uses repeated curved arches across the upper foot or around the toes, then soft dot chains connect the shapes to create movement. This kind of layout is especially nice for brides who like a lighter look but still want more than a simple vine. The arches frame the foot well, and the dots add bridal softness without taking much time. One good way to keep this style neat is to choose one arch size and repeat it instead of changing the scale too often. That makes the pattern feel more intentional. If you are doing a simple practice version yourself, start with three arches over the upper foot and connect them with dots before adding any floral details. It is easier to build extra decoration later than to clean up a crowded layout. This pattern also works well with payals because the arch rhythm echoes jewelry in a subtle way.
24. Jhumka and Bell Inspired Hanging Details

Jhumka-inspired mehndi details add a festive jewelry mood that feels perfect for wedding events. These motifs are usually used around the ankle, where tiny bell or earring-like shapes hang from a decorative band. They can also appear near the center trail or beside paisleys as little hanging accents. The reason this style works so well is that it brings movement into the design even though the henna itself is static. It looks playful, dressed, and wedding-specific. Brides who already love chandelier earrings or jhumka-style jewelry often enjoy echoing that idea in their mehndi. A practical budget tip is to use the hanging details only around the ankle and keep the foot itself lighter. That gives the full design a bridal feel without adding too many hours to the session. If you want to try the shape on paper first, draw a tiny dome, then add two or three dangling drops beneath it. Repeating the same hanging unit in a row helps the design look clean and festive rather than random.
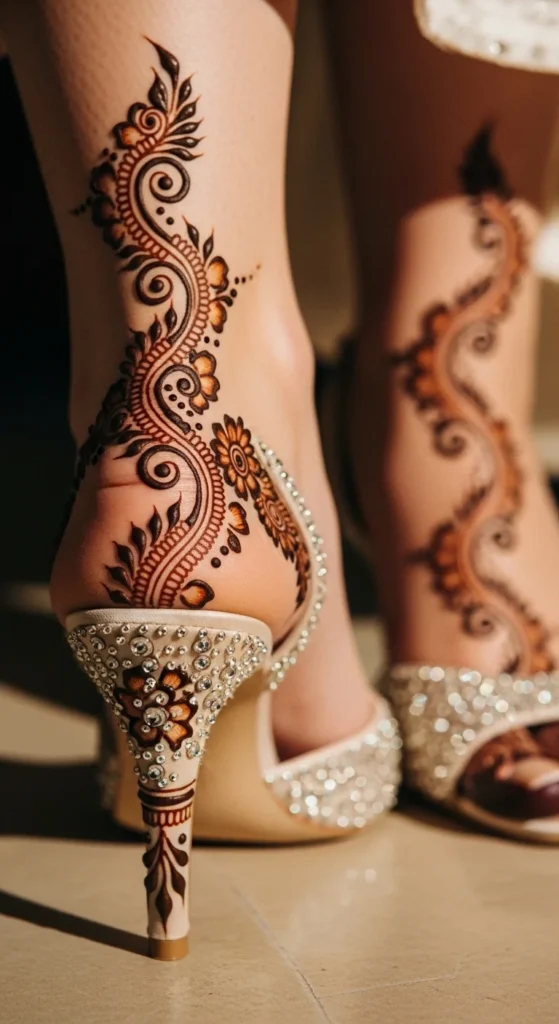
25. Heel-to-Ankle Bracelet Trail
A heel-to-ankle bracelet trail is a beautiful option when you want attention on the back and sides of the foot instead of only the top. The mehndi begins near the heel and moves upward in a narrow decorative strip, often with floral buds, leaves, or bead-like dot chains. This can look lovely with open-back footwear, and it gives a more custom feel because the placement is less expected. It is also a smart style if you want the front of the foot to stay calmer for sandals or rings. You can pair the back trail with minimal toe details and an anklet band for a balanced bridal effect. If you are working within a smaller budget, this style is a strong choice because it covers a narrow path but still feels complete. For DIY practice, mark the trail path with a soft pencil while your foot is flat on the floor. That makes placement easier than trying to freehand on a curved heel. This design feels elegant, useful, and just a little different from the standard bridal layouts.
26. Open Sandal Friendly Foot Mehndi
If your wedding shoes are open and decorative, an open-sandal-friendly mehndi design is worth planning on purpose. The goal here is not maximum coverage. The goal is smart placement. Focus on the toes, the outer sides of the feet, and the ankle area where the mehndi will still be visible once the sandals are on. Leave the central top area lighter if a wide shoe strap will cover it anyway. This helps you avoid paying for detail that no one will see. It also keeps the overall look more breathable and stylish. A practical idea is to take a photo of your bridal shoes and show it to your mehndi artist before the session. That way they can place the main motifs where the sandal actually leaves skin open. If you want to test the layout at home, wear the shoe and mark the visible areas with washable liner first. Then imagine your main floral or paisley motifs in those sections only. This approach makes the design feel smarter, more intentional, and better suited to the full bridal styling.
27. Regal Mehndi Extension up the Lower Leg
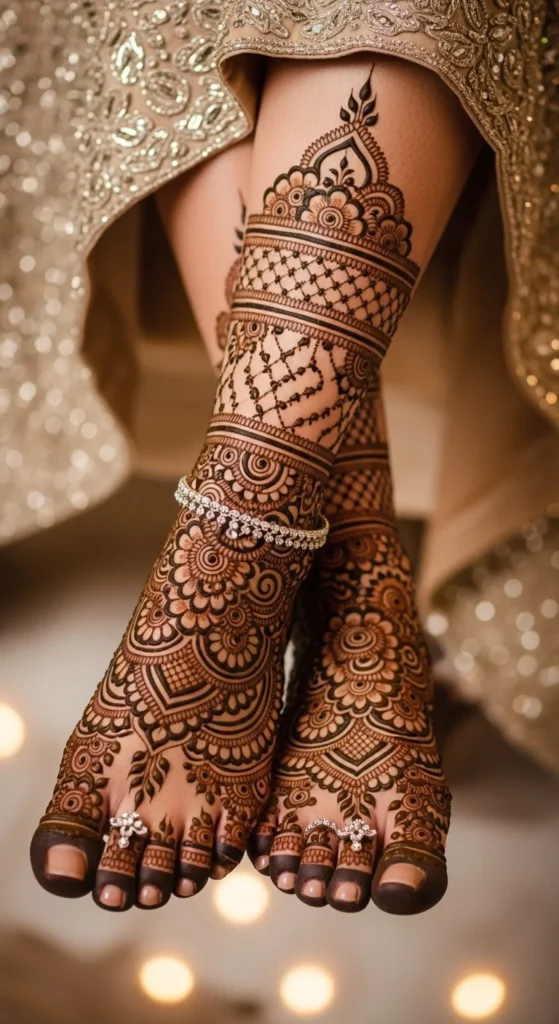
For brides who want a dramatic wedding finish, extending the foot mehndi upward toward the lower leg creates a regal and very dressed look. This style usually begins with full foot coverage, then continues past the ankle with floral sections, paisleys, mesh panels, or bracelet-like bands. It works especially well with outfits that lift slightly while walking or sitting, since the extra detail becomes visible in motion and in ceremony photos. A good way to keep the design from feeling too heavy is to break the extension into sections rather than filling every area solidly. For example, use one rich ankle band, a lighter open gap, then another motif higher up. That spacing keeps the leg design readable. Since this kind of mehndi takes time, a practical budget-saving idea is to extend only the front or outer side of the lower leg instead of covering all around. Full-leg bridal foot extensions are often chosen by brides who want a grand traditional effect and are happy to make mehndi one of the hero details of the wedding look.
Conclusion
The best bridal foot mehndi design is the one that works with your outfit, your jewelry, your budget, and your comfort level on the day. A full heavy pattern can look stunning, but a lighter design with smart placement can look just as polished in photos. Start by deciding what matters most to you. Maybe it is floral softness, rich traditional detail, visible payals, clean modern spacing, or one personal touch like initials. Once that is clear, the design becomes much easier to choose. Save two or three reference styles, not twenty, and focus on placement as much as pattern. That simple step usually leads to a much better result. Whether you go for classic lotus work, bold Arabic swirls, or a minimalist anklet layout, the right foot mehndi can make your bridal styling feel complete from head to toe.

Lily Summers is a digital artist and creative storyteller who loves bringing colorful characters to life. With a passion for cartoons, fan art, and playful sketches, she inspires others to explore their imagination through art. When she’s not sketching, you’ll find her dreaming up new ideas for CraftedWizard.com to spark creativity in every artist. 🌈✨