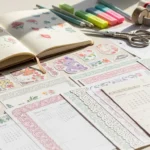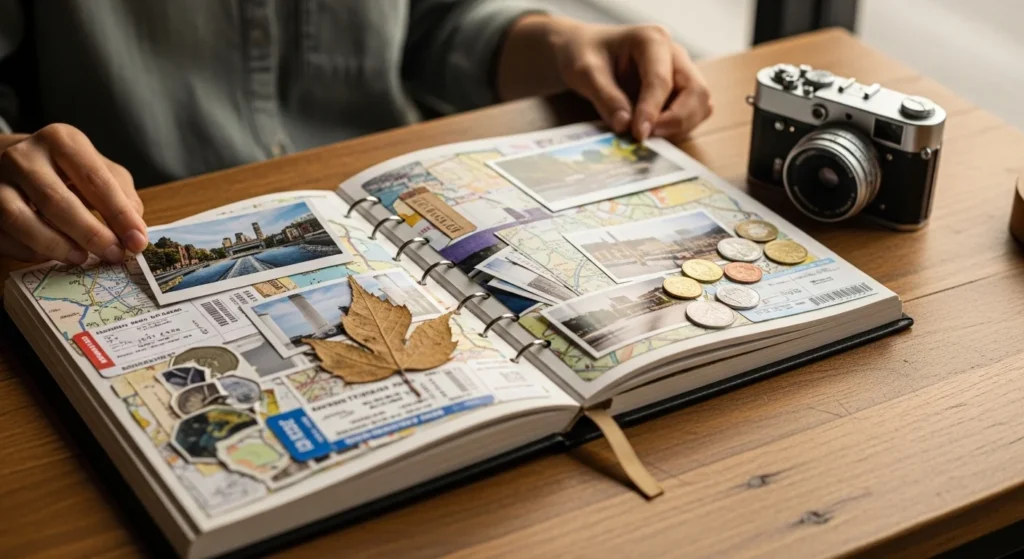
Travel memories fade faster than you expect. Not the big moments, but the small ones. The street you got lost on. The snack you tried once. The tiny hotel key card you forgot in your wallet. A travel scrapbook helps you keep those details in one place, without turning it into a complicated project. This list gives you travel scrapbook ideas that work for weekend trips, long vacations, and even day adventures. You can use what you already brought home, print simple photos, and build pages that feel personal and easy to flip through years later.
1) Map Border Photo Spread
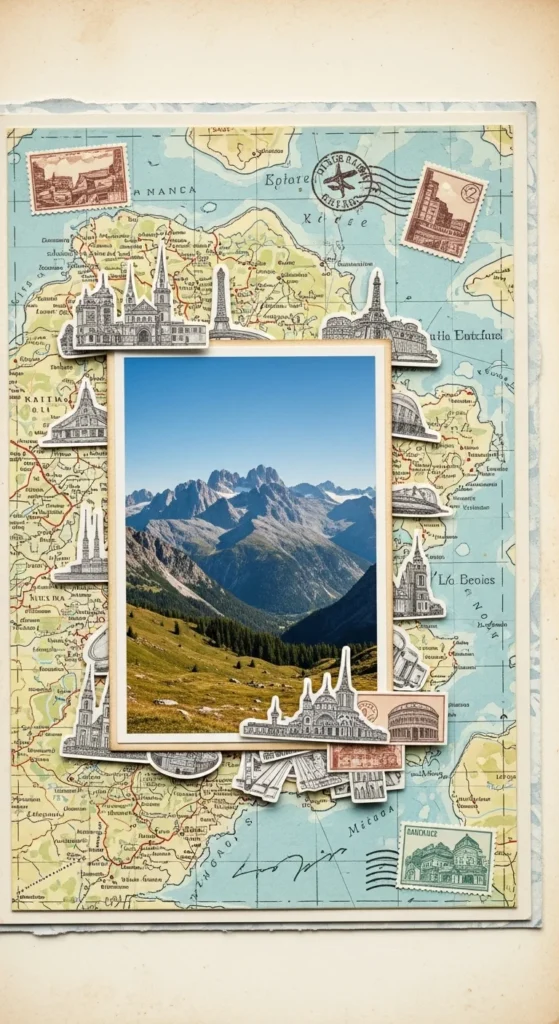
Use an old map page or a printed map background to frame your photos like a border. Cut the map into strips and place it around the page edges, then keep the center for your main travel photos. This makes even simple phone pictures feel like a complete travel story. If you don’t have a map, print a basic street map in black-and-white and tear it into pieces for a textured border look. Keep the photo cluster simple, like one large photo and two smaller ones. Add small paper scraps that match the map colors so the page feels calm. If you brought home tiny items like a café sugar packet or a luggage sticker, tuck them under a photo edge so they peek out without making the page bulky. This spread works for any destination because maps instantly signal “place” and create a travel mood without heavy decorating.
2) Boarding Pass Pocket Page
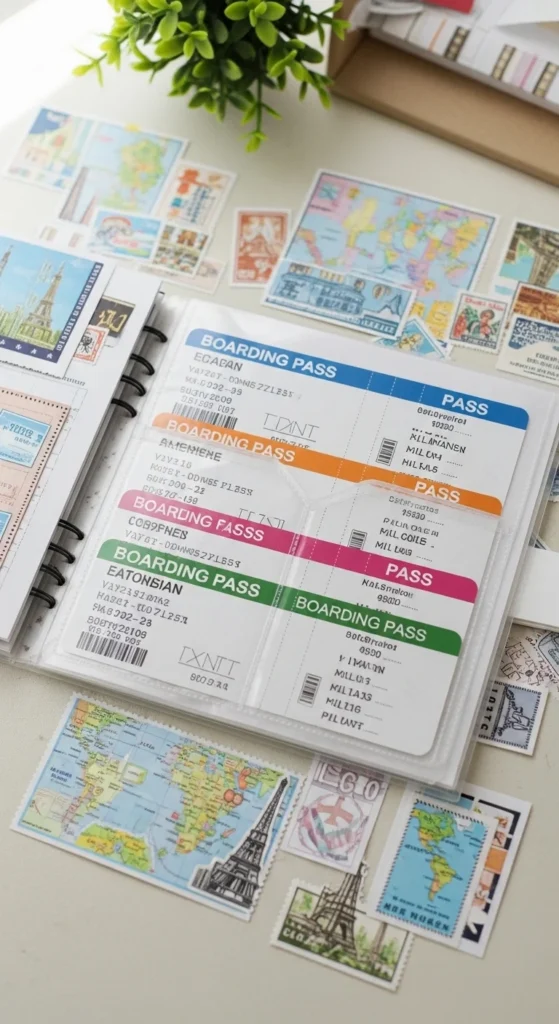
Create a pocket on the page where your boarding pass, train ticket, or bus receipt can slide in and out. Make the pocket using a folded piece of patterned paper or a small envelope cut down to size, then glue three sides so the top stays open. Place a photo above the pocket, like your airport selfie, a window shot, or the first meal after landing. Use torn kraft paper as a base layer to make the pocket area look intentional. If you don’t have a ticket, use a printed screenshot of your booking or a small printed calendar date photo instead. Keep the page flat by storing only paper items inside the pocket. This page becomes a quick way to remember dates and routes, and it gives you a home for the travel pieces you always find later in your bag.
3) Postcard Collage Layout
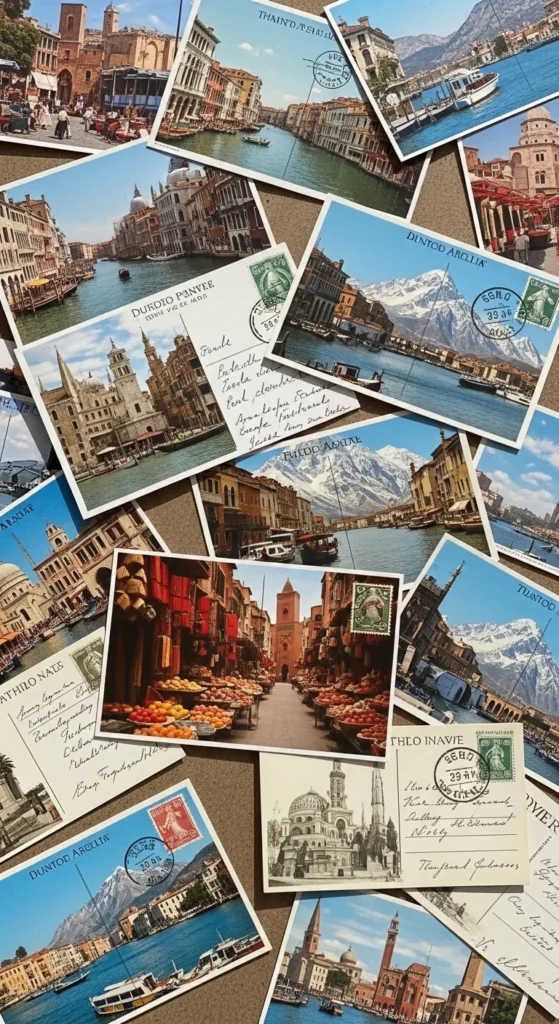
Postcards are perfect scrapbook backgrounds because they already carry the feel of a place. Layer postcards behind your photos like mats, letting the edges peek out. Mix store-bought postcards with simple prints of your own photos in postcard size. Keep the collage in one area of the page and leave some blank space so it doesn’t look crowded. Add small photo corners using plain paper triangles if you don’t have photo corner stickers. If your postcards have writing, place them as a background layer so the text stays partly hidden and your photos remain the focus. Add one extra detail like a small stamp-shaped paper piece or a torn strip of packing paper from a souvenir shop bag. This layout works well when you visited multiple spots in one city and want the page to feel like a travel board without a lot of effort.
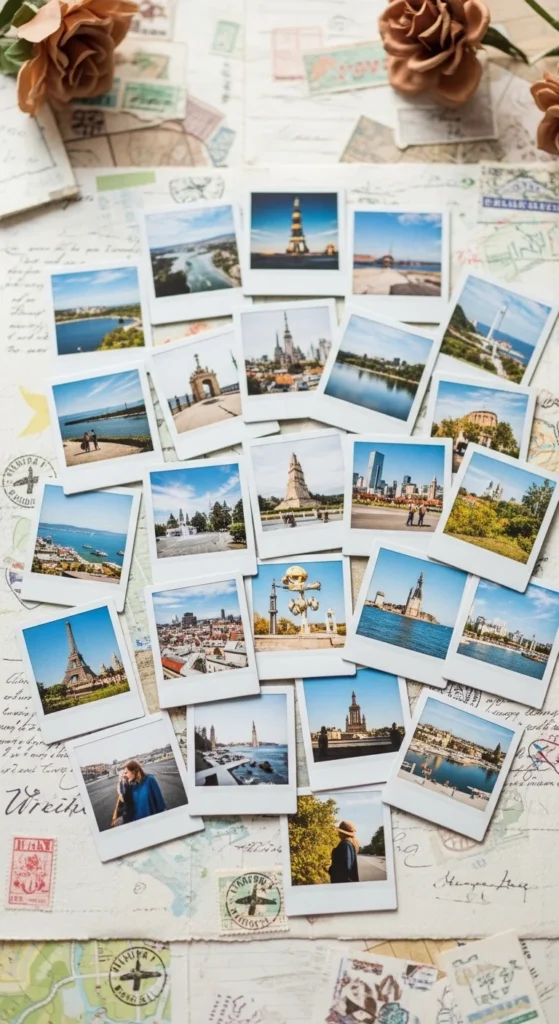
4) City Grid Photo Page
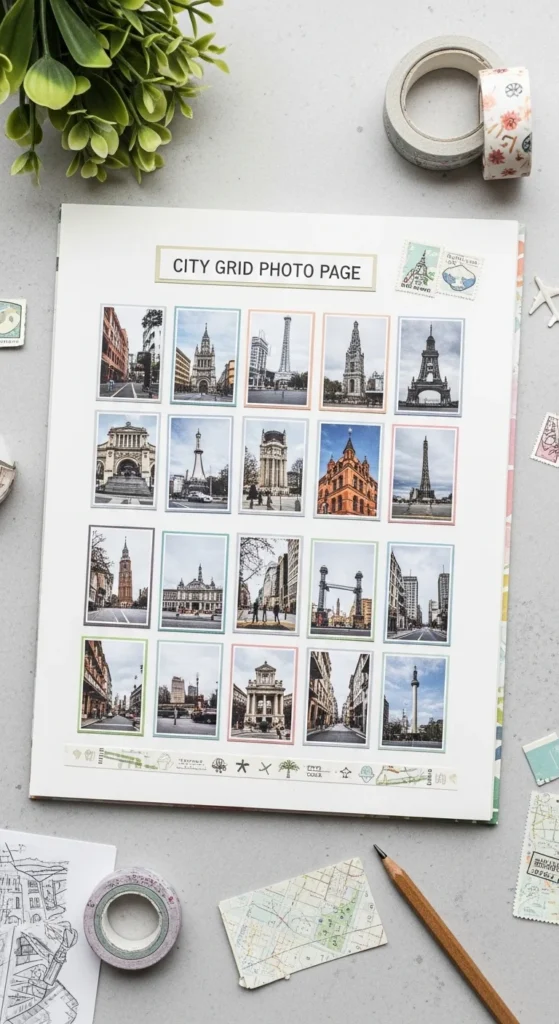
A city grid page tells a clear story fast. Print nine small photos from your trip and place them in a 3×3 layout. Choose a mix of scenes, like streets, food, people, and one wide view. Keep spacing even so the page feels neat. If you only have six photos, fill the rest with small paper squares made from brochures, map pieces, or packaging from local snacks. Use one background color like cream, kraft, or soft grey to keep the page calm. Add thin paper strips between rows for structure. This is a great idea for busy travelers because it doesn’t require complex decoration. It also works for weekend trips where you took lots of quick photos and don’t want to spend time designing a complicated layout.
5) One Day, One Page Timeline
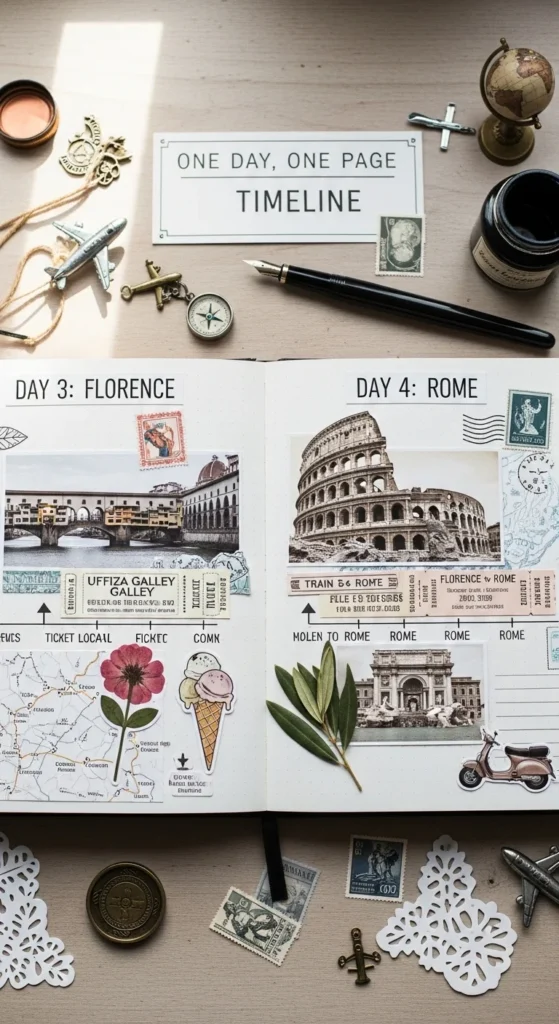
Pick one day from your trip and give it a full page like a mini story. Arrange photos in order from morning to night, using simple horizontal rows or a gentle diagonal flow. Add small keepsakes from the day like a café receipt, a museum sticker, or a metro token tucked under a photo edge. Keep the design simple by repeating the same paper mat behind every photo. If you don’t like writing, use tiny icon stickers to show the vibe of each moment, like a cup for coffee or a small camera icon for sightseeing. This layout is perfect for days where a lot happened, like a day trip, a wedding destination event, or a long walking tour. When you flip through your scrapbook later, this kind of page brings back the full rhythm of the day.
6) Food & Café Keepsake Spread
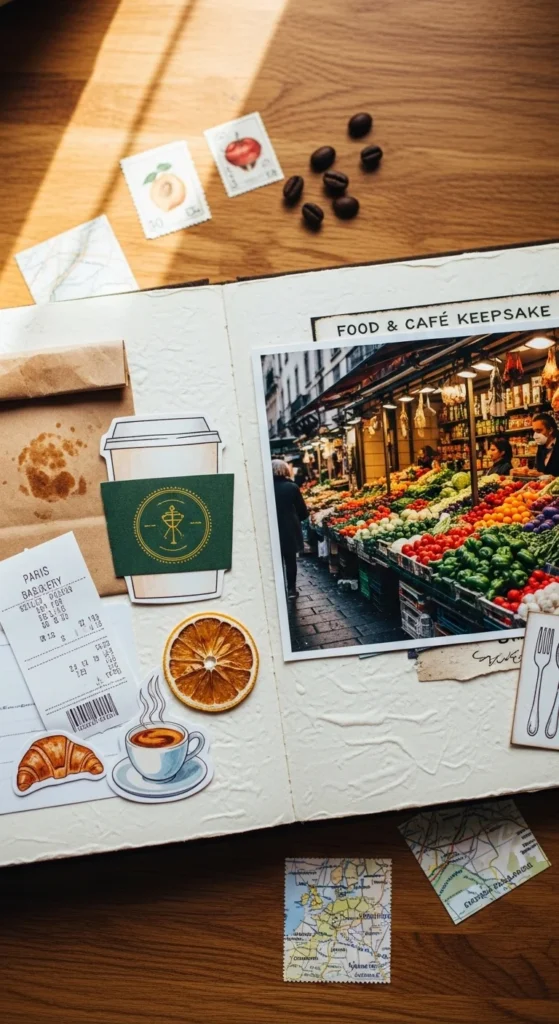
Travel food memories deserve a page because they’re often the most emotional part of a trip. Use photos of meals, café tables, street snacks, and packaging from local treats. Cut the clean parts of wrappers into small shapes and use them as texture behind photos. Use a warm neutral base like kraft paper to make the food colors pop. Add a small napkin corner, a tea tag, or a coffee sleeve piece if you saved one. Keep bulky items out and stick to flat paper pieces so your scrapbook stays easy to close. Arrange photos like a menu board, with one main meal photo and smaller snack photos around it. This page works for any destination, and it helps you remember the little tastes and stops that don’t always show up in big travel highlight reels.
7) Museum Ticket Story Page
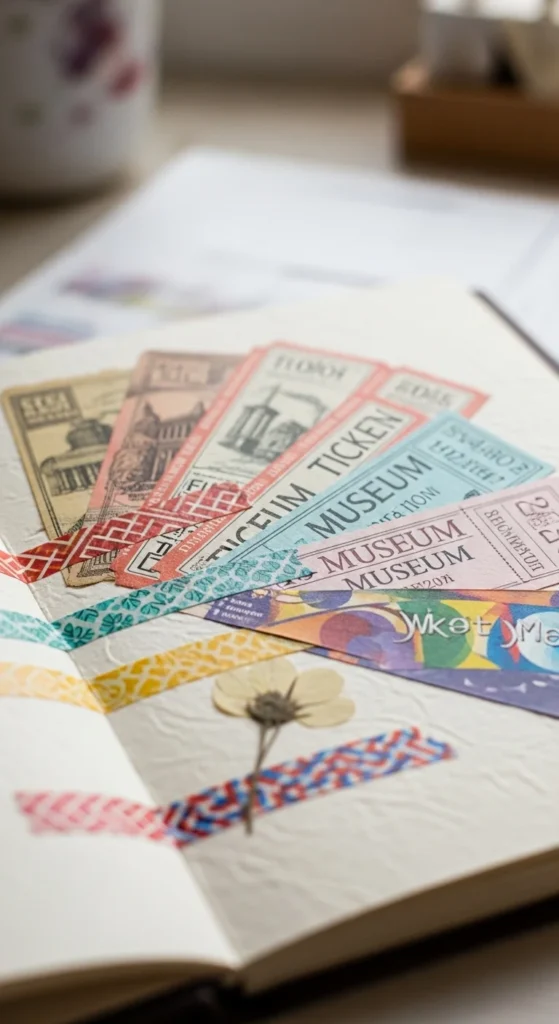
Museum pages look great when they feel structured and calm. Use your ticket as a focal piece and place it beside one or two photos from the museum visit, like the building exterior or a hallway shot. Add small brochure fragments as layered background pieces. Keep colors muted so the page matches the museum feel. Use straight edges for a clean look, or tear edges lightly for texture. If you didn’t take many photos inside, use one photo plus a small printed image of the museum façade from your own phone shot. Add a small paper frame around the ticket so it looks intentional, not random. This is a great way to preserve cultural parts of your trip and keep paper items from getting lost inside drawers. It also works for aquariums, galleries, historic forts, and exhibition visits.
8) Hotel Key Sleeve Holder

Hotel key sleeves are one of the easiest travel keepsakes to scrapbook because they’re flat and durable. Glue the sleeve on your page like a pocket and slide the key card inside. Add a room photo or a window view photo above it. Layer a small strip of patterned paper behind the sleeve to make it pop. If you didn’t keep the sleeve, use a folded paper pocket in the same size and shape, then store the card inside. Add small texture pieces like a receipt from the hotel café or a luggage sticker corner. Keep the layout clean so the sleeve becomes the main visual element. This page becomes a simple “where we stayed” memory that instantly brings back the feeling of that room, the lighting, and the small routines you had on that trip.
9) Currency & Coin Corner Display

Coins and currency instantly remind you of a place. Use a small clear pocket or coin holder strip to keep coins secure on your page. For paper currency, fold it once and slide it into a clear sleeve or pocket so it doesn’t tear. Add a photo of a market, a street cashier moment, or a souvenir shop scene to match the money theme. Keep the page simple and let the currency act like the decoration. Use neutral papers so the money colors stand out. If you don’t want to use real money, use copies printed from your travel photos and keep the originals stored safely. This style works for international travel, and it’s a fun page to flip through because it’s tactile and unusual. It also becomes a great memory for kids and family members who love seeing different currencies.
10) Mini Photo Strip Banner
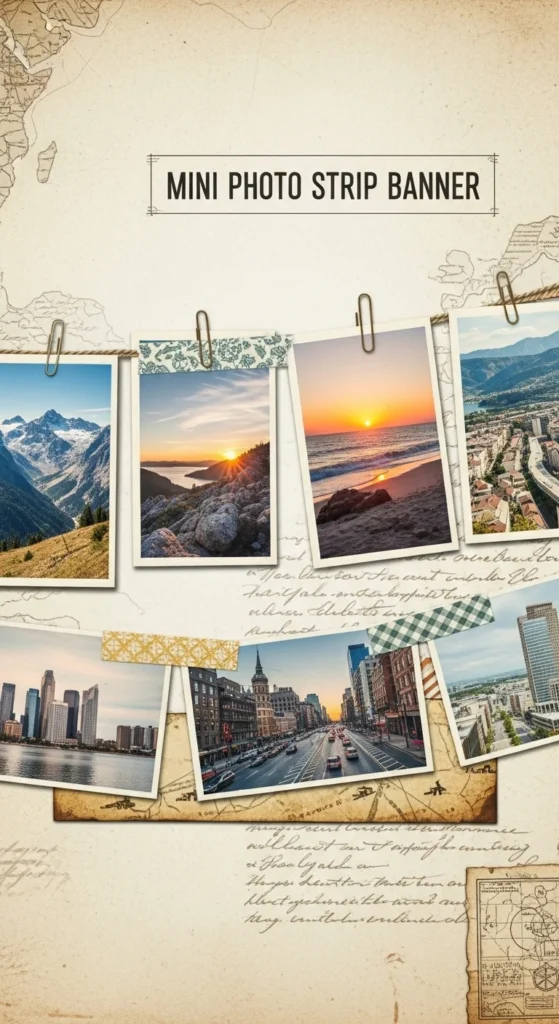
Photo strips make travel memories feel like a snapshot diary. Print a few photo strip-style prints and place them across the page like a banner. You can angle them slightly or keep them straight. Add a simple background like a torn map piece or a kraft strip under each strip. Keep the rest of the page light so the photo strips don’t feel crowded. If you don’t have photo strips, cut thin rectangles from regular prints and line them up in a row. Add one larger feature photo below the strip banner to anchor the page. This layout is great for trips where you took many quick scenes: street food, hotel mirror selfie, skyline, bus windows, beach toes, and small details that tell the real story.
11) Polaroid Frame Cluster
Make your travel page feel like a memory wall by using Polaroid-style frames. Cut frames from white cardstock, leave a thicker bottom edge, and place photos behind the windows. Cluster three to five frames together and overlap them slightly. Use a map piece or a brochure fragment behind the cluster for texture. Keep colors simple so the frames look clean and travel-themed, not random. This works especially well for city breaks and beach trips where you have lots of medium shots: cafés, street views, and friend selfies. Add small flat keepsakes tucked under a corner, like a luggage sticker piece or a receipt corner. This cluster style gives you a full page that still feels airy because the white frames create breathing space.
12) Route Line Across the Page

Draw or place a thin line that travels across the page like your route. You can use a pen line, a thin strip of paper, or a piece of twine glued down in a gentle curve. Place small photos or keepsakes along the route like “stops,” such as a café photo, a景 street photo, and a sunset shot. Use a map fragment beneath the route for extra travel mood. Keep the route subtle so it doesn’t overpower the photos. This idea works especially well for road trips, city hopping, train routes, and day tours where the journey itself was part of the memory. It gives the page motion and makes a simple photo collection feel like a story you can follow with your eyes.
13) Luggage Tag Flip-Up
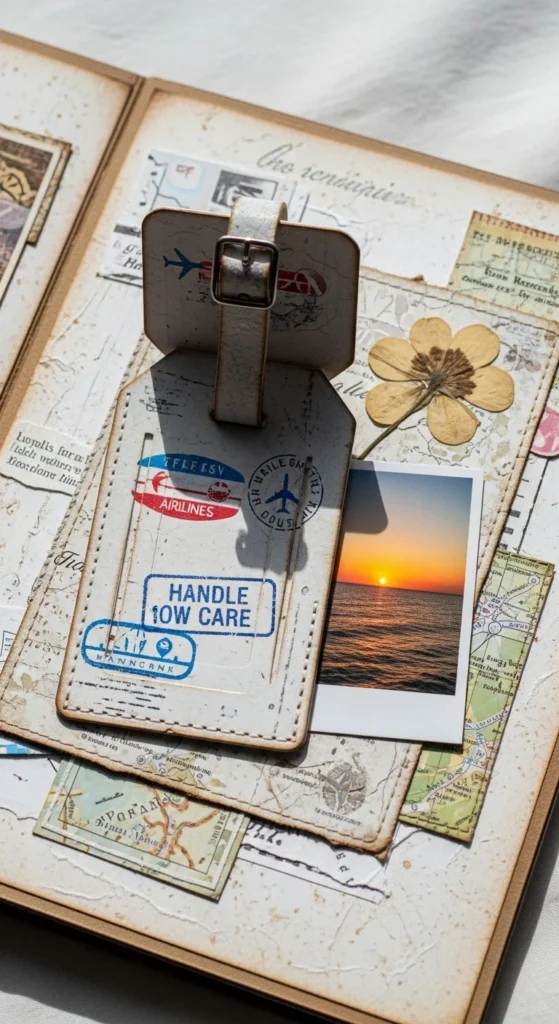
Use a luggage tag as a flip-up flap on the page. Glue the tag on one edge only so it opens. Under it, store an extra photo, a small note card, or a tiny keepsake like a local transport token. If you don’t have a real luggage tag, cut one from thick paper and punch a hole, then loop twine through it to make it feel real. Place a main photo beside the tag so the tag becomes part of the layout, not an isolated piece. Keep the rest of the page simple so the flap becomes a fun interactive element. This idea works beautifully for airport trips, long-distance travel, and even staycations where you still want that “travel feel” captured on the page.
14) Packing List Without Words (Icons)
Make a “packing list” block using only icons and shapes instead of text. Cut small images from magazines, packaging, or sticker sheets—things like a shirt, shoes, sunscreen, camera, and passport icon. Arrange them in a neat rectangle like a checklist panel, but keep it purely visual. Place travel photos beside the icon panel, like luggage shots, airport moments, or outfit photos from the trip. Use a neutral background so the icons pop and look organized. This layout is great when you want a graphic-looking page that still feels personal. It also works for trips where you didn’t take many photos, because the icons help fill the page while staying travel-themed.
15) Souvenir Wrapper Texture Page
Use souvenir packaging and wrappers as the texture layer of your page. Trim the clean parts of snack wrappers, bakery bags, or souvenir shop tissue paper into rectangles or torn strips. Layer them behind photos like background mats. Keep the wrapper pieces flat and avoid thick folds so the page closes cleanly. Pair the packaging with photos of the moment you bought it, like a street snack stall, a café table, or a market walk. Use one consistent paper color underneath, like kraft or white, so the wrapper colors don’t fight each other. This idea is especially good for night markets, food tours, and trips where you brought back small edible treats. It helps you preserve the “tiny details” of travel that you forget fastest.
16) Beach Sand Window Pocket
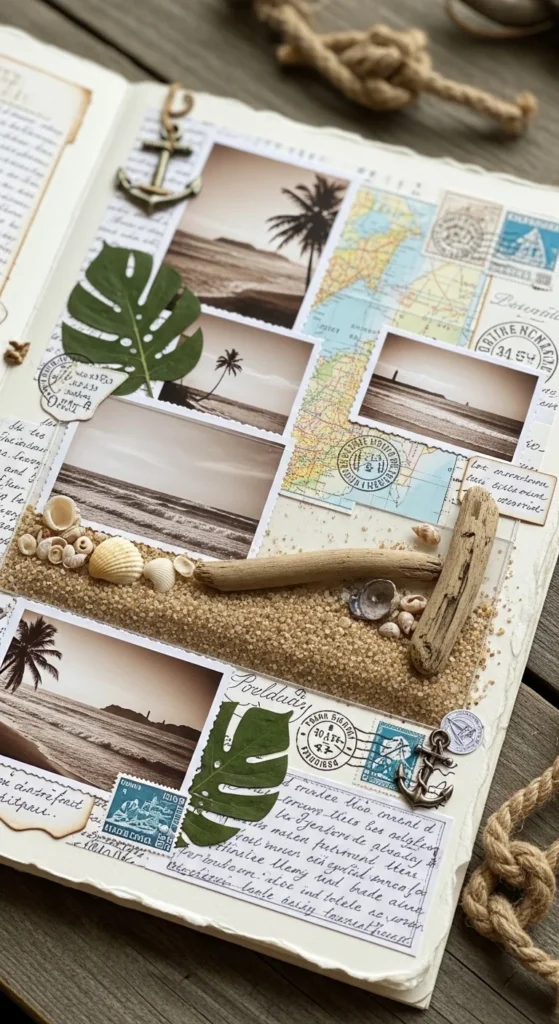
Create a small clear pocket “window” and place a tiny amount of sand inside for a beach memory page. Use clear plastic from safe packaging or a photo sleeve cut to size, then seal edges tightly so the sand stays inside. Keep the pocket small and thin so it doesn’t add too much bulk. Place beach photos around it, like shoreline shots, sunset views, and feet-in-the-sand photos. Use soft blue and beige papers for the background to match the beach mood. Add small shells only if they are flat or printed, not real bulky shells. This page gives a tactile memory without turning your scrapbook into a heavy keepsake box.
17) Train Ride Motion Spread
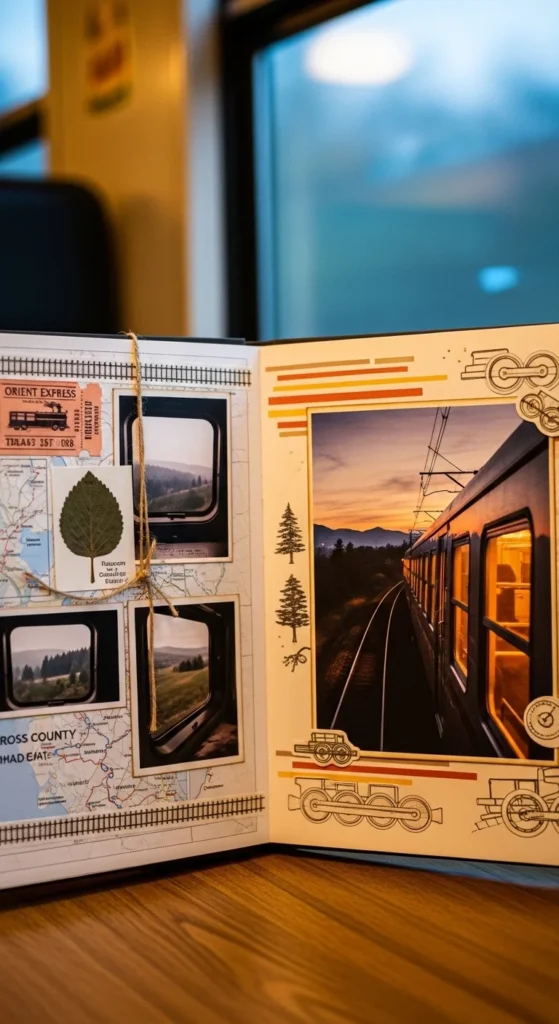
Make a page that feels like motion by placing photos in a diagonal “moving” line. Use window shots, platform photos, tickets, and small scenes you captured during the ride. Add thin paper strips under the photos like tracks, using dark grey or kraft paper. Keep the arrangement light by using similar photo sizes and leaving space between them. If you have a ticket, store it in a slim pocket at the bottom. Use a few small circle accents to mimic wheels or station lights, without adding text. This layout works for trains, buses, ferries, and long drives where the travel itself was part of the adventure.
18) Night Market Color Page
Night markets and evening walks have their own vibe—glowing lights, colorful stalls, and busy scenes. Use a darker background paper like deep navy, charcoal, or black to match the night mood. Then place bright photos on top so they pop. Layer small shiny or metallic paper pieces behind some photos to echo street lights, but keep it flat. Add packaging pieces from snacks you ate at the market, trimmed into small accents. Keep the layout tidy with a simple grid or two rows of photos so the colors don’t feel chaotic. This page works well for festivals, night bazaars, and city evenings where the photos are naturally more dramatic.
19) Nature Hike Leaf Press Page

Use pressed leaves to build a nature travel page that feels grounded and calm. Press a few small leaves from your hike and place them around your photos like soft corner accents. Use earthy paper colors—cream, olive, kraft—to match the nature theme. Add trail photos, viewpoint shots, and small details like boots on dirt, rocks, or a close-up of plants. Keep the leaves small so the page stays flat and the scrapbook closes well. If you didn’t press leaves, use printed plant photos you took on the trip and cut them into leaf shapes. This idea fits hikes, mountain trips, park walks, and road trips where nature was the highlight.
20) Street Signs Cutout Collage

Street signs, shop logos, and local patterns carry a city’s personality. Use photos you took of signs and print them small, then cut them into rectangles for a collage background. Layer your main travel photos on top so the sign collage becomes texture. Keep the collage mostly on one side of the page so it doesn’t overwhelm the layout. Use neutral paper behind the collage to keep the cutouts looking neat. If your printed signs contain words, treat them as background elements, keeping them partially hidden so the page doesn’t look like a poster. This idea works great for big cities, old streets, and markets where you took many small “detail” photos.
21) Local Patterns Paper Weave
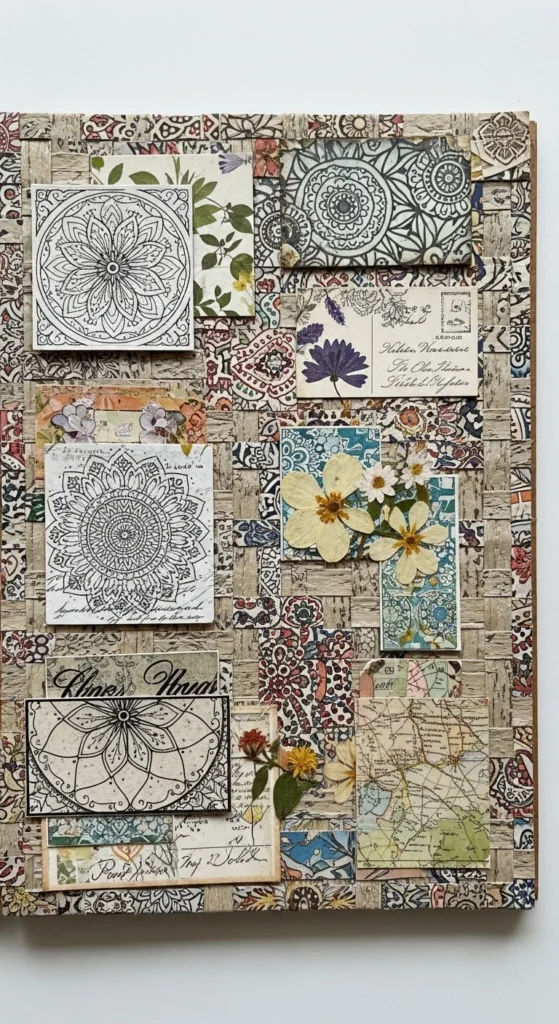
Create a woven paper panel using strips of patterned paper that match your destination. Use brochure colors, souvenir bag patterns, or scrapbook paper that feels like local tiles, textiles, or architecture. Weave the strips like a simple basket pattern and glue it onto the page as a textured block. Place photos beside the weave panel, like street architecture, hotel courtyard shots, or cultural places. Keep the rest of the page simple so the weave doesn’t feel heavy. This idea is great when you want one handmade “feature” element that isn’t a pocket or a flap, and it gives your travel pages a craft feel while still staying flat and photo-friendly.
22) Travel Buddy Photo Pair Page

Dedicate one page to the people you traveled with. Use paired photos: one of you together and one “moment” shot like laughing at a café or walking on a street. Repeat the pair pattern down the page if you have multiple buddies, like three photo pairs stacked in a clean column. Add small keepsakes tied to people, like a shared receipt, a photo booth strip, or a small paper bracelet kept flat. Keep the design warm and simple, with soft papers and clean mats. This layout becomes one of the most meaningful pages because it preserves the human part of travel, not just the places.
23) Before/After Place Comparison
Use two photos of the same place to show change. It can be morning vs night, empty street vs busy street, or a location before rain and after rain. Place the two photos side by side as a comparison spread. Add a small map piece behind them to reinforce location, and keep the rest of the page minimal so the comparison is clear. This works especially well for iconic places, beaches, viewpoints, and city streets you revisited. It also works for long trips where you want to show how your mood shifted from start to finish. The page feels intentional even without writing because the story is visible through the two images.
24) Weather Mood Palette Page
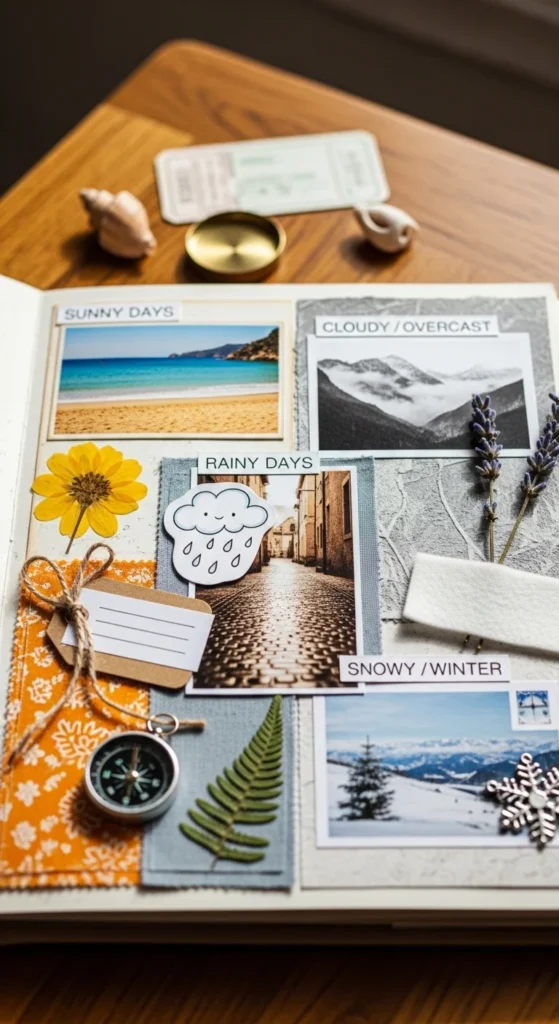
Build a page around the weather vibe of your trip. Create small color blocks using paper scraps that match what you saw: soft grey for rainy skies, beige for sand, deep blue for oceans, green for hills. Place your photos around the palette blocks like a mood board. Add small texture pieces that fit the weather, like a napkin from a rainy café day, or a leaf pressed from a foggy morning walk. Keep the palette blocks neat and even so the page looks clean. This idea works for trips where the mood mattered more than the landmarks, like monsoon travel, winter trips, or coastal vacations.
25) “Favorite Spots” Map Pins (Stickers)
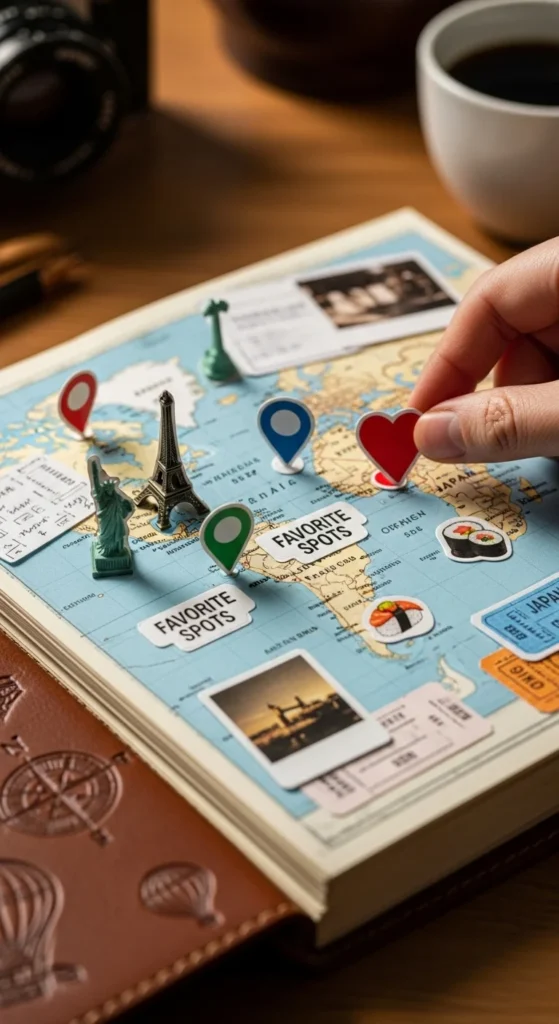
Use a map piece as a base, then add pin-style stickers or small colored dots where you went. Place photos around the map like little “memories” connected to each pin. Keep the map piece medium-sized so it doesn’t take over the whole page. Add small paper strips like lines connecting pins to photos, but keep them subtle. If you don’t have pin stickers, use punched circles or tiny heart stickers. This layout is perfect for city trips where you hit many spots, like cafés, landmarks, and markets. It also helps you remember your route without needing to write anything.
26) Final Day Reflection Spread
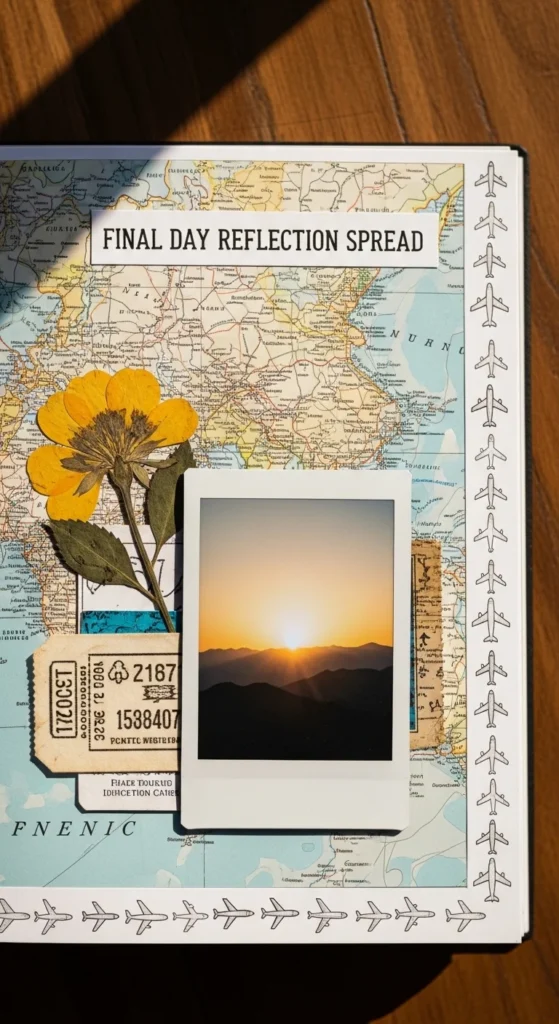
Make your last page feel like a calm closing scene. Use photos from the final day: suitcase on the bed, airport window, last meal, last sunset, or the road leaving the city. Keep colors soft and layout clean, with lots of breathing space. Add one travel item like a final receipt, a baggage tag piece, or a small map corner tucked under a photo. Place your favorite photo of the trip as the largest one on this spread so it feels like the final image of a movie. This page helps your scrapbook feel complete and satisfying, and it makes flipping through the whole book feel like a story with an ending.
Conclusion
Travel scrapbooks work best when they keep both the place and the small details that made it real. Use your photos, add flat keepsakes you already have, and choose one clear layout idea per page so the process stays easy. Start with one trip and finish a few spreads, then keep going—because the memories you’ll enjoy most later are often the ones you would have forgotten first.

Lily Summers is a digital artist and creative storyteller who loves bringing colorful characters to life. With a passion for cartoons, fan art, and playful sketches, she inspires others to explore their imagination through art. When she’s not sketching, you’ll find her dreaming up new ideas for CraftedWizard.com to spark creativity in every artist. 🌈✨