Small laundry rooms can feel cramped, cluttered, and hard to work in. Limited square footage often means no folding space, overflowing supplies, and laundry baskets constantly in the way. The good news is that smart layout choices and vertical storage can completely change how the space works. When every wall, corner, and door surface is used with purpose, even the tiniest laundry nook can feel organized and easy to move around in. The ideas below focus on practical storage, flexible surfaces, and simple DIY upgrades that help you maximize every inch without spending a fortune or starting a full remodel.
1. Add Floating Shelves Above Machines
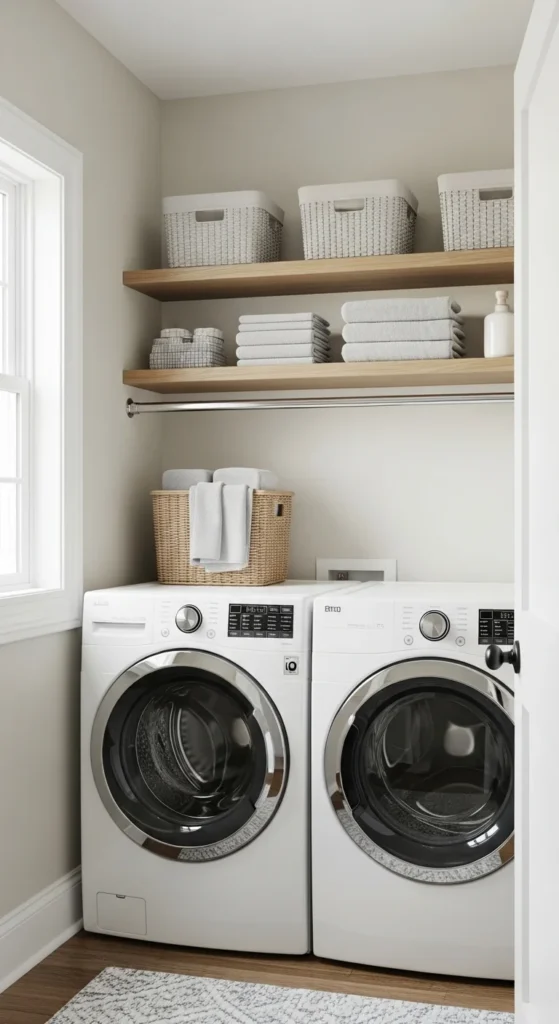
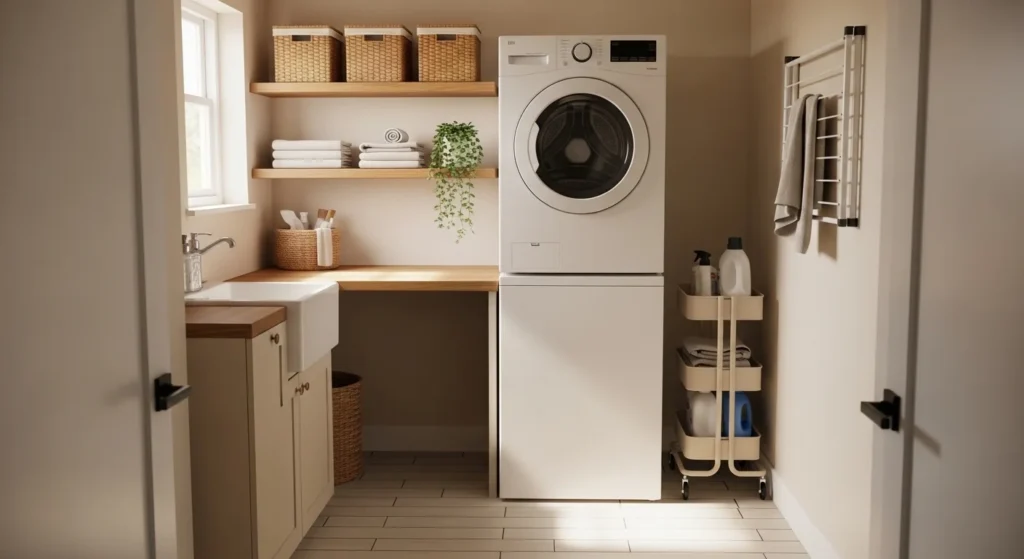
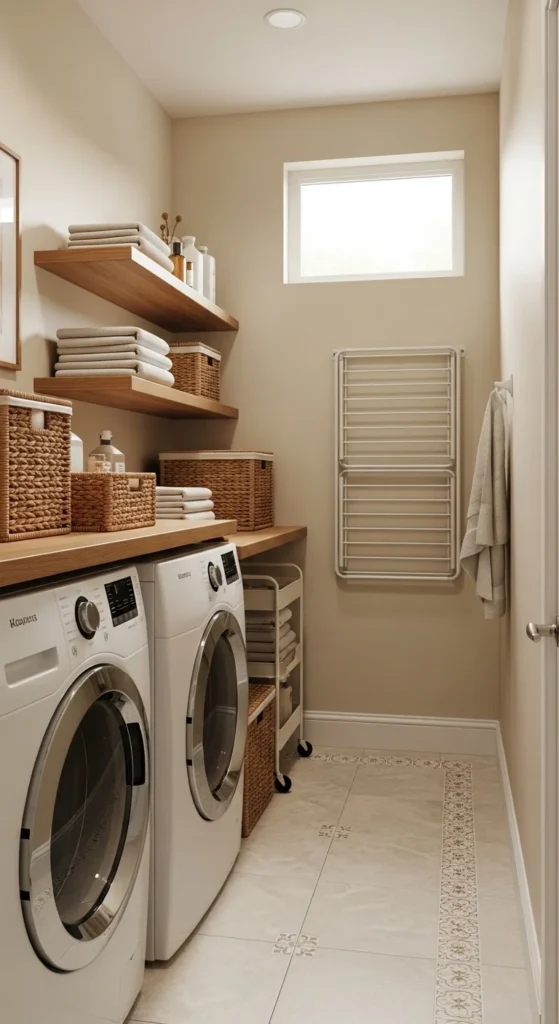
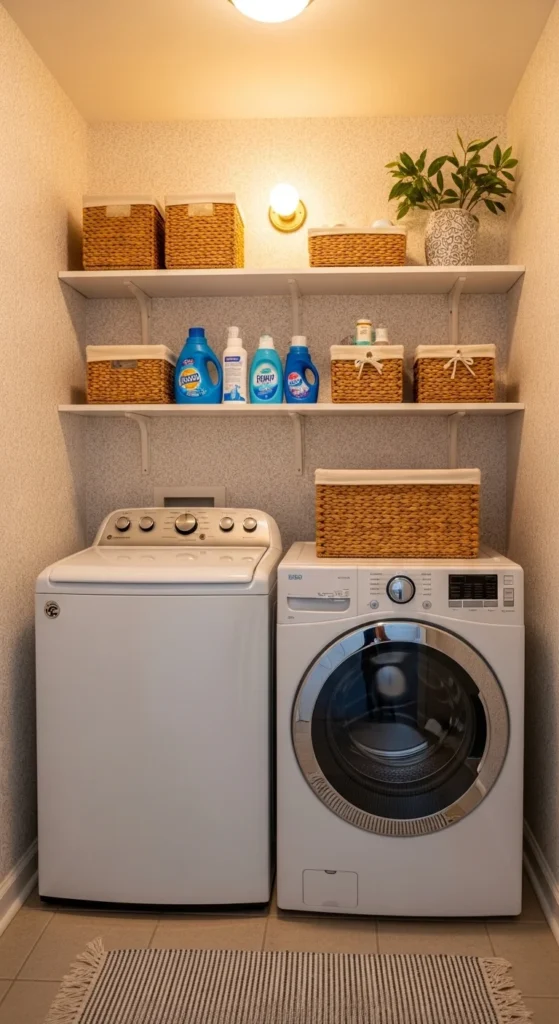
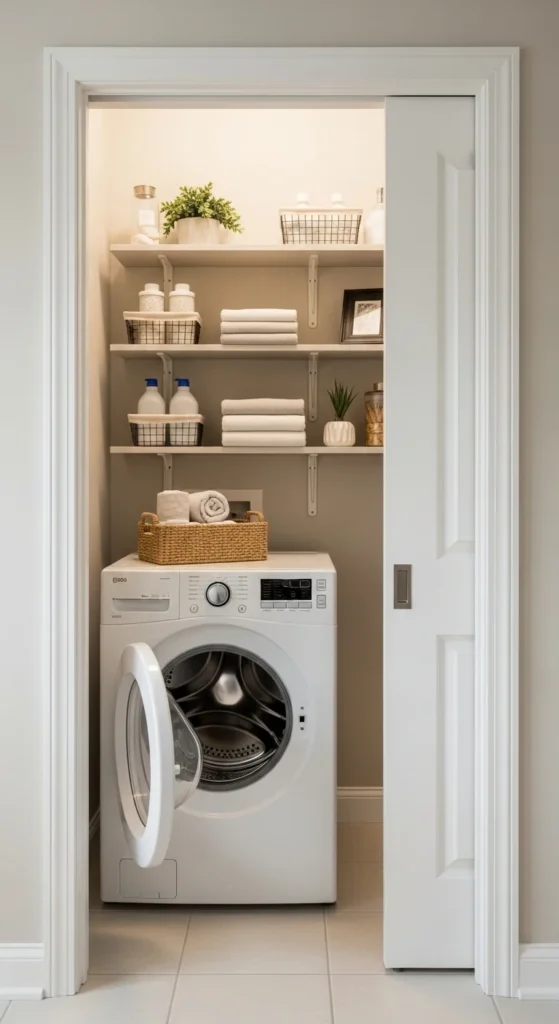
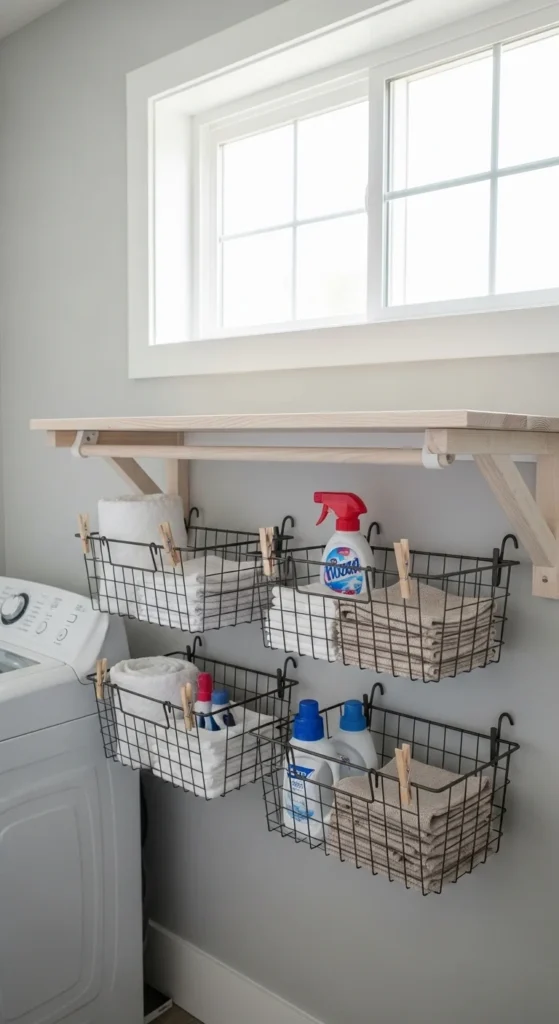
Wall space above the washer and dryer is often empty, yet it is one of the best storage zones in a small laundry room. Floating shelves turn that unused wall into a practical spot for detergents, baskets, and folded linens. Keep everyday items on the lower shelf so they are easy to grab. Store backups higher up. Simple wood boards and sturdy brackets from a hardware store work well and cost far less than custom cabinets. Painting shelves the same color as the wall keeps the room from feeling crowded. Woven baskets hide small items and reduce visual mess, while clear jars make pods and clothespins easy to see. If deep shelves feel bulky, stick with narrow ones that hold essentials without sticking out too far. This upgrade clears clutter from the floor and helps the room feel taller and more open.
2. Install a Stackable Washer and Dryer
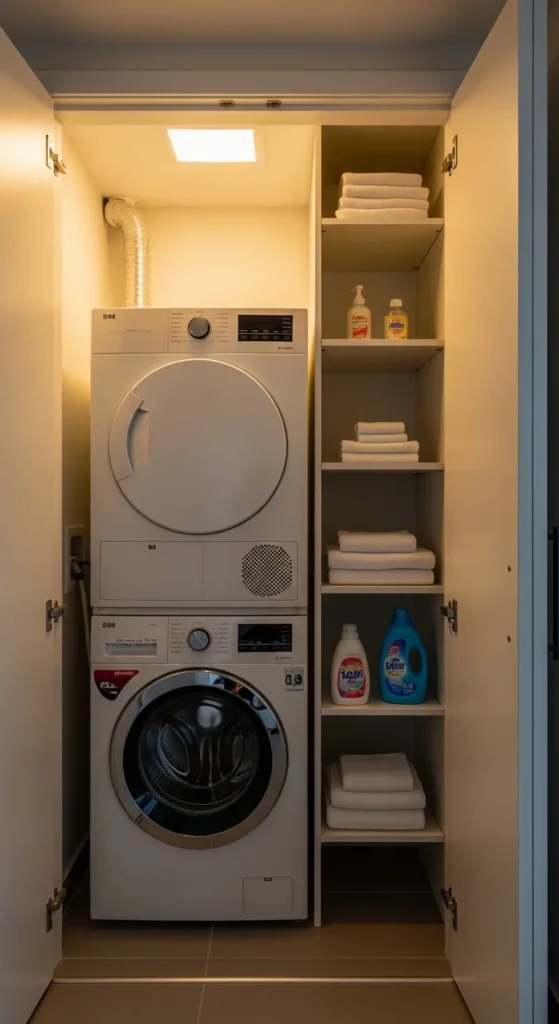
Stacking your washer and dryer instantly frees up floor space that can be used for storage or folding. This layout works especially well in closets and narrow rooms where side-by-side machines take up the entire width. Front-loading models are made for stacking, and most brands sell kits that secure the units safely. With appliances arranged vertically, you can add a slim cabinet, rolling cart, or open shelving beside them. That narrow strip of space becomes valuable storage instead of wasted air. Keep a small folding step stool nearby if reaching the dryer feels high. Choose one that folds flat and slides beside the machines. Stacking also makes the room feel taller and less crowded. When you eventually replace old machines, planning for a vertical setup is one of the smartest long-term space-saving moves.
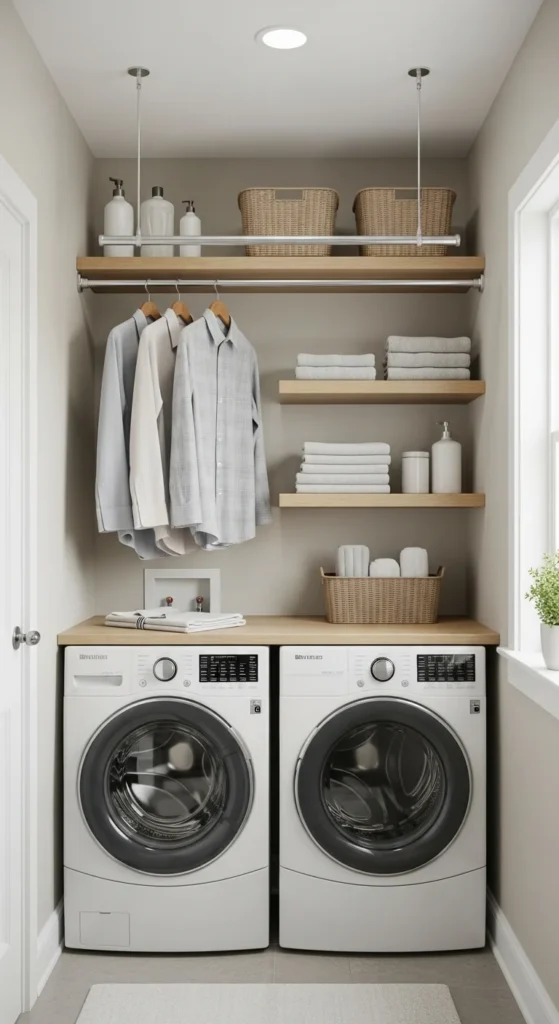
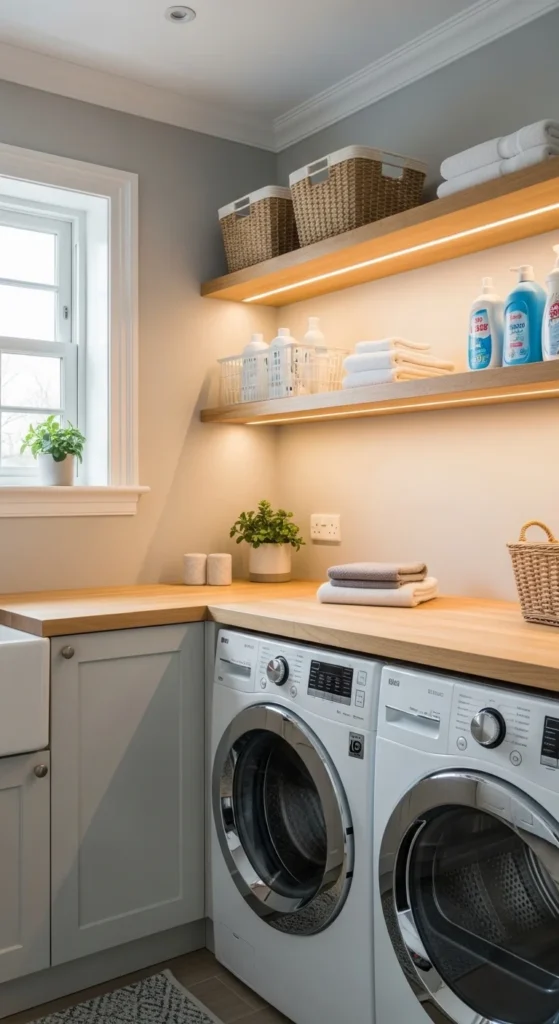
3. Build a Countertop Over Front-Load Machines

A countertop placed over front-loading machines creates an instant folding station without using extra floor space. This surface makes sorting and folding much easier and prevents clean clothes from piling up elsewhere in the house. Butcher block, plywood with laminate, or even a sealed solid wood board can work. Many home stores cut wood to size, making installation simpler. Secure the top with brackets on the wall behind the machines for added stability. If your machines vibrate, add small rubber pads between the counter and appliance tops. Keep the counter clear except for a small basket or tray for loose items. This simple surface upgrade turns your machines into part of the workspace rather than obstacles in the room.
4. Use a Slim Rolling Cart Between Appliances
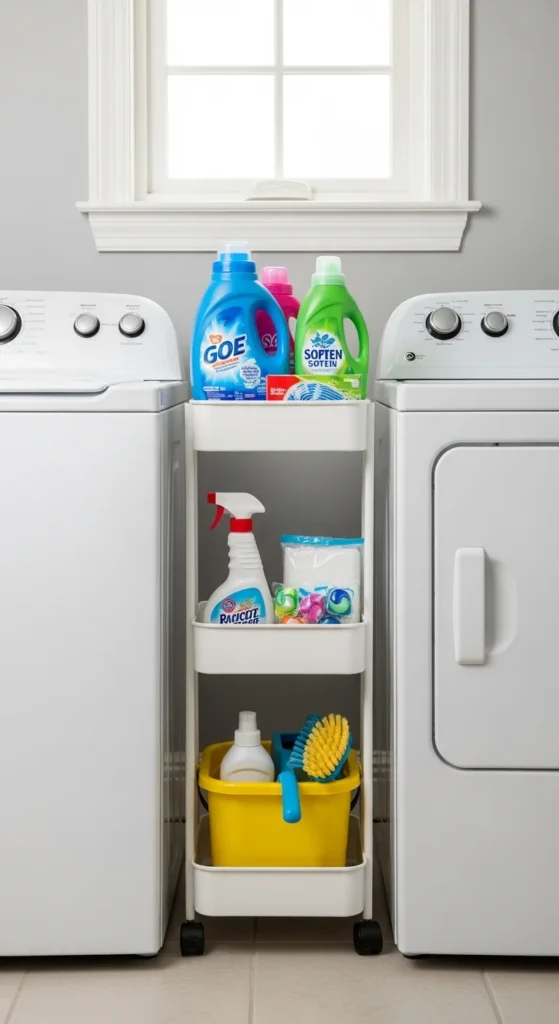
A slim rolling cart can slide into the narrow gap between machines or between a machine and the wall. This small strip of space often goes unused, yet it is perfect for vertical storage. Choose a cart with multiple tiers to hold detergents, sprays, dryer sheets, and stain removers. Wheels make it easy to pull out when you need something and slide it back when you are done. Metal or plastic carts are affordable and easy to clean if spills happen. Add small bins on each shelf to keep items grouped and prevent tipping. This mobile solution keeps supplies close without crowding shelves or countertops.
5. Mount a Wall-Mounted Drying Rack
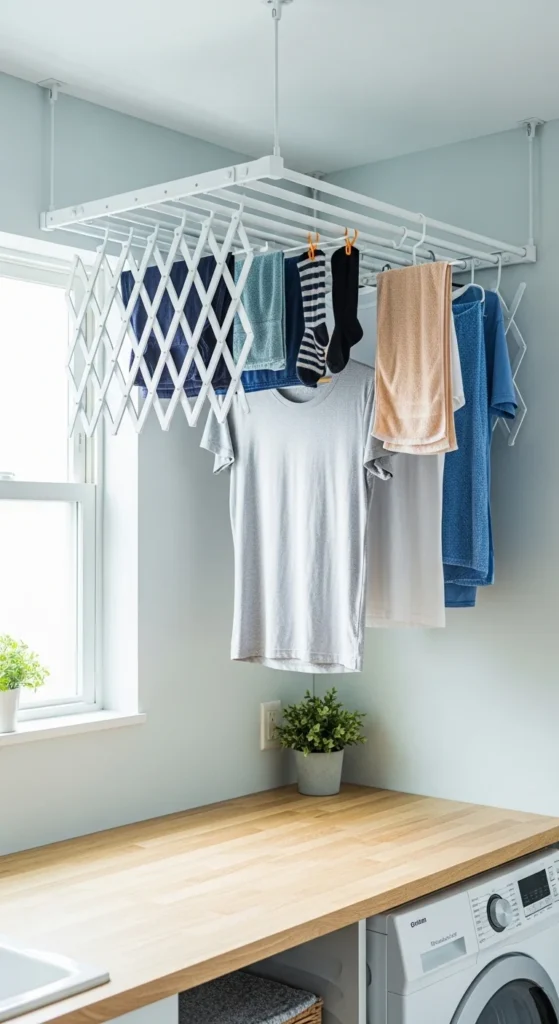
Air-drying racks can take over the floor in small spaces. A wall-mounted drying rack solves that problem by folding flat when not in use. Install it above a countertop or on an empty wall so wet items drip safely. These racks work well for delicates, workout gear, and items that should not go in the dryer. Many models fold out like an accordion and collapse to just a few inches deep. Installation requires only basic wall anchors and screws. When folded away, the rack almost disappears, keeping the room open and easy to move through.
6. Add Over-the-Door Organizers
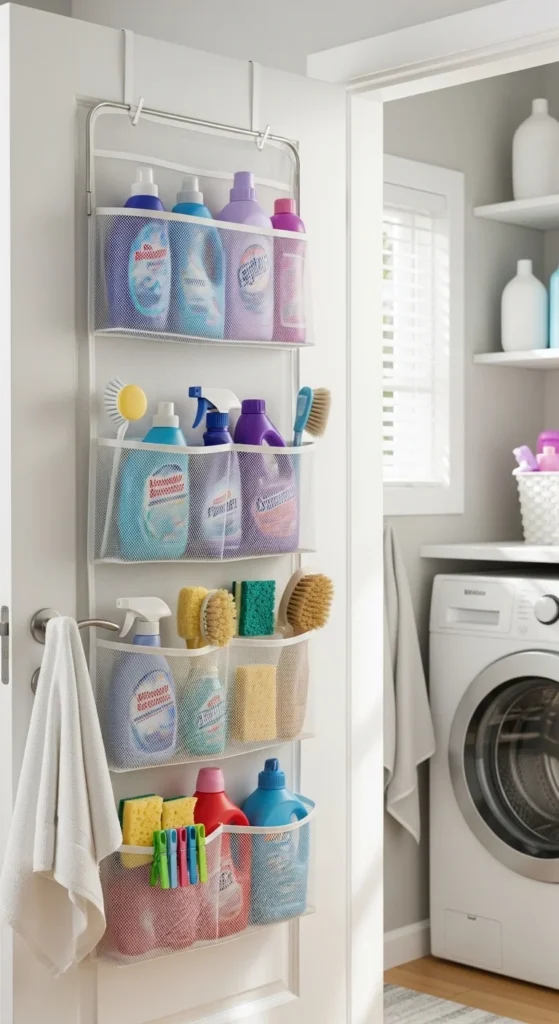
The back of a laundry room door offers vertical storage that costs almost nothing to use. Over-the-door organizers with pockets or small shelves hold dryer sheets, stain sticks, and cleaning tools. This option works well for renters because it requires no drilling. Choose clear pockets so you can see items at a glance. Keep heavier products on lower pockets for balance. This hidden storage area reduces clutter on shelves and keeps small items from getting lost.
7. Install Pull-Out Hampers in Cabinets
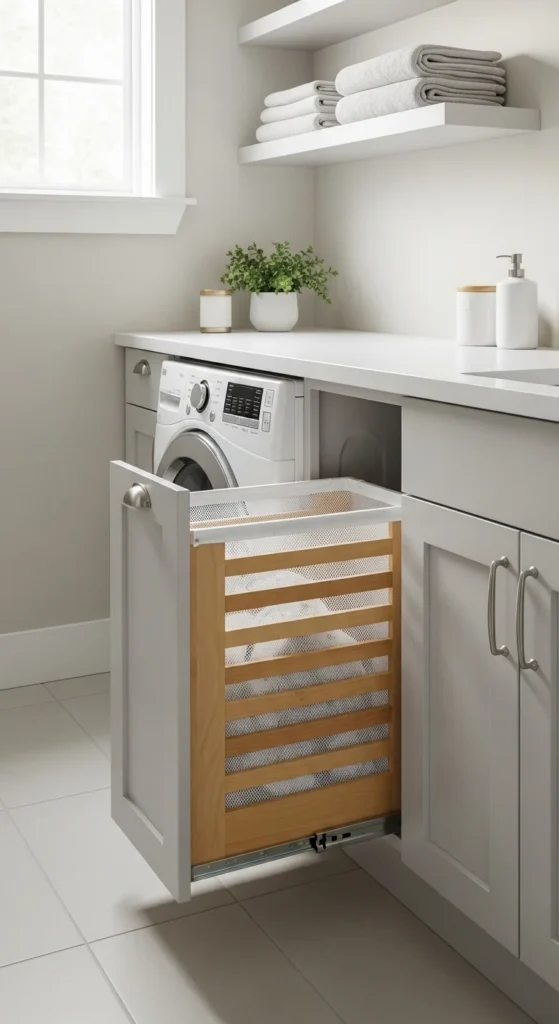
Pull-out hampers make sorting laundry easier while keeping baskets off the floor. If you have a cabinet beside your machines, install a slide-out frame that holds a laundry bin. This setup keeps dirty clothes hidden but easy to access. You can even use two bins for lights and darks. Slide systems are available at home stores and attach with basic screws. This approach keeps pathways clear and makes the room feel less crowded.
8. Use Corner Shelving for Awkward Angles

Corners often sit empty because standard shelves do not fit well. Corner shelves turn those tight angles into practical storage. Use them for folded towels, small baskets, or decorative jars. Floating corner shelves are easy to install and help draw the eye upward, making the room feel taller. Keeping items light and neatly arranged prevents the corner from feeling heavy.
9. Hang a Pegboard for Tools and Accessories
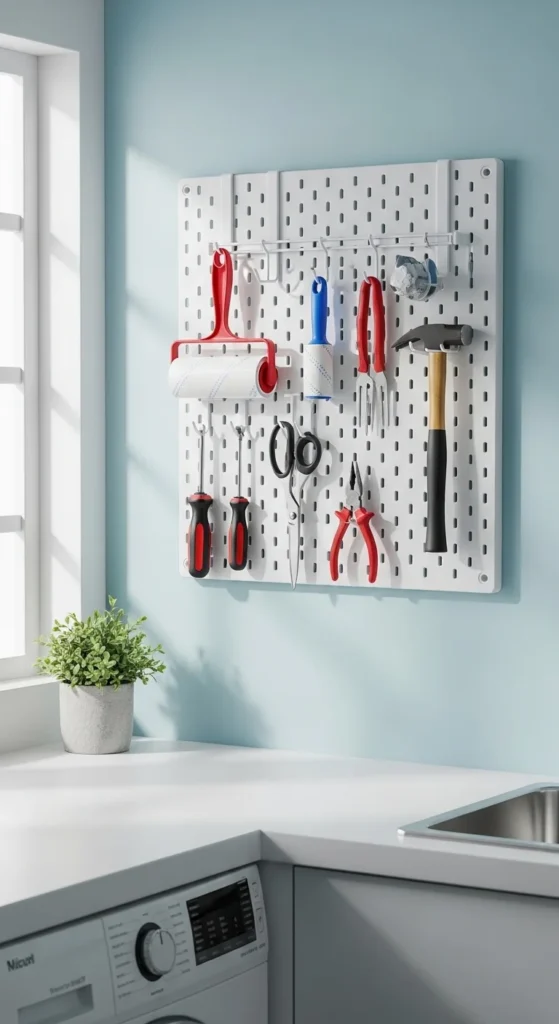
A pegboard keeps small tools organized and off surfaces. Mount one on an empty wall and add hooks for scissors, lint rollers, measuring spoons, and small baskets. Painting the pegboard the same color as the wall keeps it from standing out too much. This flexible system lets you rearrange hooks as your needs change.
10. Add Machine Pedestals With Storage Drawers
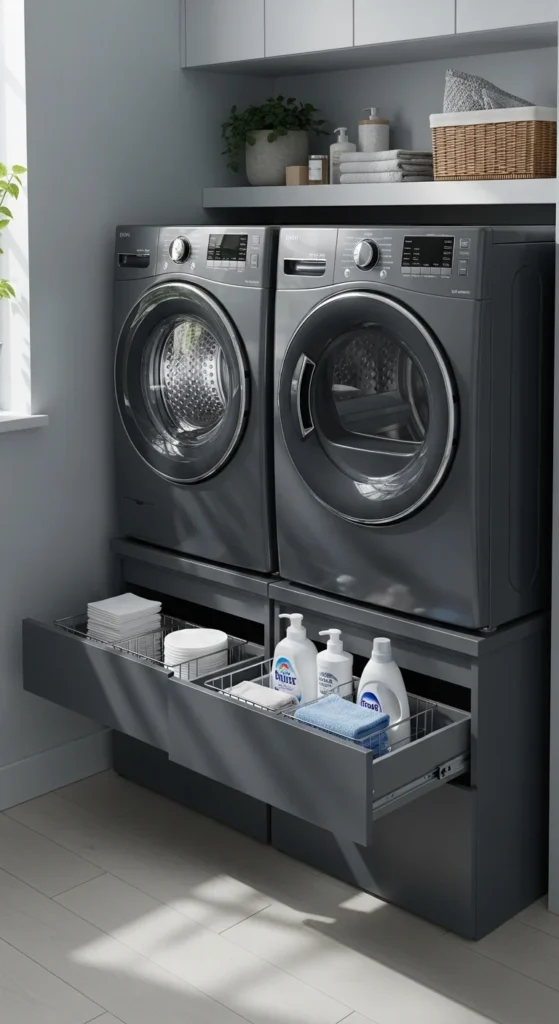
Machine pedestals lift your washer and dryer to a more comfortable height while adding hidden storage underneath. The raised position reduces bending, which makes loading and unloading easier on your back. Built-in drawers are perfect for storing detergent refills, dryer sheets, stain removers, and cleaning cloths. Keeping these items below the machines frees up shelves and counters for other uses. If brand-name pedestals feel expensive, a DIY platform can achieve a similar result. A sturdy wooden base with cubby openings can hold baskets or bins just as well. Paint it to match your machines or cabinetry so it blends in. Make sure the structure is level and strong enough to handle vibration during spin cycles. This setup combines comfort and storage in one compact footprint, which is ideal when every inch of floor space matters.
11. Install a Tension Rod for Hanging Clothes
A simple tension rod creates an instant hanging area without tools or wall damage. Place it between two walls above the machines or inside a closet-style laundry nook. This bar works well for air-drying shirts, dresses, and delicate fabrics that should not go in the dryer. It also serves as a temporary holding space for clothes straight from the dryer to prevent wrinkles. Because the rod presses into place, it is renter-friendly and easy to reposition if your layout changes. Choose a sturdy metal rod with a non-slip grip so it can hold damp clothing weight. Keeping hangers on the rod at all times makes the system even more convenient. This small addition turns empty air space into a functional drying zone without crowding the floor.
12. Create Labeled Bins for Easy Sorting
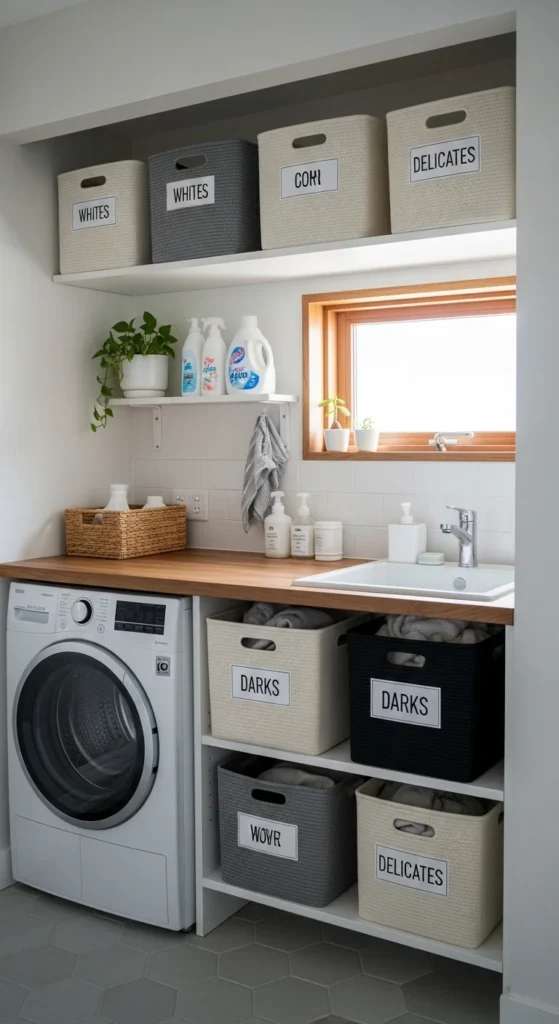
Sorting laundry becomes faster when each category has a designated container. Place fabric or plastic bins on shelves and label them for whites, darks, towels, or delicates. This setup prevents piles from forming on the floor and keeps everything tidy between wash days. Labels can be simple tags, chalkboard stickers, or printed cards slipped into clear holders. Color-coding bins for family members is another helpful trick. Kids can learn to place their clothes in the right spot, which saves you sorting time later. Choose bins with handles so they are easy to pull down from higher shelves. Keeping categories separated also reduces the chance of color bleeding accidents. This system adds structure without requiring extra square footage, making it perfect for small laundry rooms.
13. Add a Compact Utility Sink
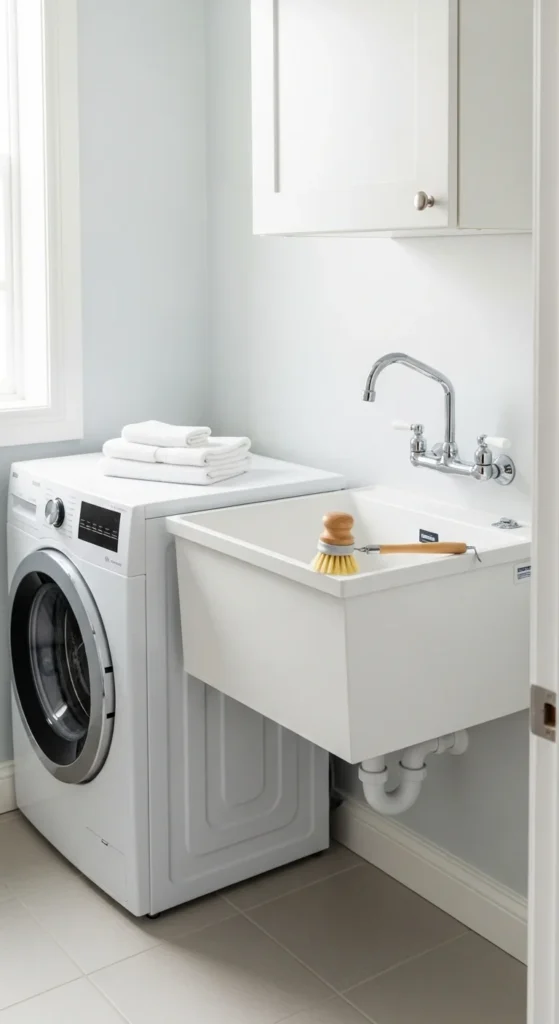
A small utility sink is helpful for pre-treating stains, rinsing muddy items, or hand-washing delicate fabrics. Even in a tight laundry room, a slim wall-mounted sink can fit beside the washer or in a corner. Look for a deep basin that prevents splashes and keeps water contained. Pair the sink with a narrow shelf above it to hold soap, brushes, and stain remover bottles. If plumbing work feels overwhelming, consider a portable utility sink that connects to existing water lines. The sink turns your laundry area into a multi-purpose cleaning station without requiring much floor space. Having water access nearby also reduces trips to the kitchen or bathroom when dealing with tough stains.
14. Use Wallpaper or Shiplap for Personality
Walls offer an opportunity to add character without affecting storage space. Peel-and-stick wallpaper is an easy way to introduce pattern or texture, and it works well for renters because it can be removed later. Light patterns or subtle stripes can make a narrow room feel more open. Shiplap panels add texture and a clean, classic look while remaining slim against the wall. Paint colors also play a role. Soft neutrals keep the room bright, while darker shades create a cozy, defined space. Updating the walls makes the laundry room feel like part of the home rather than an afterthought, all without using a single inch of functional space.
15. Install Angled Shelves for Laundry Baskets
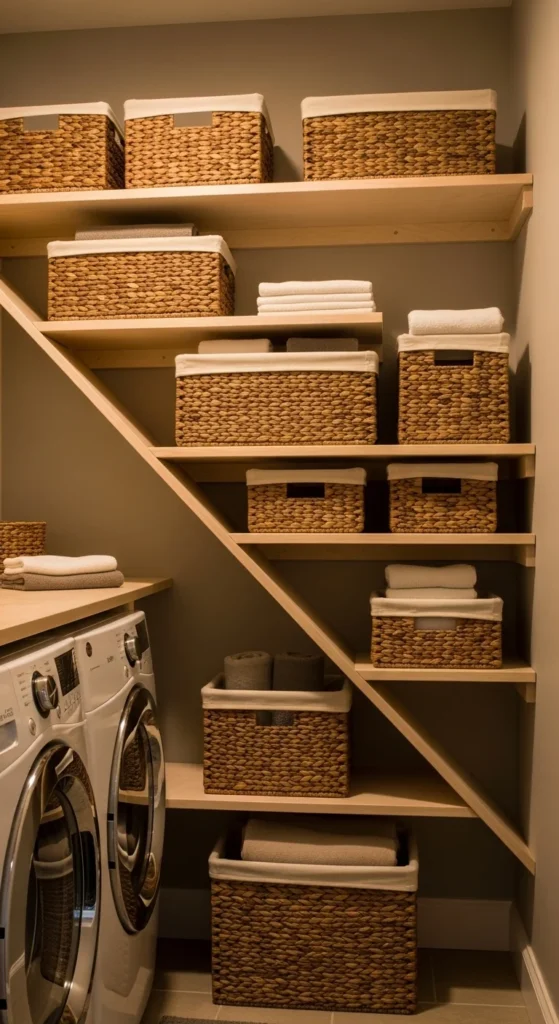
Angled shelving makes it easier to slide baskets in and out, especially in tall narrow spaces. The slight tilt prevents baskets from slipping forward while keeping contents visible. This setup works well for sorting clean laundry by person or category. Install the shelves vertically along one wall to keep the floor clear. Lightweight baskets with handles are easiest to manage. Labeling each basket adds another layer of organization. Because the shelves are open, the system feels lighter than bulky cabinets and keeps air circulating around stored items.
16. Add a Fold-Down Ironing Board
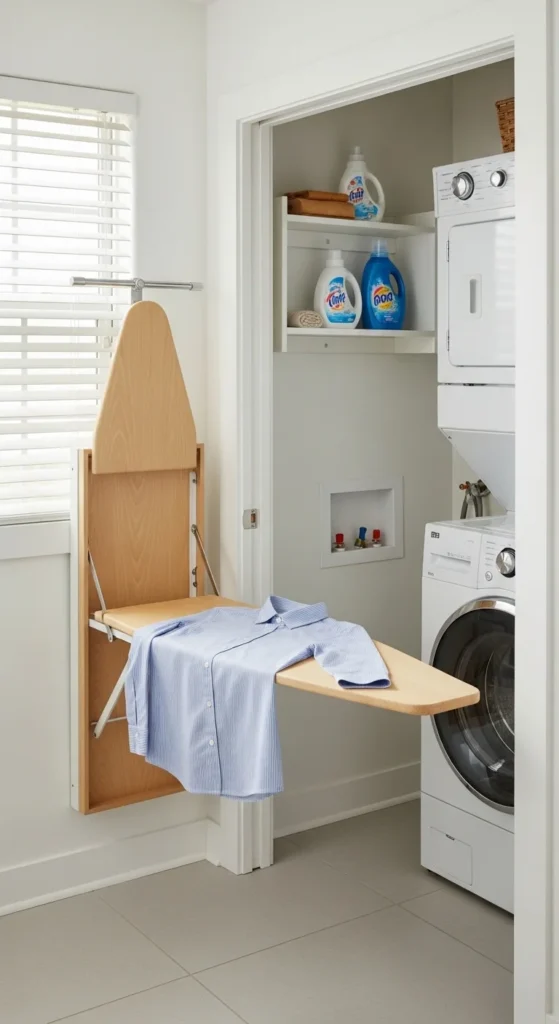
A fold-down ironing board hides in a slim wall cabinet and swings out only when needed. This saves valuable floor space and removes the need for a bulky freestanding board. Install it on an empty wall or inside a tall cabinet. When folded away, it looks like a simple panel. This setup is perfect for quick touch-ups and keeps ironing tasks close to where clothes are washed and dried.
17. Use Curtains to Hide Open Storage
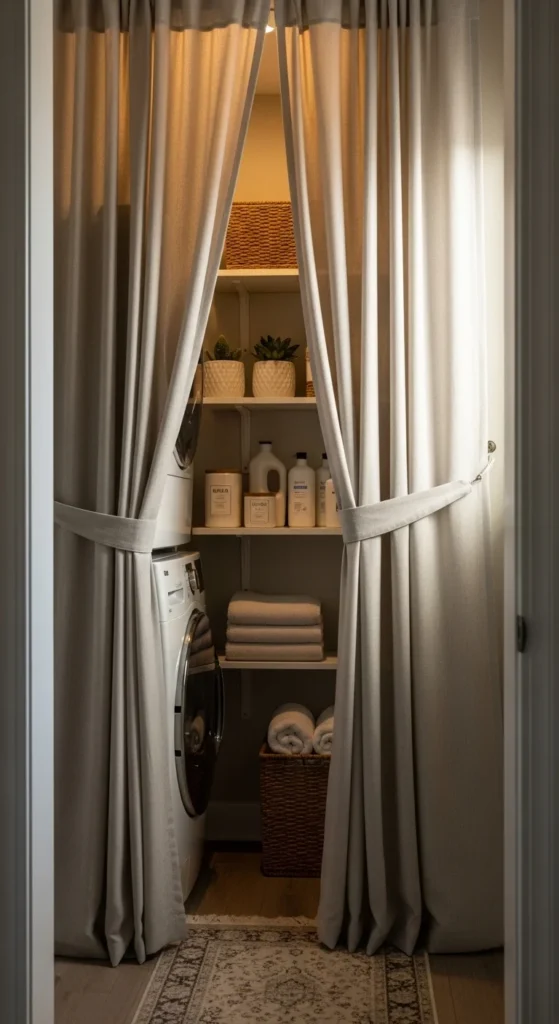
Open shelves can look messy even when items are organized. A simple curtain softens the look and hides visual clutter. Use a tension rod and lightweight fabric for an easy, low-cost solution. Curtains are also helpful in open-plan homes where the laundry area is visible from other rooms. Choose a washable fabric so it stays clean over time.
18. Install Pocket Doors to Save Space
Pocket doors slide into the wall rather than swinging outward. This frees up walking space and prevents door clearance from interfering with storage. They are especially useful for hallway or closet laundry setups. Frosted glass or painted panels keep the design simple and clean.
19. Add Wall Hooks for Cleaning Tools
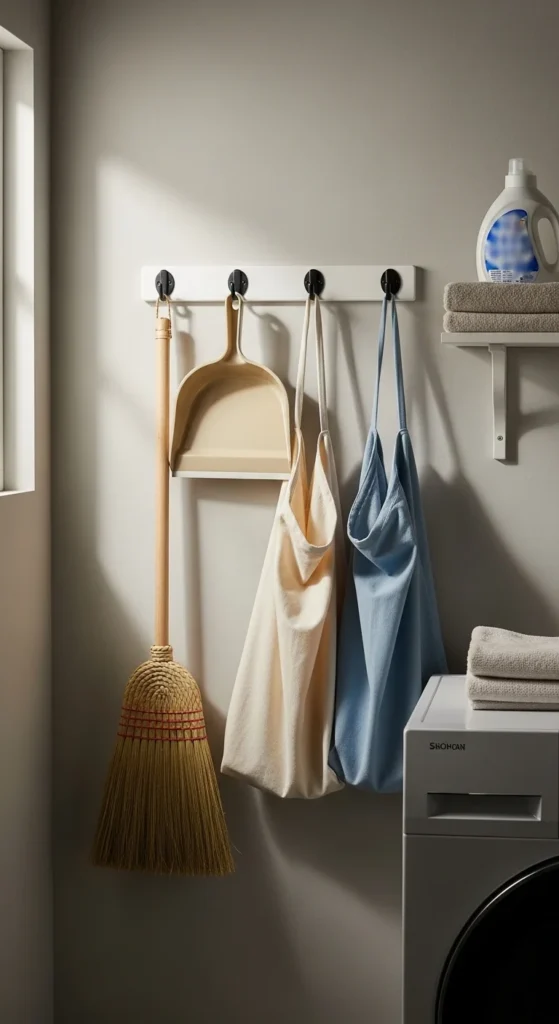
Hooks keep brooms, dustpans, and reusable laundry bags off the floor and easy to reach. Install them on narrow wall strips or behind the door. This vertical storage method keeps long items tidy without taking up shelf or cabinet space.
20. Use Clear Containers for Laundry Supplies
Clear containers make it easy to see how much detergent or supplies remain. They also create a uniform, tidy appearance on open shelves. Choose airtight lids for pods to keep moisture out. Group similar items together in matching bins to reduce visual clutter.
21. Create a Fold-Down Wall Ledge
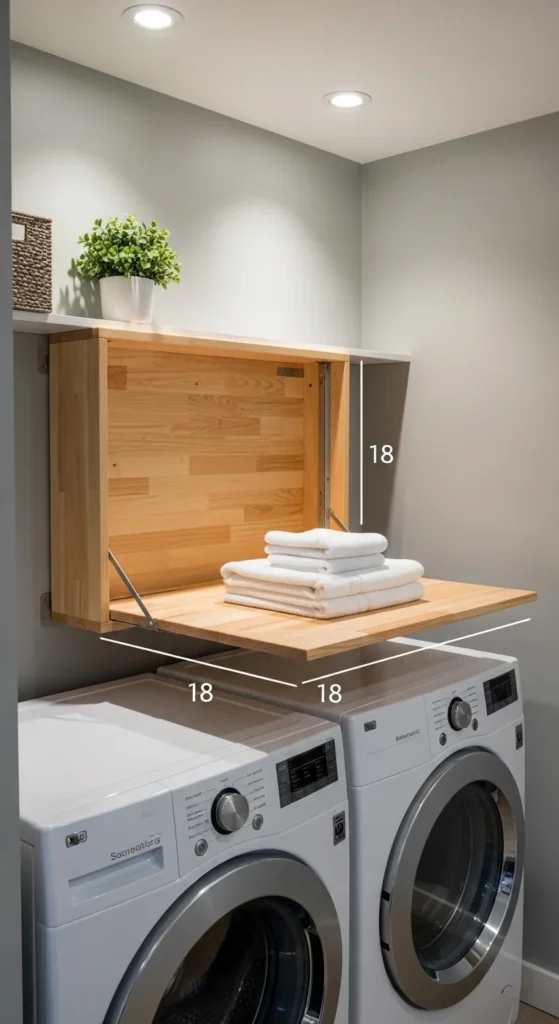
A fold-down ledge adds temporary counter space without permanent bulk. Install it on an open wall near the machines. Use sturdy hinges and brackets that lock into place when extended. Fold it flat when not needed to keep pathways clear.
22. Add Under-Shelf Baskets
Under-shelf baskets attach beneath existing shelves and use vertical gaps that often go wasted. They are perfect for storing small items like cloths, dryer sheets, or cleaning brushes. This addition increases storage without adding new furniture.
23. Use a Rolling Laundry Hamper
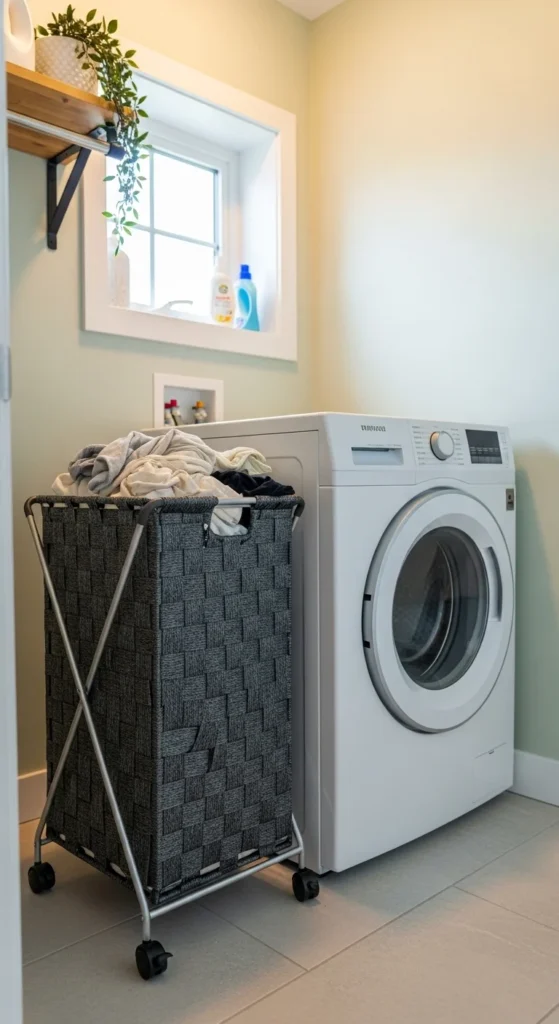
A rolling hamper moves easily from bedroom to laundry area. Choose a narrow style that fits beside machines or inside a closet. Wheels make transport simple and reduce heavy lifting.
24. Install Under-Shelf Lighting
Stick-on LED light strips brighten dim areas and make sorting or folding easier. Battery-operated options avoid wiring and are simple to install.
25. Mount a Magnetic Strip for Small Tools
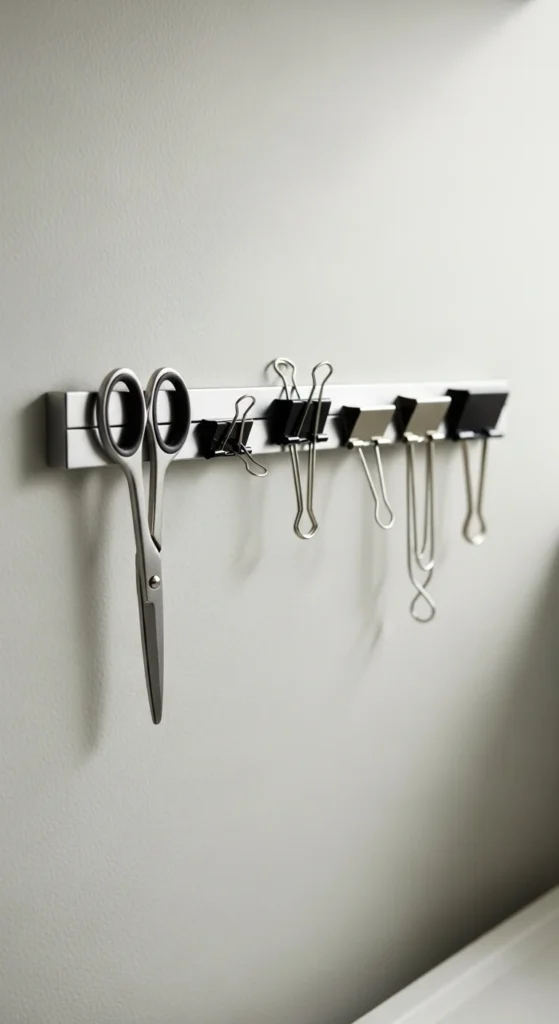
A magnetic strip keeps small metal tools like scissors or clips visible and off work surfaces. Mount it near your folding area for easy access.
26. Add a Tall Narrow Storage Cabinet

Tall narrow cabinets use vertical space efficiently. They store bulk items, extra paper goods, and cleaning supplies behind closed doors, keeping the room visually calm.
27. Create Clear Zones for Washing, Folding, and Storage
Dividing the room into zones helps daily tasks flow smoothly. Keep washing supplies near the machines, folding space on the counter, and storage above or beside. When each activity has a dedicated area, the room feels more organized and easier to use.
Conclusion
Smart small laundry room design focuses on vertical storage, flexible work surfaces, and hidden organization. Floating shelves, stacked appliances, and wall-mounted racks make the biggest impact in tight spaces. Mobile items like rolling carts and hampers add convenience without blocking walkways. Small upgrades such as hooks, lighting, and fold-down surfaces improve function while keeping the layout open. Start with one or two changes that fit your space and budget, then build gradually. Thoughtful adjustments add up, helping even the smallest laundry area work smoothly every day.