
Rainbow Dash nail art is a fun way to add color and personality to your look. Fans of My Little Pony love turning their nails into tiny canvases filled with rainbows, lightning bolts, and glitter. These styles are playful, budget-friendly, and easy to try at home. You can start simple with stickers or try hand-painted details for a creative challenge. Whether you want bold party nails or soft pastel designs, these 25 ideas will help you turn heads without spending much.
1. Classic Rainbow Stripes

Rainbow stripes never go out of style. Paint each nail with crisp lines of red, orange, yellow, green, blue, and purple. Use striping tape for cleaner edges. Add a shiny top coat to make the colors pop. If you want a softer version, try pastel shades for a lighter look. For a DIY shortcut, grab rainbow stripe nail wraps from a budget store. They look hand-painted but save time. Pair this design with casual outfits, like denim jackets or sneakers, to make your nails stand out naturally.
2. Lightning Bolt Accent

Rainbow Dash’s lightning bolt cutie mark makes a great accent nail. Paint most nails with a rainbow base. Then add a simple white or yellow lightning bolt on one nail. You can use a fine brush or even nail stickers for precision. This design works best on medium-length nails, so the shape of the bolt looks clean. For extra flair, place glitter around the bolt. It’s a fun style for birthdays or theme parties, and you don’t need salon skills to pull it off.
3. Glitter Rainbow Tips

French tips get a colorful twist with rainbow glitter. Paint the base with a sheer nude polish, then use fine glitter polish for rainbow-colored tips. You can layer colors in order or mix them for a sparkling blend. This design feels festive without being overwhelming. It’s perfect for anyone who wants to try Rainbow Dash nails but keep things subtle. For a DIY hack, dip nail edges into craft glitter while the polish is tacky. Seal with a strong top coat to prevent fallout.
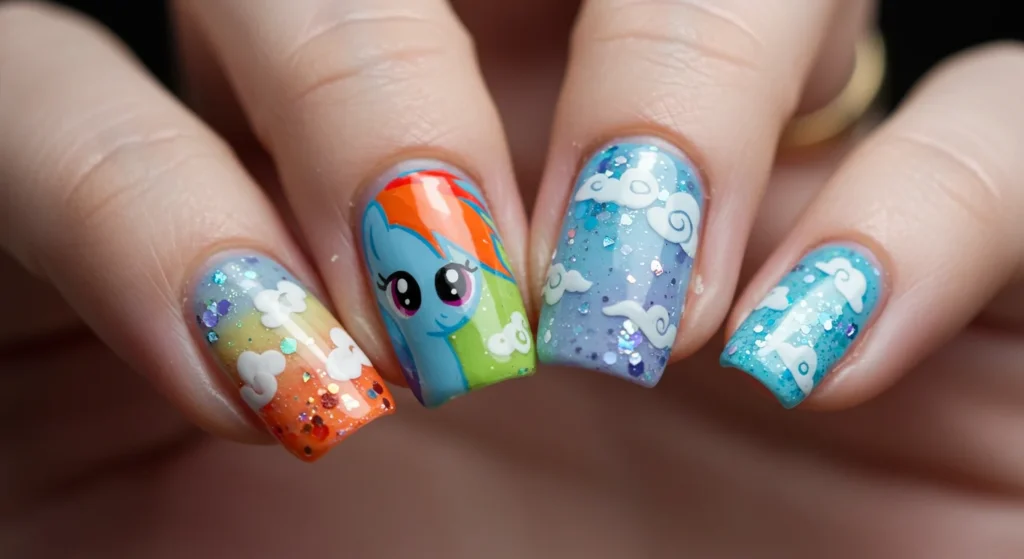
4. Cloudy Skies

A sky-inspired nail set brings Rainbow Dash’s world to life. Paint your nails light blue, then add fluffy clouds with a small dotting tool. On one or two nails, paint tiny rainbow streaks peeking through the clouds. You don’t need steady hands for the clouds they look better when slightly uneven. If painting feels tricky, look for cloud nail stickers online. This design pairs well with summer dresses or casual day looks. It’s cheerful, light, and very easy to pull off at home.
5. Ombre Rainbow Fade

An ombre rainbow design feels modern and bold. Start with a sponge to dab on rainbow gradients across each nail. Blend the colors so they melt into each other. It might take a few layers, but the result looks striking. For easier blending, use gel polish since it gives more working time. If you’re short on supplies, try ready-made ombre rainbow nail wraps. This design stands out at festivals or parties, especially when paired with glitter top coats.
6. Character Silhouettes

Adding character silhouettes gives a bold graphic touch. Paint your nails with bright rainbow backgrounds. Then, use black polish or decals to add Rainbow Dash flying or her head outline. If freehand feels tricky, buy silhouette stickers for accuracy. Keep the base glossy so the black designs really pop. This idea feels artistic and works well for themed fan events. You don’t need salon skills just patience and a good top coat to hold the stickers in place.
7. Confetti Sparkle Nails

Confetti glitter polish is one of the easiest ways to get Rainbow Dash nails. Just paint your base with a clear or pastel polish, then layer rainbow confetti glitter on top. Each nail will look different, but that’s the charm. Add two coats for more sparkle. If you don’t want to spend on special glitter polish, mix loose craft glitter into clear polish for a DIY version. These nails shine best under party lights, making them perfect for celebrations.
8. Rainbow Dash Cutie Mark

The cutie mark design is a fan favorite. Paint most nails in solid rainbow colors. Then, on one accent nail, carefully paint Rainbow Dash’s signature cloud with a red, yellow, and blue lightning bolt. You can use nail pens or tiny brushes for detail. Stickers also work well if you prefer a quick method. The design instantly tells fans which pony inspired your nails. It’s simple, playful, and works well for casual or themed looks.
9. Pastel Rainbow Dash

Pastel versions of Rainbow Dash nails are softer and more wearable. Swap bold rainbow colors for pale pink, mint, lavender, and baby blue. Add small white stars or dots for extra detail. This look works well for springtime or everyday wear. If painting gradients feels hard, simply paint each nail a different pastel color. It’s quick, budget-friendly, and still gives the rainbow vibe. A matte top coat makes the pastel shades look extra stylish.
10. Starry Night Rainbow

Dark backgrounds make rainbow designs pop. Paint your nails navy blue or black, then add diagonal rainbow streaks across each nail. Finish with tiny white stars or dots to mimic a starry night sky. This design feels dramatic yet fun. You can use toothpicks for small stars if you don’t have a nail art brush. Glitter polish works as an easy substitute for hand-painted stars. It’s a bold look that works for concerts or night outings.
11. Rainbow French Tips

French tips get playful with rainbow polish. Instead of white tips, paint each nail edge in a different rainbow color. Keep the base nude or pale pink to balance the bold tips. This style feels neat but still colorful. If you’re new to nail art, use curved tip stickers for cleaner lines. A matte top coat gives a modern finish, while a glossy coat keeps it bright. It’s an affordable design that works for workdays or weekend fun.
12. Rainbow Glitter Fade

A glitter fade brings sparkle without going overboard. Paint a nude or clear base. Then apply rainbow glitter polish near the cuticle and fade it toward the tips. The gradual sparkle looks elegant yet fun. This design works well for parties or special events. For a DIY approach, dab loose glitter onto wet polish with a sponge. Use a strong top coat to seal the glitter in. It’s budget-friendly and looks salon-quality with minimal effort.
13. Rainbow Lightning Strikes

This design makes each nail look like it’s charged with energy. Start with a plain white base. Then paint thin rainbow-colored lightning strikes across the nails. You can use a fine nail brush or colorful nail pens. If freehand feels hard, buy lightning bolt decals. The design stands out most on medium to long nails. Pair it with simple outfits so your nails become the main accessory. It’s a bold yet easy look to pull off at home.
14. Rainbow Polka Dots

Polka dots are quick, cute, and playful. Paint your nails with a white or pastel base. Then use a dotting tool or toothpick to add rainbow dots across the surface. Mix small and large dots for variety. If you don’t want to paint by hand, look for polka dot nail stickers. This style looks cheerful and is very beginner-friendly. It’s perfect for kids’ parties, casual hangouts, or just adding fun color to your daily look.
15. Rainbow Flame Nails

Flame designs feel edgy and stylish. Paint your nails black or white as a base, then add flame patterns in rainbow colors rising from the tips. Use thin brushes for sharper flames. If that feels tricky, try flame nail decals available online. The rainbow twist makes them less gothic and more playful. This look works great for festivals or concerts. A glossy finish keeps the colors bright, while a matte top coat makes it modern and trendy.
16. Rainbow Dash Full Character Nails

For true fans, go bold with full character art. Use decals or nail wraps that feature Rainbow Dash herself across multiple nails. Some sets place her face on one nail and her mane on another. This style requires less painting skill but gives maximum impact. It’s a fun way to show your fandom at themed parties. DIY fans can hand-paint her with tiny brushes, though stickers make it faster. Always seal with a clear coat to protect the artwork.
17. Pastel Ombre Dash

Ombre gradients work beautifully in pastel shades too. Blend soft colors like peach, lavender, mint, and baby blue across each nail. Use a sponge for smooth blending. Add tiny white stars or hearts for extra charm. This look is gentle, wearable, and perfect for spring. If blending seems tricky, use press-on nails already made in pastel ombre. They’re affordable and reusable. A matte finish gives a dreamy vibe, while gloss adds a polished touch.
18. Rainbow Water Marble

Water marble designs create unique swirls every time. Fill a cup with room-temperature water. Drop different polish colors into the surface and swirl with a toothpick. Dip your nails to capture the pattern. The result looks like rainbow tie-dye. It takes practice, but it’s fun once you get the hang of it. For less mess, try water marble decals that stick directly to the nail. Every nail comes out different, which makes this design extra playful.
19. Rainbow Gradient with Stars

This design layers simple gradients with cute accents. Paint each nail in blended rainbow colors. Then add tiny star decals or paint silver stars over the top. The stars shine best against darker gradients, like blue or purple ends. You can use glitter polish as a shortcut for the stars. This design is festive but easy for beginners. It’s also budget-friendly, since you only need basic polishes and star stickers.
20. Rainbow Foil Nails

Foil accents make nails look expensive with little effort. Start with a solid base, like black or nude. Press rainbow foil pieces onto the tacky surface. Seal with a clear coat to lock them in. The foil creates a shattered glass effect with rainbow shine. You can find foil kits online for just a few dollars. It’s a quick DIY option that feels special without salon pricing. This design works well for evening events or bold looks.
21. Rainbow Dash Glitter Mane

Rainbow Dash’s mane inspires this design. Paint your nails in glitter stripes of red, orange, yellow, green, blue, and purple. Layer the colors slightly for a flowing look. Use fine glitter polish for smoother blending. If hand-painting feels tricky, try pre-made rainbow stripe decals. This playful style works well for parties or cosplay events. A glossy top coat makes the glitter shine brighter under lights.
22. Negative Space Rainbows

Negative space designs feel stylish and modern. Instead of painting the whole nail, leave sections clear. Add rainbow arcs, stripes, or small accents on the bare nail. It looks clean while still colorful. To keep the design neat, use striping tape for sharp edges. A glossy clear coat finishes the look. This style works great for shorter nails since the design doesn’t overwhelm the nail bed.
23. Rainbow Dash Wing Detail

Wing details add a magical touch. Paint a soft sky-blue base. Then add feather-like strokes in rainbow colors across one or two nails. Use a fine brush for a layered look. If painting feels tough, find feather decals online. This design feels whimsical and shows Rainbow Dash’s flying spirit. It’s perfect for fans who want something unique. Pair it with cloud or sky-themed nails for a complete set.
24. Rainbow Stamped Nails

Stamping plates make nail art easier. Choose rainbow-themed designs like swirls, stripes, or stars. Apply the polish to the plate, scrape off excess, and stamp onto your nails. Use white or nude polish as a base for brighter results. Rainbow gradients stamped over black also look bold. Nail stamping kits are inexpensive and reusable, making this a great DIY option. Add a glossy coat to protect the design.
25. Rainbow Party Nails

Party nails mix everything fun into one design. Paint each nail differently—one glitter, one stripe, one confetti, and one with a cutie mark. The mixed styles give a playful, chaotic energy, perfect for birthdays or festivals. This design doesn’t need perfect lines. The randomness makes it fun. Use stickers and glitter for quicker results if you don’t want to paint every detail. These nails guarantee attention in any setting.
Conclusion
Rainbow Dash nail art is all about creativity, color, and fun. From simple polka dots to full character designs, there’s a style for every skill level and budget. You can use stickers, decals, glitter, or freehand painting to match your comfort zone. These 25 ideas let you bring your love for Rainbow Dash into everyday style or special events. Grab some polish, try one design, and let your nails shine with personality.

Lily Summers is a digital artist and creative storyteller who loves bringing colorful characters to life. With a passion for cartoons, fan art, and playful sketches, she inspires others to explore their imagination through art. When she’s not sketching, you’ll find her dreaming up new ideas for CraftedWizard.com to spark creativity in every artist. 🌈✨


