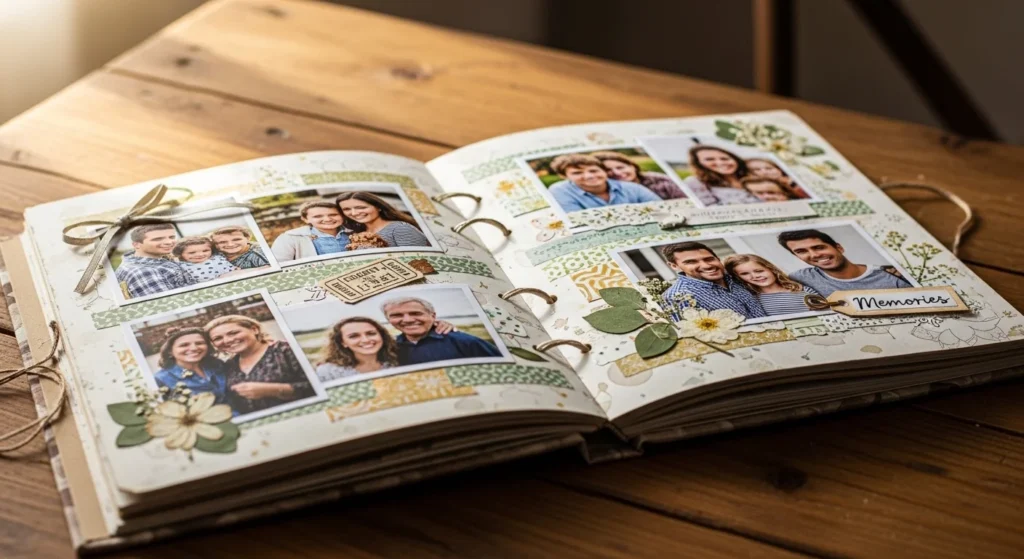
A photo scrapbook gives your favorite moments a place to stay beyond your phone gallery. It turns travel days, family milestones, birthday laughs, holiday dinners, and quiet everyday memories into pages you can hold, flip through, and revisit any time. The best part is that great scrapbook pages do not have to feel expensive or hard to make. With simple supplies like printed photos, envelopes, patterned paper, washi tape, pens, ribbon, paint chips, and pressed flowers, you can build layouts that feel personal and polished. These photo scrapbook ideas are made for memory keeping that looks beautiful but still feels easy to start, even if you are new to paper crafts. From single photo spotlight pages to map-based travel spreads, pop-up designs, and hybrid digital layouts, these ideas help your memories shine in ways that feel creative, practical, and fun.
1. Map Background Travel Pages

Using maps as backgrounds is one of the easiest ways to make a travel scrapbook page feel full of story right away. A city map, road atlas page, subway guide, or printed map from home adds location detail before anyone even looks closely at the photos. This idea works beautifully for road trips, honeymoons, weekend getaways, and family vacations. Start with two or three favorite trip photos and place them over the map so some roads and place lines still show around the edges. Add a small receipt, postcard, ticket, or luggage tag if you saved one. If you want a handmade touch, draw your travel route with a fine pen or stitch it with thread for extra texture. You do not have to buy special scrapbook paper either. Old brochures, photocopied maps, and printed screenshots can work well. Keep the rest of the page simple so the map stays the star. A small date, one short memory note, and a few neutral paper layers are enough. This kind of layout turns a plain page into something that feels connected to the trip itself, not just the photos from it.
2. Cut Photos Into Shapes
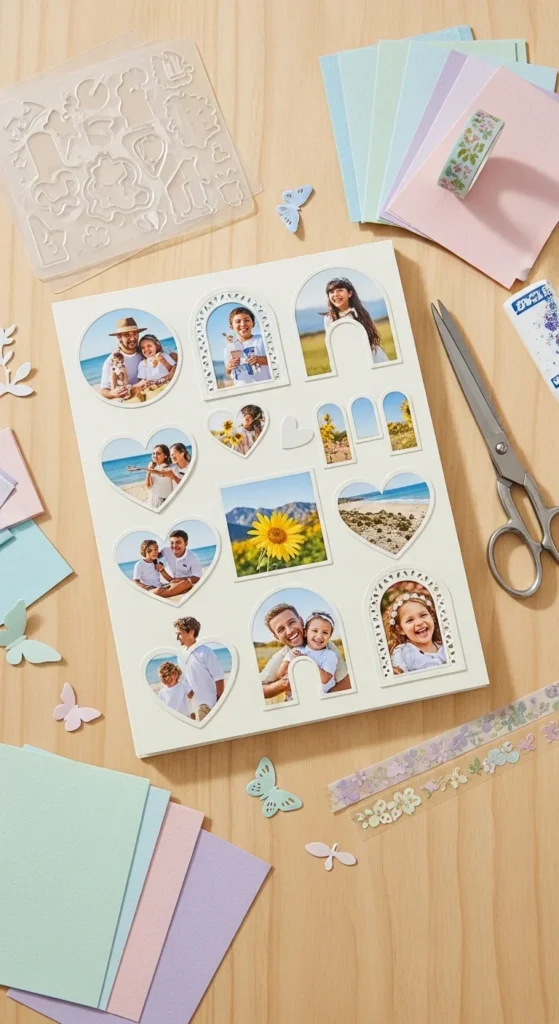
If your scrapbook pages always look too boxy, cutting photos into shapes is a simple fix that adds movement and charm. Circles, hearts, tags, arches, stars, and soft waves can make a page feel more playful without adding clutter. This idea works especially well for birthday pages, baby albums, friendship memories, and romantic spreads. Start by choosing duplicate prints or less precious photos so you feel relaxed while trimming. Trace a lid, cookie cutter, or handmade paper template on the back before cutting. Then mix one or two shaped photos with regular rectangular prints so the page still feels balanced. A full page of shapes can look busy, but a few on one layout feel intentional and fun. This method is also useful when a photo has distracting edges, because shaping it helps you crop tightly around the best part of the image. Add a small dotted border around the cut shape with a pen or place it over patterned paper to make it stand out more. It is a great way to break the routine of straight edges and bring more personality into your scrapbook without spending extra money on fancy supplies.
3. Washi Tape Border Frames
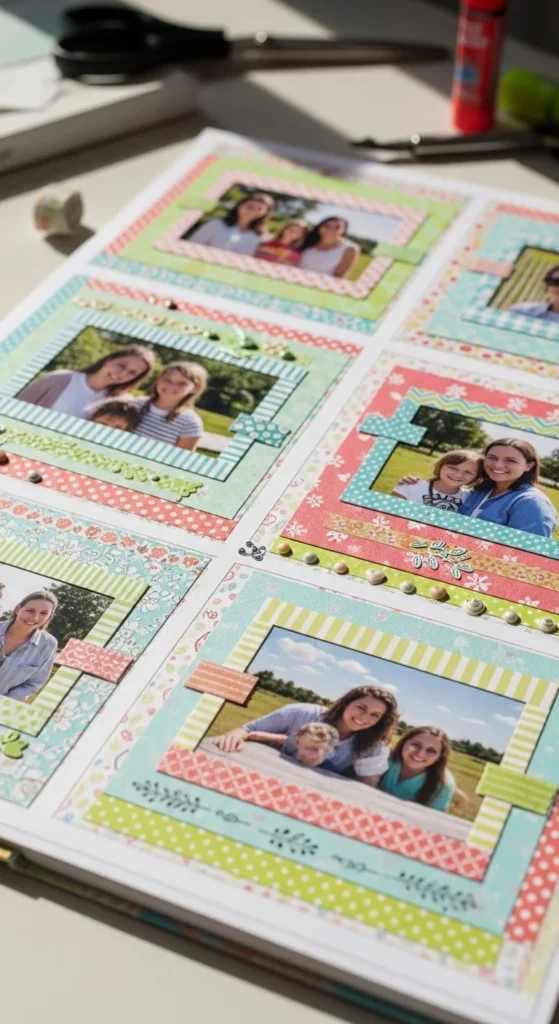
Washi tape is one of the easiest scrapbook supplies to use because it adds color, pattern, and decoration in seconds without the mess of wet glue. You can frame one photo, edge an entire page, create fake photo corners, or divide sections of a layout with just a few strips. Floral tape looks lovely on spring pages, stripes fit travel albums, and soft neutral patterns work well for family memory books. A very easy layout is to place a single photo in the center and create a tape border around it. Another is to line the left and right edges of the page with tape and layer two photos in between. Because washi tape peels up more easily than most adhesives, it is beginner friendly and gives you room to change your mind. That makes crafting feel less stressful. You can also tear the tape by hand instead of cutting it, which gives the page a softer handmade style. If you want to keep costs low, buy only two or three rolls that match many color themes. Even with a small collection, you can create plenty of pretty pages. It is one of the fastest ways to make simple scrapbook layouts look finished.
4. Spotlight One Photo Per Page

A page with only one photo can feel more powerful than a page filled with many. When you give one image room to breathe, it becomes the full emotional focus of the layout. This style is perfect for graduation pictures, wedding portraits, baby milestones, pet close-ups, or one travel photo that captures the whole feeling of the day. Start with a larger print and place it near the center or slightly off-center on the page. Then build just a few small details around it, like a strip of ribbon, a paper mat, a tiny flower cluster, or a short handwritten caption. The open space around the photo helps the page feel calm and polished instead of crowded. This is also one of the best scrapbook ideas for beginners because it removes the pressure of arranging many images at once. You only need one strong memory and a few pretty extras. If you like a clean look, keep embellishments in one corner only. If you want something softer, layer the photo over torn paper or fabric scraps. A scrapbook feels much better to flip through when some pages are quiet. These spotlight pages give important memories the attention they deserve.
5. Pressed Flower Memory Pages

Pressed flowers can make a scrapbook page feel gentle, handmade, and full of emotion. They work especially well for spring walks, weddings, garden parties, family portraits, and quiet everyday moments. Even a tiny daisy or fern can add a lot of charm to a simple layout. You can press flowers from your own yard between books, save petals from a bouquet, or buy dried flowers from a craft store. Flat pieces work best so the album still closes neatly. Try placing one or two photos on cream, kraft, or pale blush paper, then tucking small flowers around the edges as though they are growing out of the page. Use a very small amount of clear-drying glue so the petals do not darken too much. If you do not have flowers, leaves, herbs, and thin grasses can give a similar look for less money. These pages pair beautifully with twine, soft ribbon, and handwritten notes. They also look lovely with black-and-white photos because the floral color adds contrast. This style is perfect when you want the scrapbook to feel natural and heartfelt. It adds beauty without making the layout feel too busy or overly decorated.
6. Pocket Envelopes for Tickets and Notes

Some of the best memories are hidden in little paper scraps, and envelope pockets are a smart way to keep them in your scrapbook without creating a messy page. Tickets, receipts, postcards, tiny letters, pressed leaves, and handwritten notes all fit beautifully inside simple paper pockets. This idea is wonderful for travel albums, concert pages, family trips, and birthday keepsakes. You can make the envelopes from kraft paper, scrapbook paper, old book pages, or even pretty packaging. Fold a rectangle, glue the sides and bottom, and leave the top open. Then decorate the front lightly with a label shape, ribbon, or small sticker. Place the pocket near one side of the page and balance it with one or two photos. That way the page still feels neat. This layout becomes interactive because you can pull the pieces out and look at them. For a family scrapbook, you could tuck in a child’s tiny note or a birthday card clipping. For travel, receipts and museum stubs work perfectly. Keep the contents thin so the page does not become bulky. Pocket envelopes are lovely because they hold the real-life pieces of a moment, not just the pictures from it.
7. Watercolor Wash Backgrounds
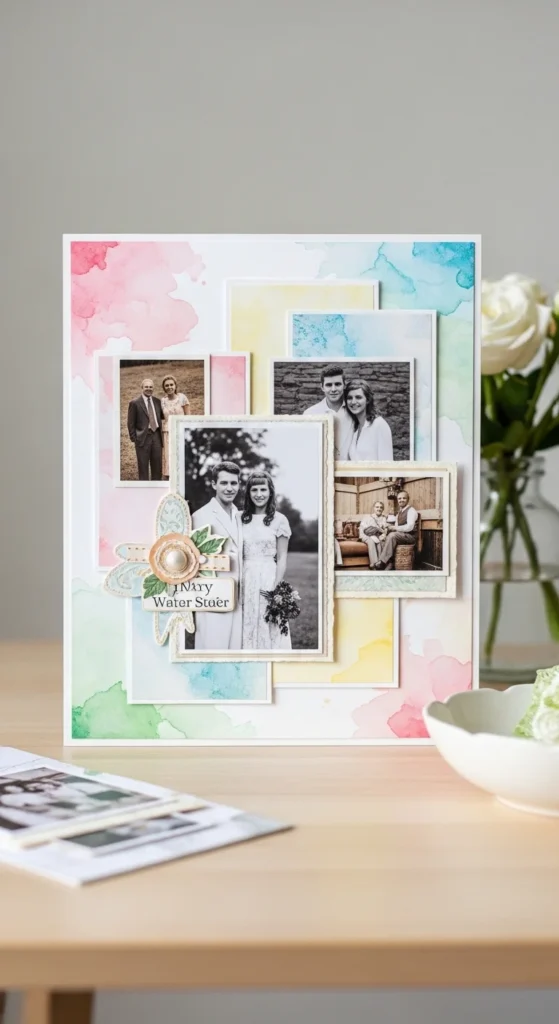
A watercolor wash can turn a plain scrapbook page into something soft and artistic without requiring advanced painting skill. Light areas of blue, pink, green, or beige behind your photos create texture and color while still letting the images stand out. This idea works especially well for baby albums, spring memories, beach days, and dreamy family pages. Use a little water and a very small amount of paint on thick paper, then brush a loose patch of color where the photos will sit. Let it dry fully before adding anything else. The key is to keep it simple. You are not painting a detailed picture. You are only creating a gentle background. If you do not have watercolor paints, watered-down craft paint can work too. Place one or two photos over the wash and add a few tiny paper accents, like circles or label pieces, to finish the page. You can match the wash color to the clothes or scenery in the photo for a more pulled-together look. This is a great option when patterned paper feels too busy but plain paper feels too empty. It adds softness and art to the page while staying low cost and beginner friendly.
8. Black-and-White Photos With Color Accents

Using black-and-white photos with a few colored accents creates a timeless scrapbook page that feels stylish and easy to design. When the photos are monochrome, you do not have to match lots of competing colors across the layout. That makes it easier to decorate with ribbon, paper, flowers, and tape in one clear palette. This idea is great for family history pages, baby photos, wedding memories, childhood pictures, and heritage albums. Print your photos in black and white, then choose one main accent color such as dusty rose, sage green, mustard, or navy. Use that tone in small ways across the page through ribbon, cardstock mats, or little embellishments. The contrast between grayscale images and soft color details makes the page feel calm and polished. You can also lean into a vintage style by using cream paper, distressed edges, and old-looking envelopes. If you are working with mixed photos that have clashing colors, converting them to black and white is also a smart fix. It creates harmony fast. This is one of the simplest ways to give a scrapbook a more classic look while still letting your chosen color details add warmth and personality.
9. Clean Photo Grid Layouts
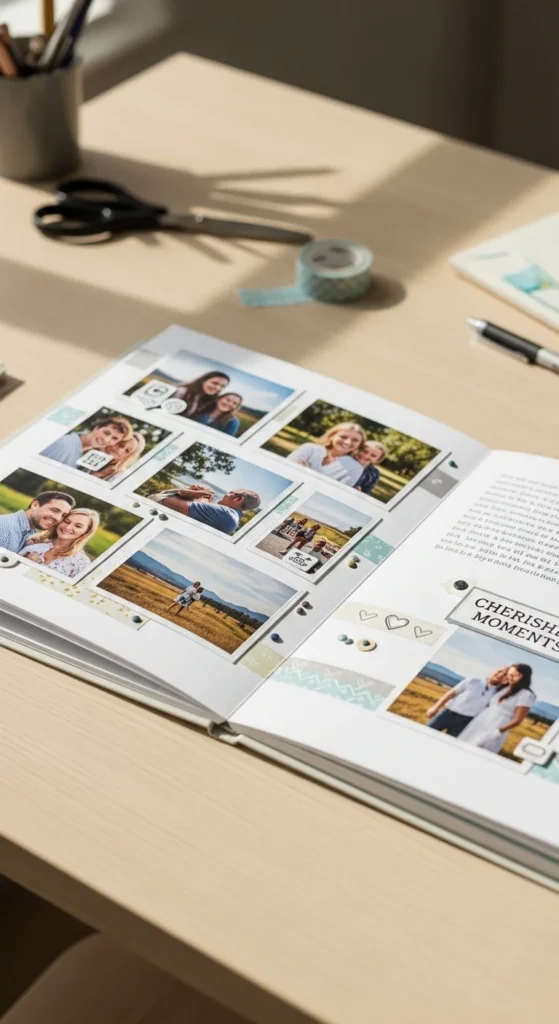
A photo grid is perfect when you have several pictures from one event and want them all on the page without making it look chaotic. Grid layouts feel organized, modern, and easy to read, which makes them great for birthday parties, school events, holidays, and family gatherings. Start by printing four, six, or nine small photos in similar sizes. Then place them in rows with equal spacing between each one. This structure creates instant order, even if the photos themselves are busy. Once the grid is set, add only a few accents. A title block, one short caption, and two or three small embellishments are enough. Too many extras can ruin the clean look. If you want variety, overlap one photo slightly outside the grid or place a small paper tag on top of one image. Grids are also a great choice for beginners because there is less guesswork in where everything should go. Use a ruler and light pencil marks if you want cleaner lines. When you have a lot of pictures and do not want to choose only one or two, this layout helps you fit more memories onto the page while still keeping everything neat and attractive.
10. Mini Accordion Fold-Out Inserts

A mini accordion insert is a fun way to fit more photos into a scrapbook without crowding the main page. It is especially useful for travel sequences, birthday parties, baby milestones, or any event where the photos tell a little story in order. To make one, cut a strip of cardstock and fold it back and forth into even panels. Then glue one small photo onto each section. You can tuck the folded piece into an envelope pocket, tie it with ribbon, or attach one end to the page so it opens like a surprise. This adds an interactive element that makes the scrapbook more enjoyable to flip through. It also helps save space because a whole series of pictures can live in one compact fold-out instead of taking over several pages. Decorate the front panel with a tiny tag or shape so it feels like a special hidden piece. If you do not want to print many photos, use the accordion insert for journaling instead and write a short line on each fold. This is a great low-cost project because it uses only scraps of cardstock and smaller printed pictures, yet it makes the scrapbook feel thoughtful and creative.
11. Embroidered Journey Lines on Maps

If you want a travel page to feel extra handmade, stitching a journey line across a map background is a beautiful idea. This technique combines paper crafting with a simple embroidery look and works best for road trips, train rides, flights, and moving stories. Start with a printed map page and mark a loose path between two or more places. Use a pin to make tiny holes along the line, then stitch through them with embroidery floss or regular thread. A dashed line or simple running stitch works well and does not take much time. Layer a few trip photos nearby and maybe add a tiny plane, car, or heart shape at the starting and ending points. The stitched line gives the page texture and movement while helping the viewer follow the story of the trip. Choose thread that stands out from the map but still matches the colors on the page. You do not need expert sewing skill to try this. Even simple imperfect stitches can look charming in a scrapbook. This technique is especially meaningful because it does not just show where you went. It visually traces the path of the memory itself in a way that feels personal and handmade.
12. Paint Chip Color Story Pages
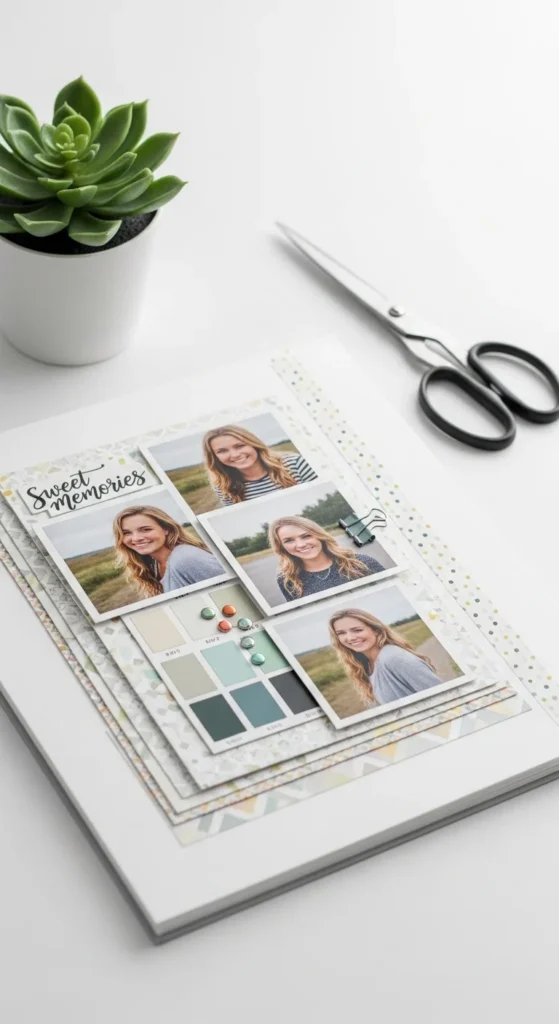
Paint chips are a clever, low-cost supply for scrapbook pages because they bring ready-made color palettes into your design. You can pick shades that match your photos, then use the paint strips as borders, journaling blocks, tiny tags, or layered accents. This is especially useful for seasonal pages, home photos, baby albums, or outfits and party themes where color already plays a big role. Try choosing three paint chips in the same color family, from light to dark, and cut them into small pieces. Layer them behind a photo or line them up in a row to create a gradient effect. They can also work as little labels under photos or as backing shapes for embellishments. If you enjoy tidy scrapbook pages, paint chips help you build a consistent palette without guessing which papers go together. Many people can even collect them free from hardware stores, which makes this a very budget-friendly craft trick. Pair them with white, kraft, or black cardstock for a clean look. This kind of layout is simple but eye-catching and gives a page an intentional color story that ties everything together beautifully.
13. Zero-Waste Photo Scrap Collages
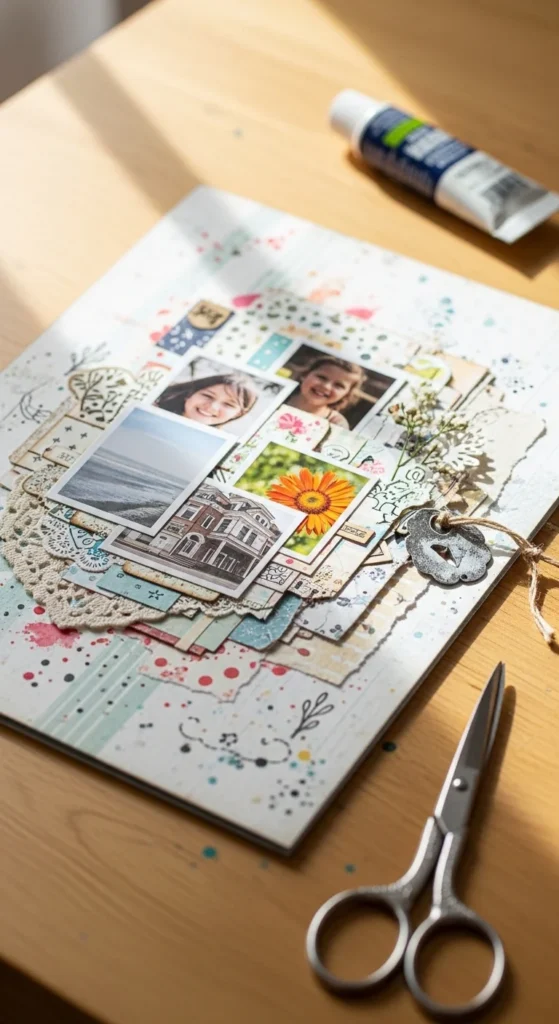
When you trim photos for other scrapbook pages, the leftover scraps do not have to go in the trash. Small strips, corners, background pieces, and repeated prints can become a collage page that feels artistic and full of personality. This is a wonderful idea for memory books because it turns leftovers into part of the story. Start by saving your trimmed pieces in a little envelope or box. Then use them to build a background layer under one main photo or to fill a whole page in a patchwork style. Mixed with paper scraps, ticket pieces, tiny labels, and tape, the result can feel playful and textured. This works especially well for theme pages, mood pages, or end-of-trip spreads where you want a more relaxed handmade look. To keep it from getting messy, choose one color palette and repeat it throughout the collage. You can also use a white pen or a few simple stamps over the scraps to tie everything together. This idea is easy on the budget and good for anyone who dislikes waste. It proves that even the little trimmed-off parts of your photos can still hold beauty and memory.
14. Storytelling Caption Clusters

Photos show what happened, but captions can tell the small details that would otherwise be forgotten. A storytelling caption cluster is a layout style where short notes sit close to the photos in little groups rather than one long journal block. This makes the page easy to read and gives it a warm personal feel. You might write what someone said, what the weather felt like, what you ate that day, or why that memory still matters. For a birthday page, you could note the age, the cake flavor, and one funny moment from the party. For a travel page, you might write the city, the café name, and one tiny surprise from the day. Use scraps of paper, labels, tags, or small journaling cards to hold the notes. Keep each one short so the page still feels light. This idea is especially useful when the photos alone do not tell the full story. Years later, those few lines often become the best part of the scrapbook. They turn a pretty page into a true memory record. It is a simple way to make your scrapbook feel more alive and personal.
15. Ribbon and Fabric Accent Borders
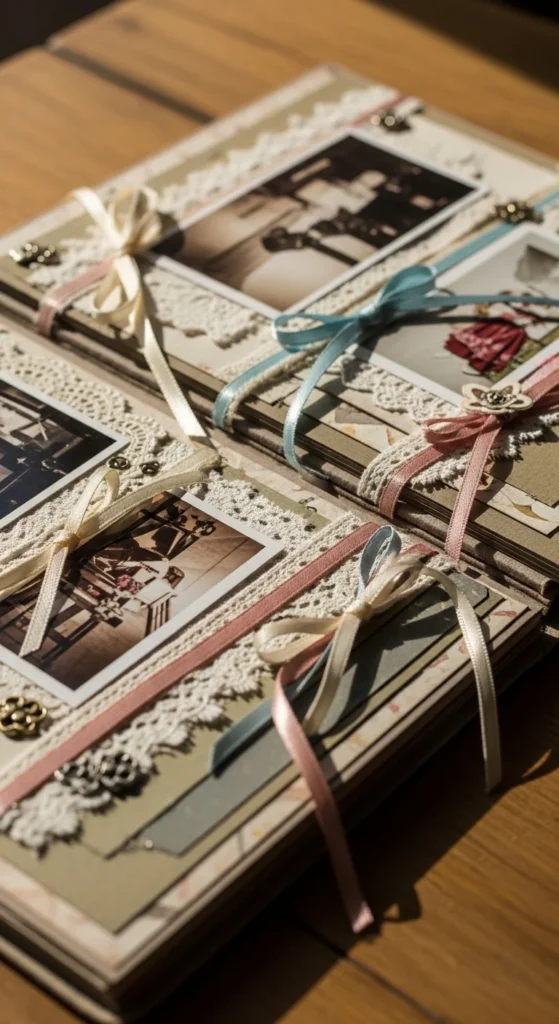
Ribbon, lace, and small fabric strips add texture to scrapbook pages in a way paper alone cannot. They soften the layout and make it feel warmer, especially for wedding albums, baby books, family pages, and vintage-inspired spreads. A thin ribbon can border a photo, tie around a tag, or run along the edge of a page like trim. Lace scraps look lovely behind photos, while soft fabric strips can be layered under paper pieces for a cozy handmade feel. You do not need to buy anything fancy. Leftover gift ribbon, fabric from old clothing, lace trimmings, and sewing scraps can all work beautifully. Keep the pieces fairly flat so the scrapbook still closes well. To avoid the page feeling heavy, use fabric on only one section and balance it with simple paper on the rest. Neutral ribbons pair nicely with almost any palette, while one bold ribbon color can become the main accent of the page. This style adds a tactile quality that makes the scrapbook feel special when you hold it. It is a lovely choice when you want your memory pages to feel soft, layered, and a little more personal.
16. Repeat Stamp Motif Pages

Using the same stamped motif across a scrapbook page helps create rhythm and makes even a simple layout look more designed. Stars, hearts, leaves, tiny flowers, circles, and date stamps all work well for this. Choose one small stamp and repeat it around the page in a few places rather than using many random designs. That keeps the spread feeling pulled together instead of cluttered. Stamp motifs are great for memory books because they can match the theme of the photos. Leaves suit outdoor pages, stars fit celebrations, and hearts work well for friendship or family albums. If you do not own stamps, you can even make simple ones from foam shapes or erasers. Use one ink color for a cleaner look, or two close shades if you want a little variety. Stamped designs are especially helpful when the page feels empty but you do not want to add bulky embellishments. They give detail without extra thickness. Pair the stamped motifs with photos, captions, and one small paper layer for a balanced page. It is a low-cost and repeatable way to decorate scrapbook layouts while still keeping them neat and charming.
17. Pop-Up Photo Surprise Pages

A pop-up photo element adds movement and surprise to a scrapbook, making the page feel extra fun without being too hard to create. This is a lovely idea for kids’ albums, birthday parties, holiday pages, graduation books, and milestone moments that deserve a little drama. To make one, cut a small tab into folded cardstock, push the tab outward, and glue a small photo or embellishment onto it so it stands up when the page opens. You can also attach mini folded platforms behind a picture to give it some lift. Keep the pop-up part light so it does not tear the page. This style works best when only one element pops up and the rest of the layout stays simple. That way the page still closes well and the moving part stays the focus. Add stars, banners, or confetti shapes nearby for extra cheer. Pop-up pages feel playful and interactive, which makes them memorable for both kids and adults. They are a good way to break up flatter layouts throughout the scrapbook and add a page that surprises people when they turn it. Small touches like this make handmade albums feel especially thoughtful.
18. Vintage Neutral Memory Spreads

Vintage neutral scrapbook pages create a warm, nostalgic mood that works beautifully for family history, wedding memories, old childhood photos, and heritage albums. This style usually uses soft browns, creams, faded greys, and muted gold tones instead of bright colors. Start with aged-looking paper, kraft cardstock, or tea-stained pages if you want to create that old-world feeling. Then layer sepia or black-and-white photos with old envelopes, ledger-style paper, lace, and simple tags. Torn edges and slightly uneven layers can help the page feel more lived-in and less polished in a good way. This is also a smart style for mixed old family pictures because the neutral palette helps different photos feel connected. If you want just a touch of color, use dusty rose, sage, or muted blue in very small amounts. A fountain-pen style handwriting or tiny date label can finish the look nicely. You do not need expensive antique embellishments either. Old book pages, leftover wrapping paper, and homemade tea-stained tags can create much of the same mood. These pages feel timeless and gentle, making them a wonderful choice for memories that carry family feeling and quiet emotion.
19. Photo-First Themed Covers

The cover of a scrapbook sets the tone for everything inside, so a strong photo-first cover is a great way to make the album feel special from the start. Choose one image that captures the spirit of the whole scrapbook, such as a family portrait, a travel landscape, a wedding detail, or a joyful candid moment. Mount that photo on sturdy cardstock or the album front and build a few simple layers around it. A mat of patterned paper, a strip of ribbon, a small charm, or one cluster of embellishments is often enough. Try not to overcrowd the cover. It should hint at the story without revealing everything. Match the cover colors to the overall mood of the scrapbook. Soft tones feel calm and classic, while brighter shades fit playful memory books. If the album is for a holiday or special event, use small themed accents sparingly around the photo. Handmade covers do not need many supplies to look lovely. The key is choosing one image with strong feeling and letting it lead the design. A good cover makes the scrapbook feel thoughtful before a single page is even turned.
20. Bold Shape and Pattern Pages
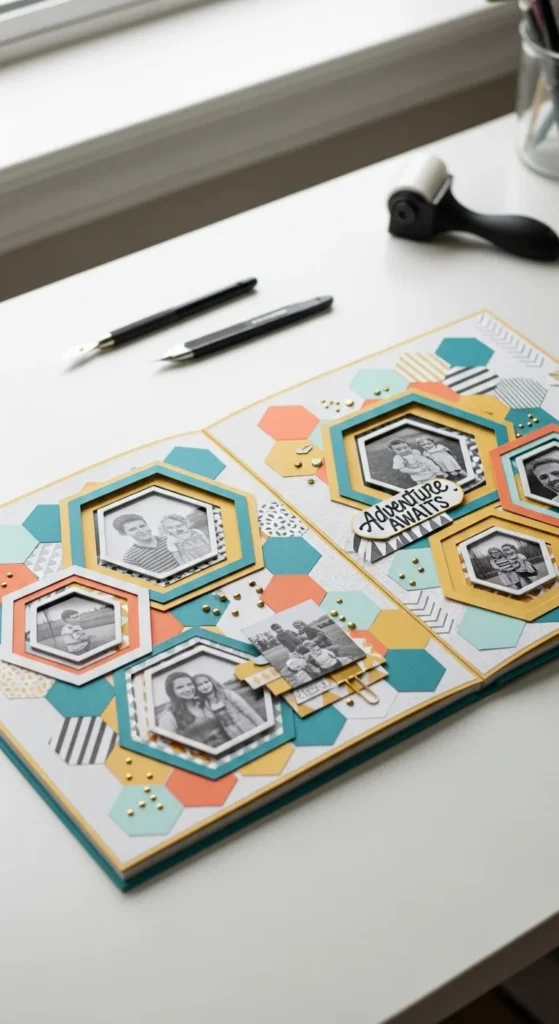
Bold shapes like hexagons, circles, arches, and repeating blocks can make a scrapbook page feel modern and graphic without being hard to build. This is a great idea for teen albums, travel books, party pages, and memory spreads where you want stronger visual structure. Start by cutting several matching shapes from patterned paper or cardstock. Then arrange them in rows, clusters, or a loose repeating pattern across the background. Tuck photos partly over the shapes so they feel integrated into the design instead of floating on top. Hexagons are especially nice because they create a honeycomb look that feels orderly but still interesting. You can also use circles for a softer page or arches for a trendier style. To keep the layout from becoming too loud, limit your palette to two or three main colors and mix bold patterns with plain paper. A simple caption and a few small embellishments are enough after that. This kind of page works well when you want a scrapbook to look a little more current and design-led. It is eye-catching, fun to assemble, and easy to repeat across several pages with different papers and themes.
21. Hybrid Digital-to-Print Layouts
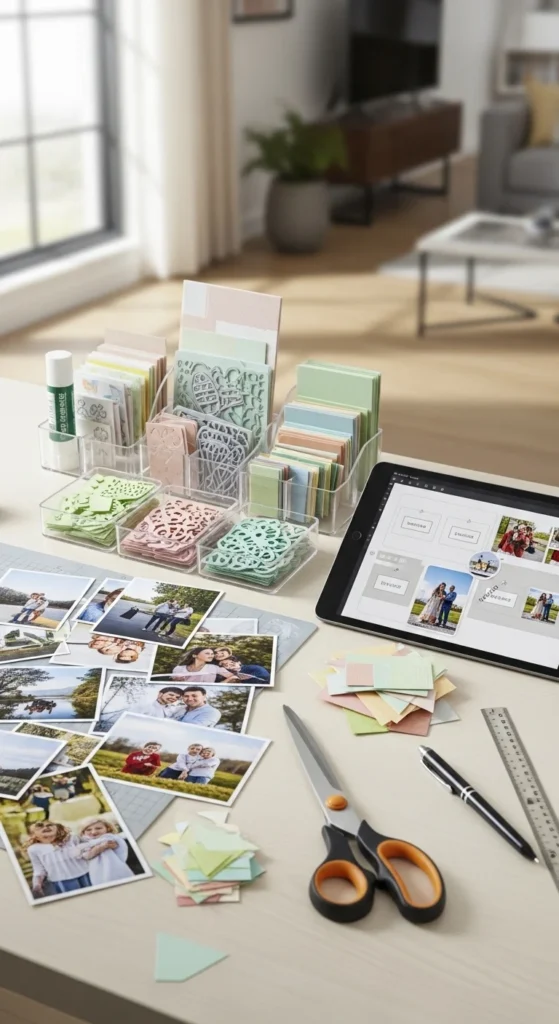
A hybrid scrapbook combines digital planning with physical crafting, which can make the whole process feel easier and less stressful. You might use an app to arrange photo sizes, test color combinations, or sketch a page idea before printing and assembling it by hand. This is especially helpful for beginners who like seeing a plan before cutting paper. Canva-style templates, collage apps, and simple note tools can help you try layouts quickly. Once you like the design, print the photos and recreate the idea on paper using cardstock, tape, and embellishments. This approach saves time and helps reduce mistakes because you already know where things might go. It also works well when you want a scrapbook to feel personal but still neat and coordinated. A hybrid system is perfect for travel books, baby albums, and annual family memory projects where you may have lots of digital photos to sort through. You do not need expensive software either. Even a simple phone collage can act as a layout guide. This method is a nice bridge between traditional scrapbooking and the way most people store memories now. It helps bring digital pictures into a handmade form that feels warm and lasting.
22. AI-Assisted Layout Planning
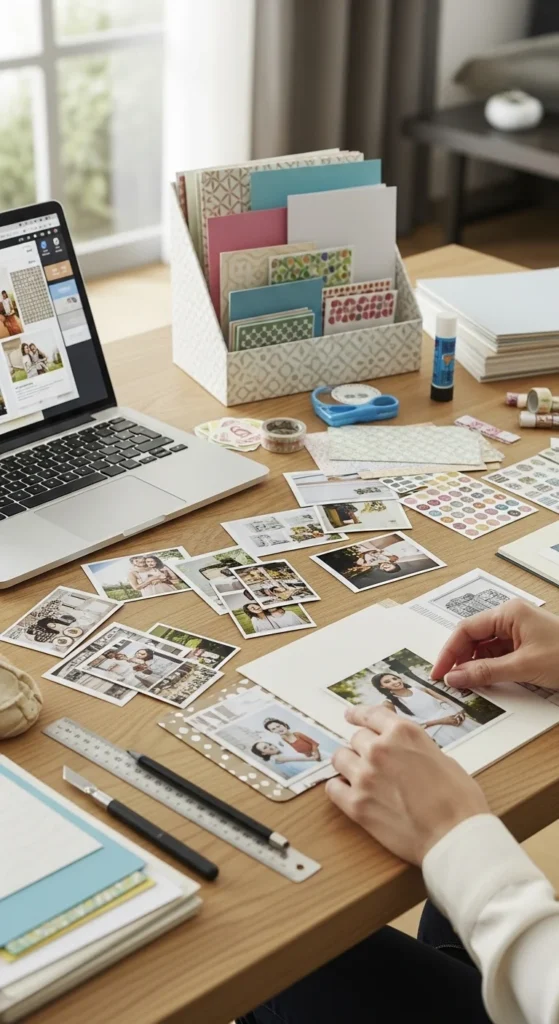
If you love scrapbooking but often freeze when it is time to arrange the page, AI-assisted layout planning can help spark ideas. You can use digital tools to suggest color palettes, page structures, journaling prompts, or ways to group photos before you start gluing anything down. The final scrapbook is still yours, but a tool can help remove that stuck feeling when you do not know where to begin. This works especially well for busy people who want to scrapbook more often but get slowed down by perfectionism. You might ask for a travel layout idea using maps and tickets, a baby page with soft neutrals, or a clean photo grid for birthday pictures. Then take the useful parts and build the layout your own way. It is smart to treat the digital suggestion as a starting point, not a strict rule. Add your own keepsakes, handwriting, and handmade details so the page still feels personal. This kind of planning can make scrapbooking feel more approachable for beginners while helping experienced crafters try new page ideas too. It is a practical way to bring modern tools into a very personal and creative hobby.
23. Under-Five-Minute Simple Pages

Not every scrapbook page has to become a long project. Some of the best memory pages come together in under five minutes with just one photo, one small embellishment, and a short note. This kind of layout is perfect for anyone who feels overwhelmed by too many supplies or too many decisions. Choose one printed photo, stick it on plain cardstock, add a strip of washi tape or a tiny paper mat, and write one sentence about the moment. That is enough. You can also use a small label shape for the date and stop there. Quick pages are wonderful for daily life albums, monthly memory books, and projects where you have many photos and want steady progress instead of perfection. They help keep scrapbooking fun rather than turning it into something you keep postponing. These simple spreads also create breathing room between more decorated pages, which makes the whole album feel easier on the eye. If you often delay memory projects because they seem too big, these quick layouts can help you keep going. One small finished page always feels better than a blank scrapbook waiting for the perfect design.
24. Seasonal Color Palette Albums
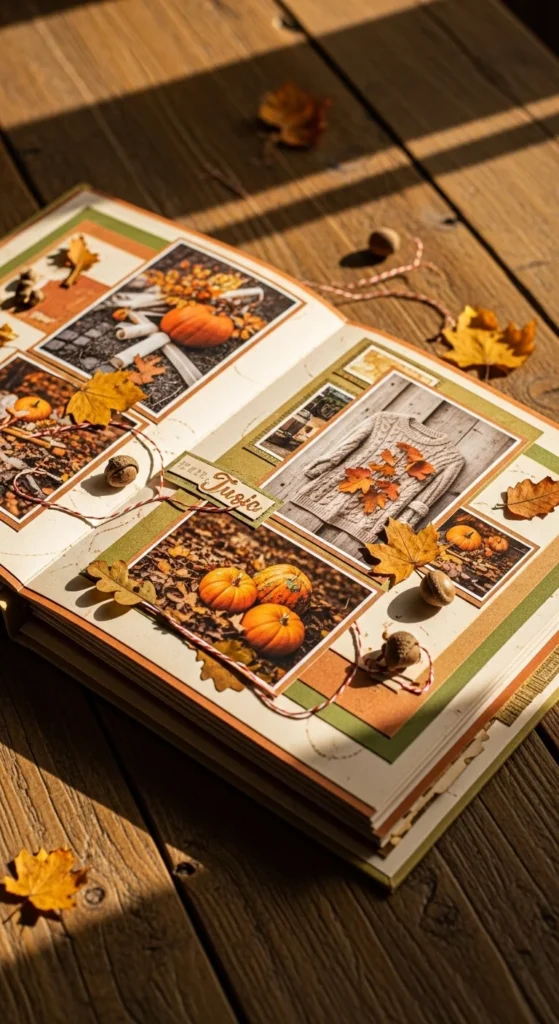
Building scrapbook pages around seasonal color palettes is a great way to make your album feel cohesive and emotionally rich. Instead of decorating each page in random colors, choose tones that match the season of the memory. Autumn pages can use rust, mustard, brown, and olive. Spring pages can use blush, sage, butter yellow, and soft blue. Summer works well with coral, aqua, and sandy neutrals, while winter can lean into grey, navy, cream, and forest green. This approach makes it much easier to pick papers and embellishments because your choices already have a clear direction. It also helps the scrapbook feel more harmonious when you flip through it. Try printing photos and then pulling two or three colors from the images to guide the page design. Add small seasonal details like leaves, florals, snowflake shapes, or little sun motifs if they suit the memory. You do not need many decorations when the palette already does so much visual work. This idea is useful for yearly albums, family books, holiday scrapbooks, and even school memory projects. Seasonal color planning makes scrapbook pages feel more intentional while staying easy to build.
25. Memory Mix Pages With Photos and Tiny Keepsakes
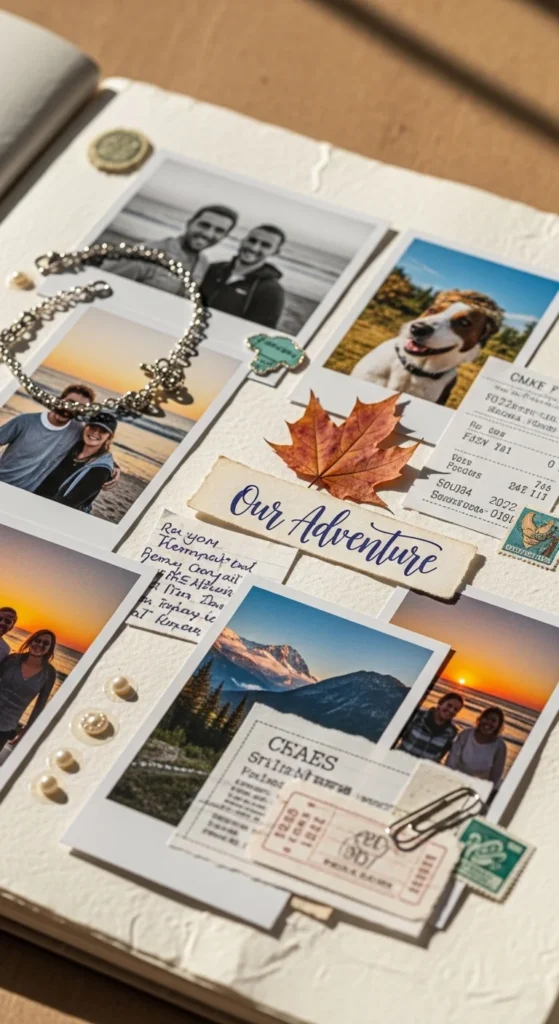
A memory mix page brings together photos and small keepsakes from the same moment so the scrapbook captures not just how the day looked, but also how it felt. This kind of page might include a café receipt from a trip, a dried flower from a wedding table, a friendship bracelet thread, a child’s drawing, or a little note written during the event. Start with one or two main photos, then arrange the keepsakes around them in a balanced way. Flat items are easiest to use, though small thicker pieces can sometimes be tucked into a pocket or attached carefully. The goal is to create a page that feels like a memory box opened out into paper form. Add one short handwritten note explaining why those little objects matter. Years later, those tiny details often hold just as much meaning as the photos themselves. This idea is especially wonderful for travel albums, milestone celebrations, family memory books, and relationship scrapbooks. It turns ordinary saved scraps into part of the visual story. When you want your scrapbook to feel deeply personal, pages like this can make the memories feel vivid, tactile, and full of life.
Conclusion
The best photo scrapbook ideas are the ones that help you start, keep going, and tell your memories in a way that feels true to you. Map backgrounds can turn travel stories into place-filled pages, cut photos into shapes can break the usual rectangle routine, washi tape can add quick style, and single photo layouts can give special moments room to stand out. Pressed flowers, envelope pockets, watercolor backgrounds, pop-ups, grids, vintage neutrals, and hybrid digital layouts all bring different moods to memory keeping, so your scrapbook can feel varied without becoming hard to make. If you feel stuck, begin with one page, one photo, and one small idea. That is enough to build momentum. Over time, those small pages become a scrapbook full of real life, tiny details, and favorite moments you can return to again and again.

Lily Summers is a digital artist and creative storyteller who loves bringing colorful characters to life. With a passion for cartoons, fan art, and playful sketches, she inspires others to explore their imagination through art. When she’s not sketching, you’ll find her dreaming up new ideas for CraftedWizard.com to spark creativity in every artist. 🌈✨