
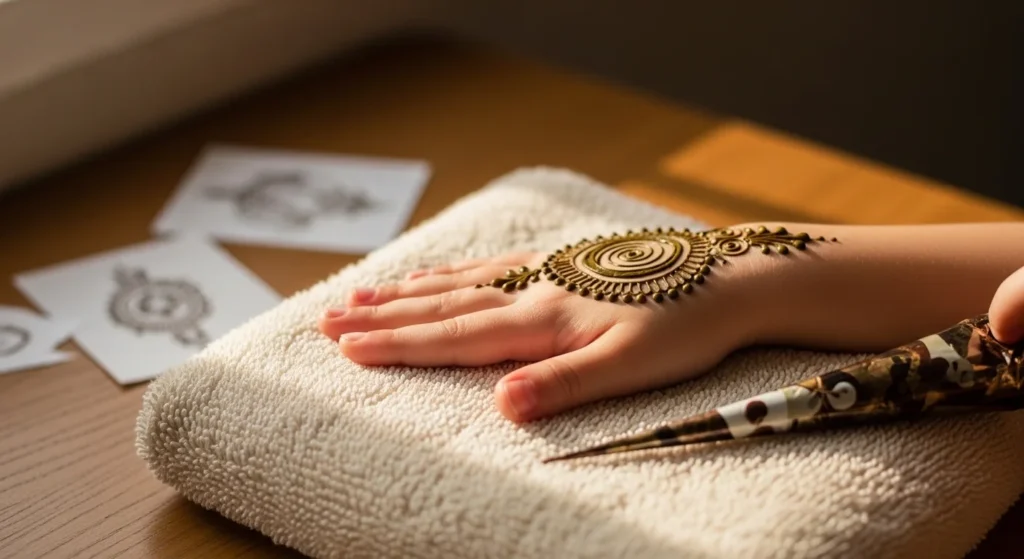
Kids’ mehndi should be quick, cute, and easy to copy, especially when little hands can’t stay still for long. This list focuses on simple shapes that look adorable even when you’re working fast, with clean lines, dots, and tiny motifs that suit small palms and wrists. Each idea is designed to be done in minutes and still look photo-ready for family gatherings, school functions, or weekend fun.
1. Dot Bracelet Band

A dotted bracelet band is one of the fastest designs that still looks complete. Start with two thin lines around the wrist, leaving a small gap between them like a bangle. Fill the space with neat dots, alternating big and small for a playful pattern that suits kids perfectly. You can keep it plain for a clean look, or add tiny dashes between a few dots to make it look richer without adding time. This design is forgiving because small smudges don’t stand out, and the overall look still feels cute and balanced. It also looks great in photos because the wrist framing makes the mehndi feel “finished” even if the rest of the hand is empty. If you want it even cuter, add a tiny heart or a small flower at the center of the band and keep everything else simple and airy.
2. Tiny Heart Chain
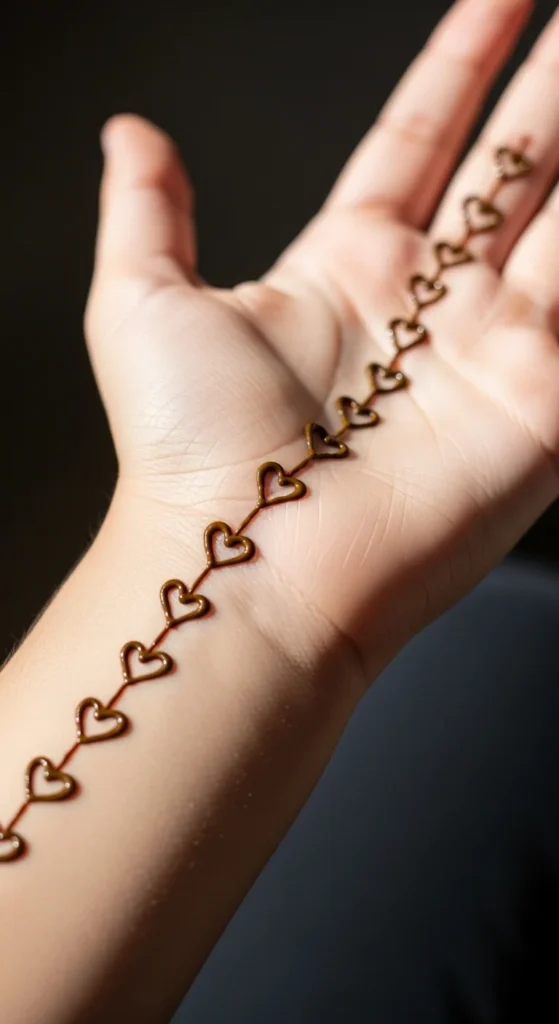
The tiny heart chain is sweet, simple, and perfect for kids who want something pretty but not heavy. Draw a small heart near the wrist, then repeat hearts in a gentle line moving toward the palm, keeping equal spacing like a little garland. Connect the hearts with tiny dots so it feels like jewelry on the skin. The best part is you can stop at any point and it still looks complete, so it works even when you’re short on time. On smaller hands, keep the hearts mini and leave plenty of empty space so the design stays light. This style also looks cute on the side of the hand, running from the pinky edge down to the wrist, because it shows well when kids wave or hold something. The final look is playful, clean, and easy to do without covering the whole palm.
3. Single Flower Burst
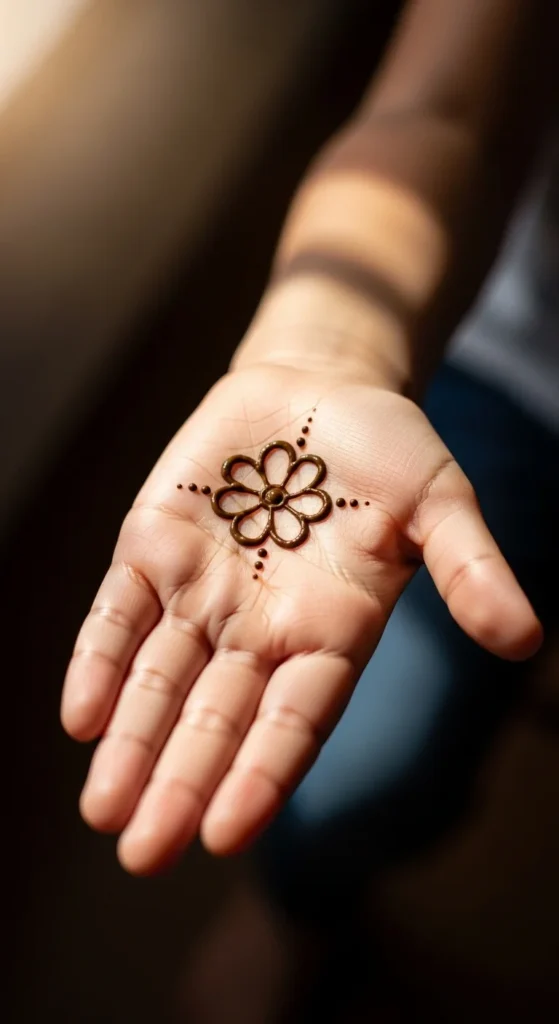
A single flower burst is a classic kid-friendly choice because it looks adorable and takes very little time. Place a small circle in the center of the palm or slightly below it, then add five or six rounded petals around it. Keep the petals chunky and smooth so the design stays clear even if the child moves a little. Add a ring of dots around the petals to make the flower pop without adding extra complexity. If you want a slightly longer version, draw a short stem going toward the wrist and add two tiny leaves, but keep the rest of the hand open so it doesn’t look heavy. This design works on the back of the hand too, especially if the child prefers a smaller motif. It gives a neat, “finished” look while staying simple enough for quick application.
4. Sun and Rays Palm Spot
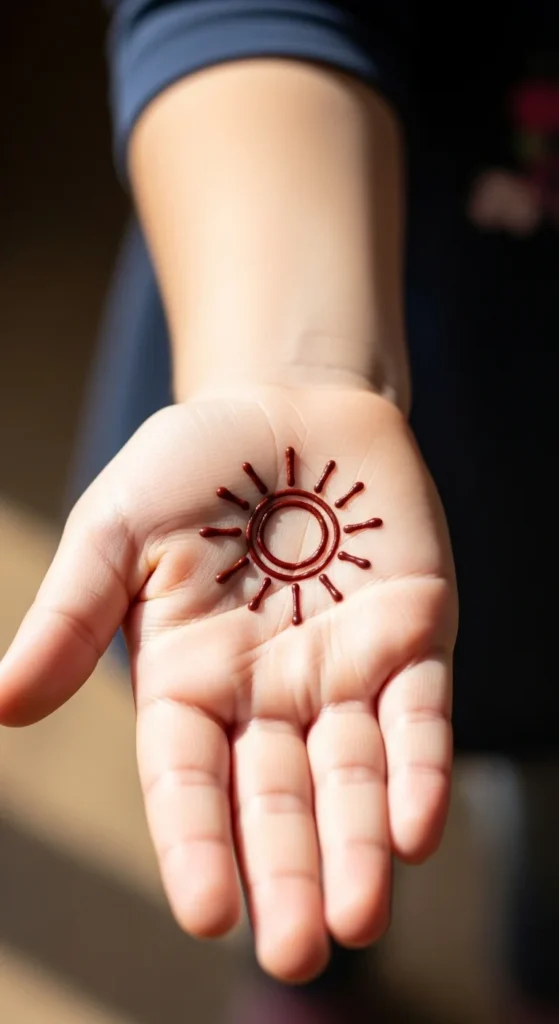
The sun and rays design is perfect when you want something cute, bold, and fast. Draw a small circle in the middle of the palm, then add short straight rays all around it like a little sunshine stamp. Keep the rays evenly spaced, and vary the length slightly for a playful look that suits kids. To fill it out without making it complicated, add two or three dots between some rays, which makes the design feel complete while staying light. This one looks great even if it’s small, and it doesn’t require long trails or detailed shading, so kids don’t get restless. It also photographs well because the simple shape reads clearly from a distance. If you’re working on tiny hands, keep the sun small and place it slightly toward the thumb side so it shows nicely when the child holds their hand up.
5. Butterfly Thumb Corner
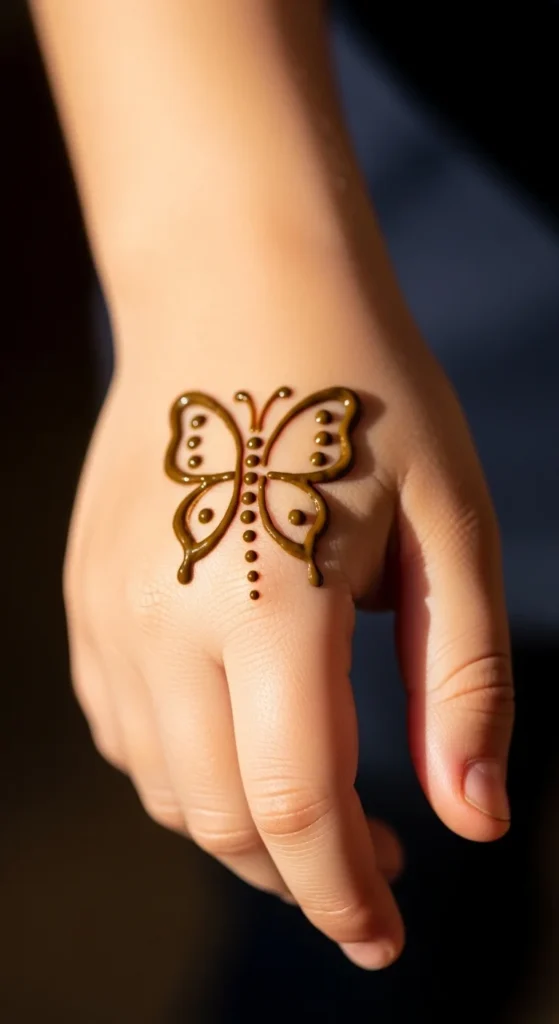
A butterfly in the thumb corner looks adorable and feels special, but it’s still quick to draw. Start with a small oval body near the base of the thumb, then draw two simple wings on each side using smooth curved outlines. Add a few dots inside the wings instead of complicated fills, so the design stays clean and fast. You can finish it with two tiny antennae and a dotted trail moving slightly toward the wrist, which makes it feel like the butterfly is floating. This design is great for kids because it sits in a spot that doesn’t smudge as quickly as the middle of the palm, and it stays visible when they’re holding toys or snacks. Keep the butterfly small and airy, and leave the rest of the hand open for a cute, minimal look.
6. Mini Star Sprinkle
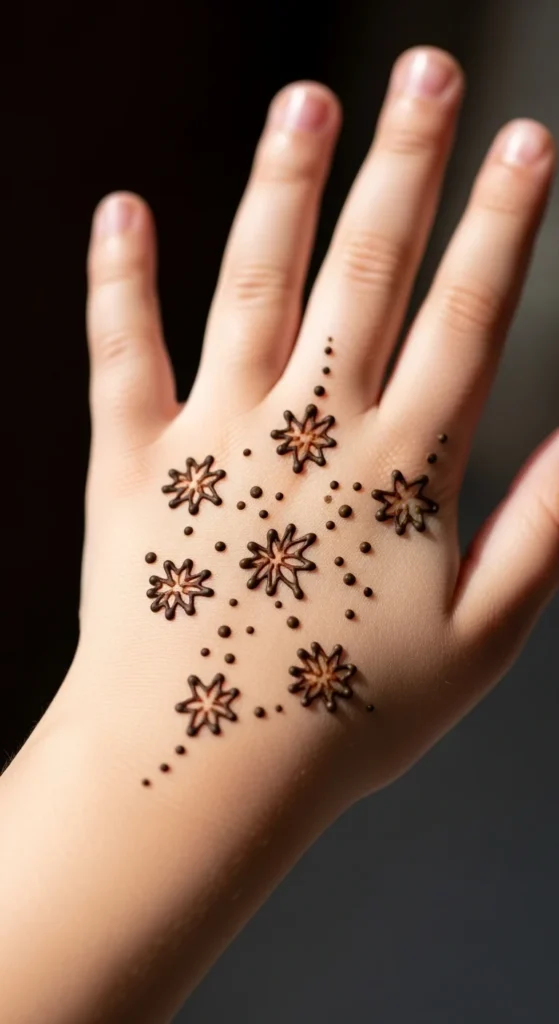
Mini star sprinkle designs are fun because they look like little magic dust on the hand. Draw three to five tiny stars on the back of the hand or near the wrist, then scatter small dots around them. Keep the stars simple—just quick five-point shapes or small plus-sign style stars—so you can finish fast. The dotted sprinkle makes the design feel fuller without making it heavy. This is a great pick for kids who don’t want a big pattern but still want something that looks festive. It also works well when you’re doing mehndi for a group of kids, because you can repeat the same style quickly while changing the star placement slightly so each one looks unique. Leave lots of skin showing so the design stays light and cute.
7. Leafy Vine Wrist Trail
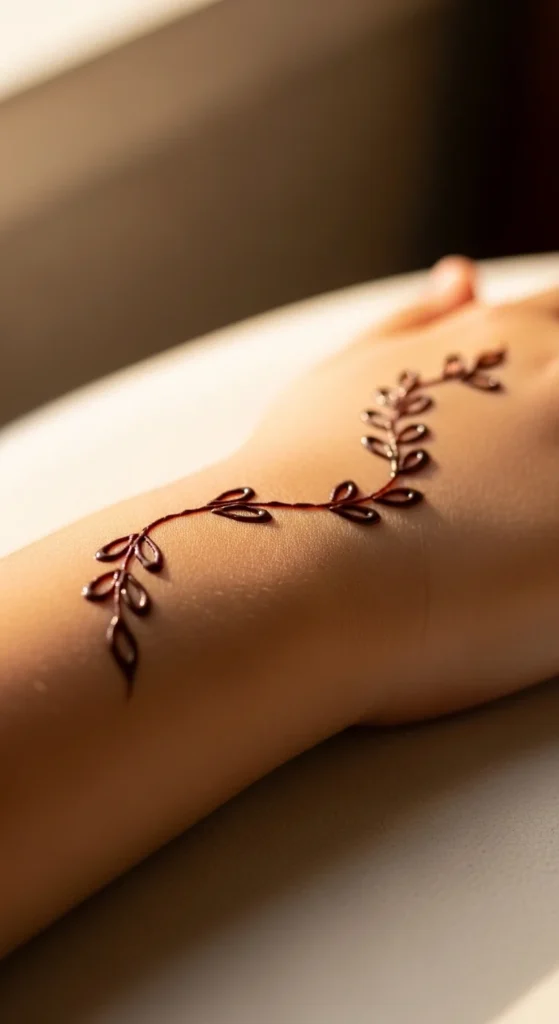
A leafy vine wrist trail looks elegant but stays very easy when you keep it simple. Draw one thin curved line starting at the wrist and moving slightly upward onto the hand. Along that line, add small leaf pairs—just two teardrop shapes facing away from each other. Repeat the leaf pair pattern and keep the spacing even so it looks neat. To make it cuter for kids, add tiny dots between some leaves or at the end of the vine like little berries. This design feels like a bracelet that’s growing upward, and it looks nice even if you stop early. It’s also a good option for kids who don’t want mehndi on the palm, because it can stay mostly on the wrist and back of the hand. The final look is soft, clean, and quick.
8. Candy Swirl Spiral
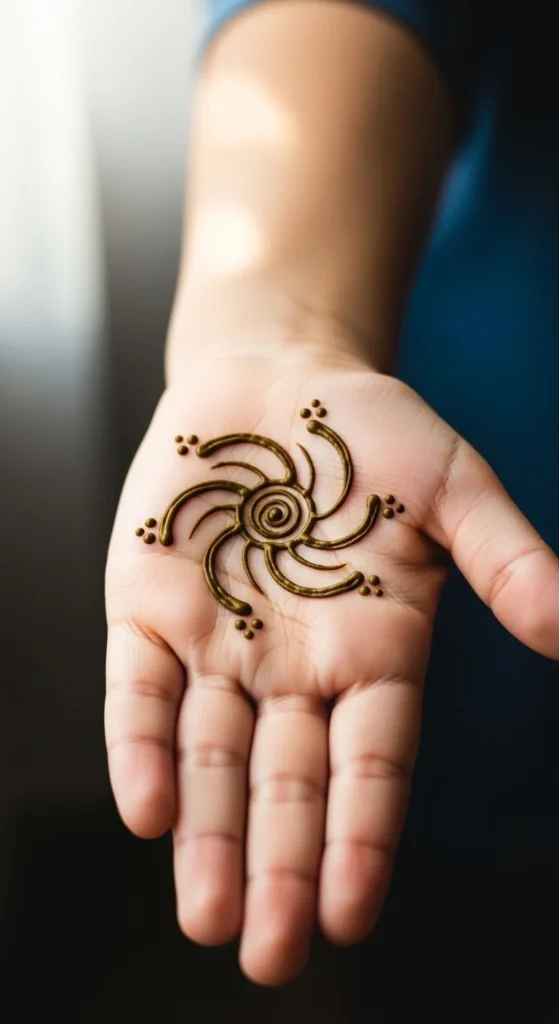
A candy swirl spiral is playful and super fast, especially for kids who like cute, simple shapes. Start with a small spiral in the palm or on the back of the hand, like a lollipop swirl. Keep the line smooth and not too tight, so it doesn’t blur while drying. Then add a second spiral line around the first to give it a fuller swirl look. Finish with a few dots around the swirl to make it feel like a complete little design. If you want a slightly longer version, draw a short stick line under the swirl like a lollipop handle, but keep it minimal so it stays quick. This style looks adorable on tiny hands because it’s bold, easy to recognize, and doesn’t require any detailed sections.
9. Simple Paisley Drop
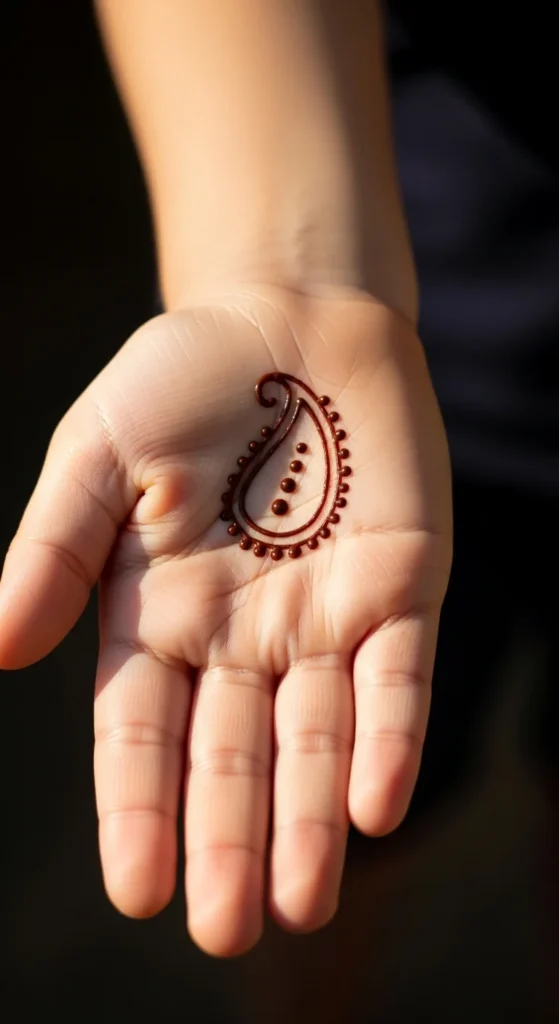
A simple paisley drop gives a traditional mehndi feel without taking long. Draw one teardrop shape with a curved tip, like a mango shape, placed in the center of the palm or on the back of the hand. Inside the paisley, add just three to five dots and one small curved line to keep it light. You can add a tiny leaf at the top of the paisley or a dotted trail going toward the wrist, but keep it short so it stays kid-friendly. The beauty of this design is that it looks classic even when it’s tiny, and it works well for kids who want something that looks like “real mehndi” but not full-hand coverage. Keep the outline smooth and bold so it shows clearly in photos.
10. Rainbow Arc Lines
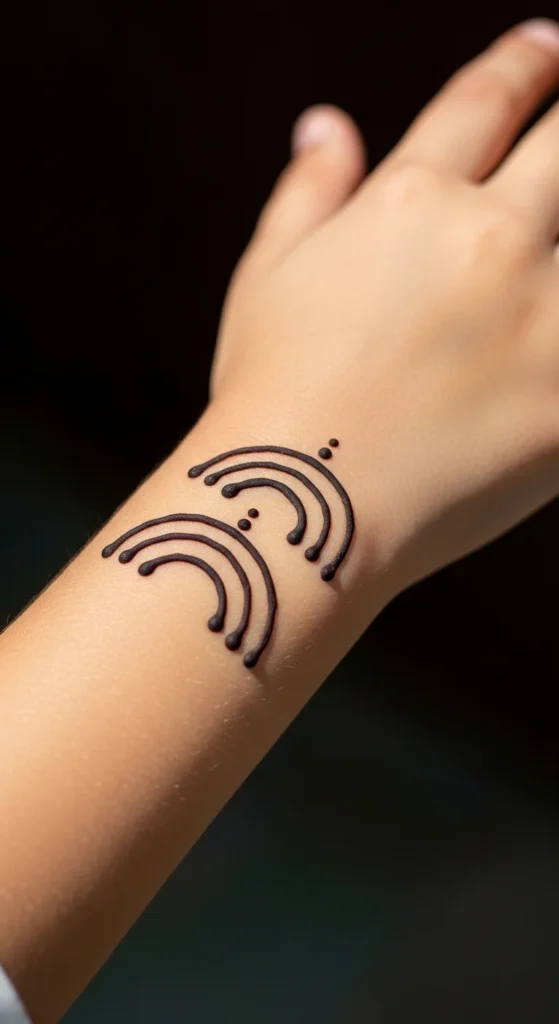
Rainbow arc lines are simple, cute, and perfect for fast mehndi on kids. Draw three curved lines close to each other, like a small rainbow, placed on the back of the hand or near the wrist. Keep the arcs smooth and evenly spaced. Add a tiny dot at both ends of each arc to make it look neat and finished. If you want a little extra detail without making it complex, add two small clouds as rounded bumps at one end of the rainbow, but keep the shapes simple. This design looks clean because it uses open space, and it’s easy to repeat if you’re doing mehndi for multiple kids at a party. It also avoids heavy palm coverage, so it’s comfortable for kids who don’t like a lot of mehndi on their skin.
11. Teddy Face Icon
A teddy face icon is adorable for kids and surprisingly easy to draw. Start with a round face shape on the back of the hand or near the wrist. Add two small circles on top as ears. For the face, keep it minimal: two tiny dots for eyes and a small rounded nose shape in the middle. You can add a short curved smile line under the nose if you want, but keep it light so it stays clean. The key is to keep the lines bold and simple, because tiny details can smudge on kids’ hands. This design looks cute on its own, and it doesn’t require any extra patterns around it. If you want it to feel a bit fuller, add a few dots around the teddy like little sparkles, but keep the hand mostly open and airy.
12. Cat Paw Prints
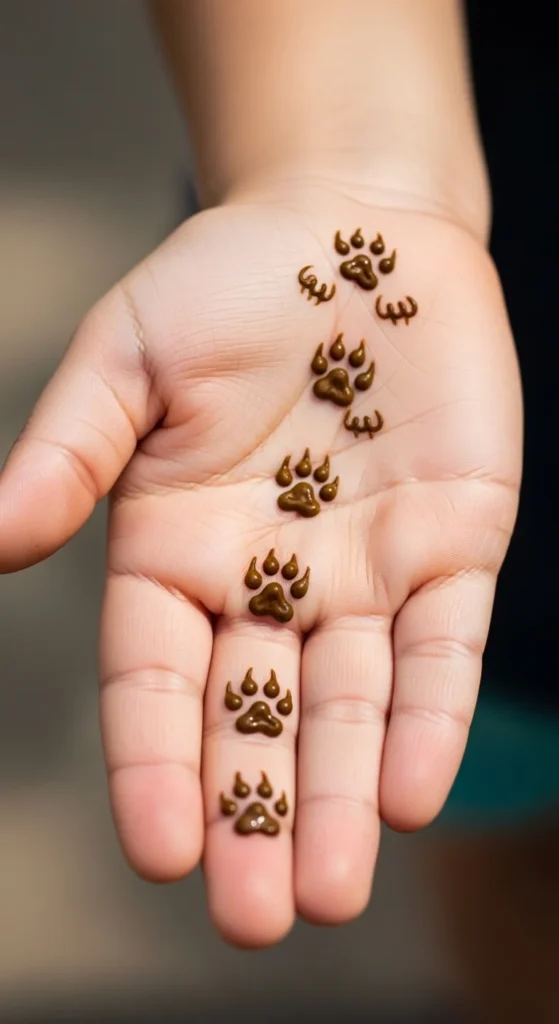
Cat paw prints are a fun, quick design that kids instantly recognize. Make one paw by drawing a small oval pad and four tiny toe dots above it. Repeat the paw print two or three times in a line, like little steps walking across the wrist or up the side of the hand. Keep the spacing even so it looks tidy, but don’t worry about perfection because the “footstep” vibe still looks cute. This design works well on small hands because each paw is tiny, and you can stop at any point and it still looks complete. It’s also a good pick for kids who don’t want something that covers the whole palm. Place the paw trail along the outer edge of the hand so it stays visible and doesn’t smudge too fast.
13. Fish Scale Patch
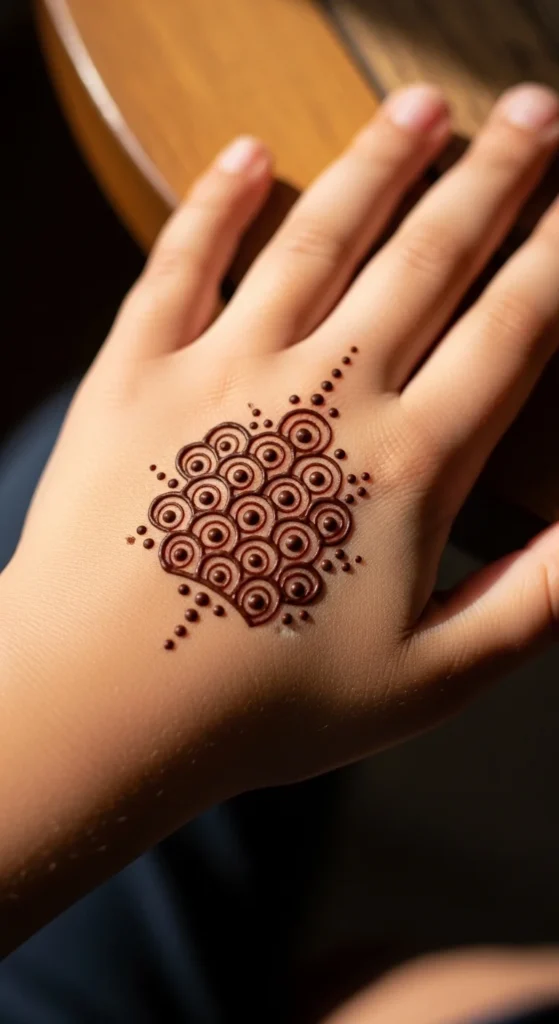
A fish scale patch looks detailed, but it’s made from one simple repeated shape. Choose a small area on the back of the hand or near the wrist and draw a row of half-circles side by side. Then draw another row under it, placing each half-circle between two from the row above, like a neat pattern. Keep it to a small patch so it stays fast and kid-friendly. Add a few dots around the patch to make it feel framed, without adding extra work. This pattern looks cute because it’s tidy and gives a “mermaid” vibe that many kids love. It also looks good even when it’s small, and the repeated shapes make it easier to draw quickly without thinking too much.
14. Cloud and Raindrops
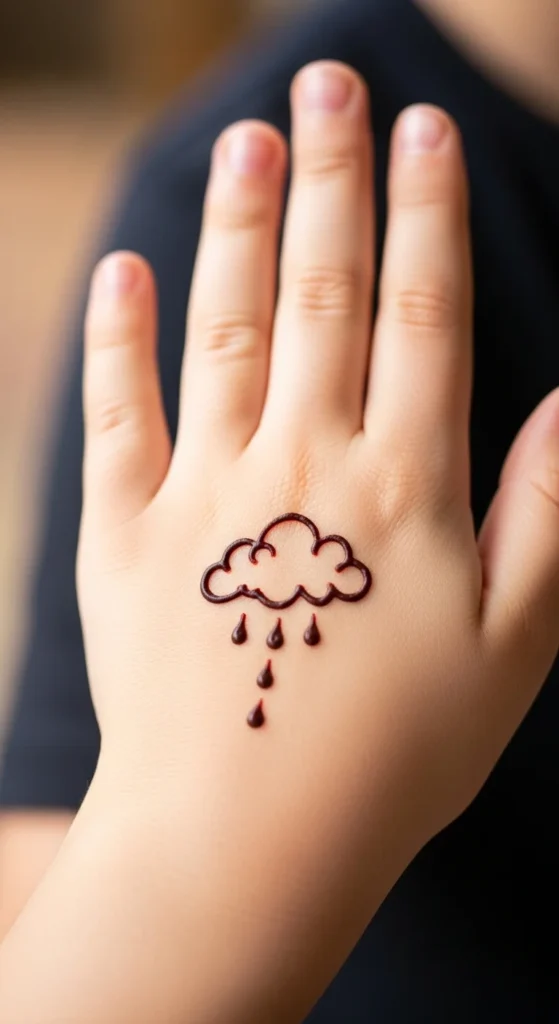
Cloud and raindrops is a sweet, simple design that works well for kids. Draw a small cloud using three or four rounded bumps connected into one shape. Under the cloud, add five to seven small raindrop shapes or dots, spaced evenly so it looks neat. Keep the cloud small and place it on the back of the hand or near the wrist where it stays visible. This design is fast because it uses basic curves, and it looks cute even without extra detail. If you want it to feel a little more “decorated,” add a tiny star dot near the cloud, but keep the rest open so the design stays light. It’s a great option for kids who like simple icons and don’t want a full pattern.
15. Moon and Sparkles
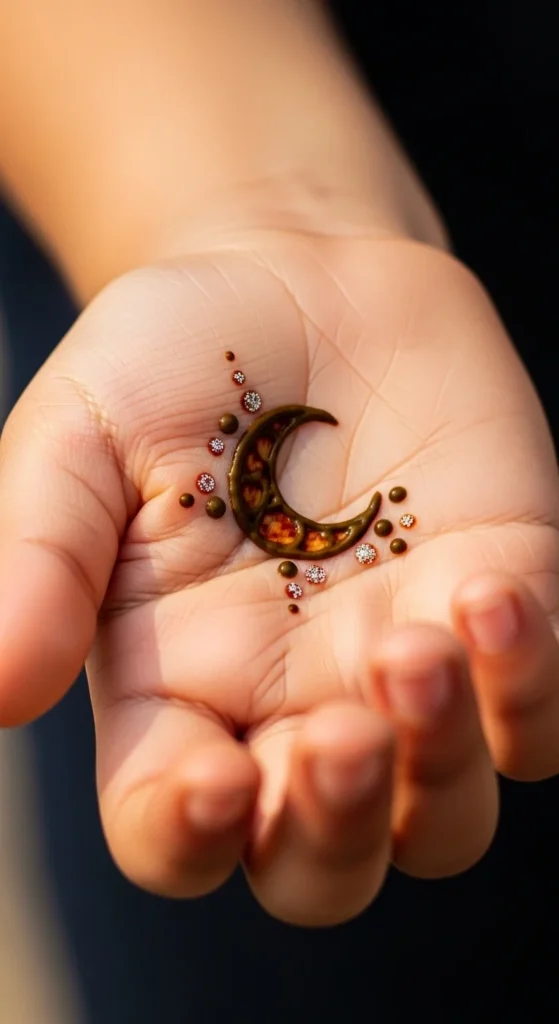
Moon and sparkles is a quick design that looks festive and soft at the same time. Draw a small crescent moon on the back of the hand or near the thumb side, keeping the curve smooth and clean. Around the moon, place tiny sparkle dots and two or three mini stars, keeping them spaced out so the design stays airy. The open space makes it look neat and also keeps it comfortable for kids who don’t like heavy mehndi coverage. This design is easy to customize too—make the moon slightly bigger for older kids or keep it tiny for very small hands. It reads clearly in photos because the crescent shape stands out, and the dots add that little “magic” feeling without any complicated patterns.
16. Initial Bubble Frame
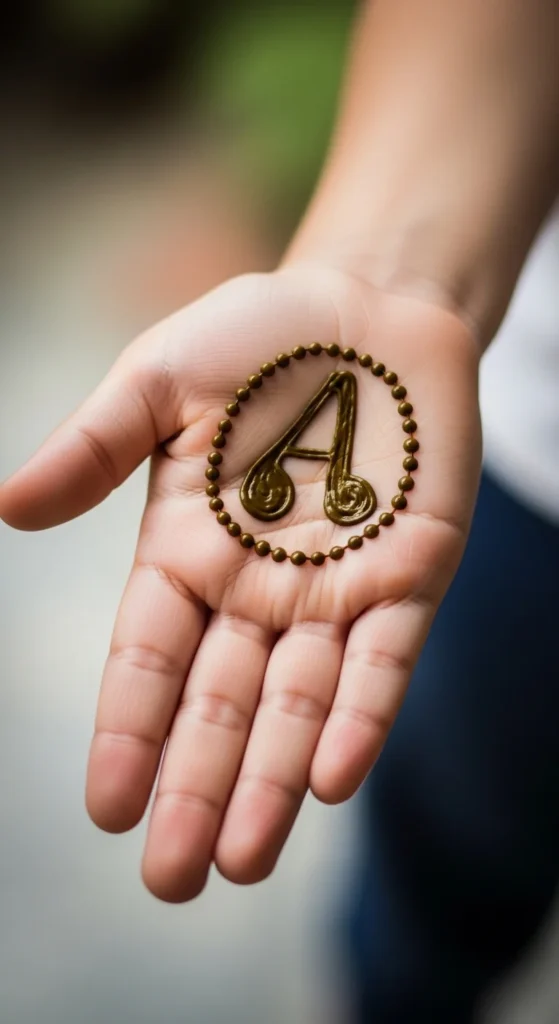
An initial bubble frame is cute because it feels personal while staying simple. Draw one large bubble-style letter shape in the center of the back of the hand or near the wrist area, using thick smooth lines. Around it, add a rounded frame made of dots or tiny scallops, keeping the spacing even so it looks tidy. The design looks complete because the frame gives it a finished border, even though it’s just one letter. For kids, keep the lines bold and avoid tiny detail so it dries cleanly. This style also works well when you’re doing mehndi for siblings or friends because each child can choose a different letter shape, but the overall look stays consistent and quick.
17. Diamond Grid Patch
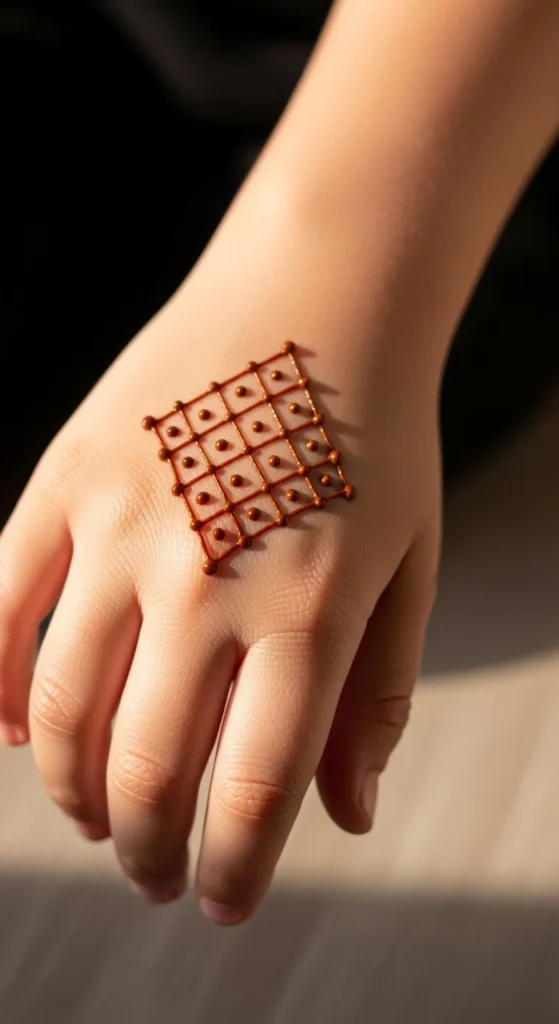
A diamond grid patch looks neat and decorative, but it’s made from simple straight lines. Pick a small square area on the back of the hand and draw parallel diagonal lines in one direction. Then draw another set of diagonal lines crossing the first set to form diamonds. Keep the grid small so it stays fast. Add a dot inside every other diamond, or place dots on a few intersections to make it look more decorative without adding complexity. This design looks tidy and photo-ready because the pattern is structured, and it also works well if the child wants something that looks a bit “grown up” but still simple. Keeping it as a small patch prevents it from feeling heavy on tiny hands.
18. Crown on Finger
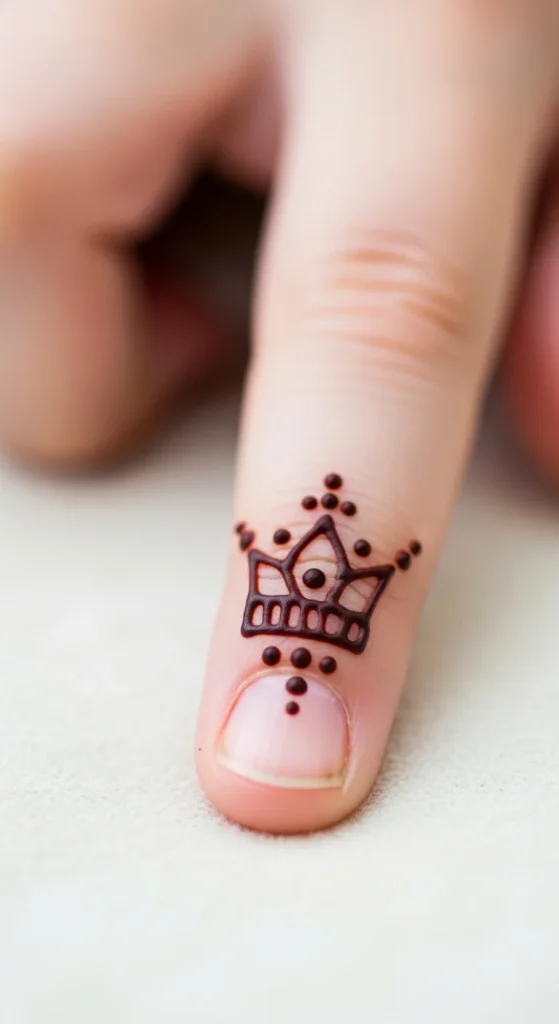
A tiny crown on one finger is a fun idea for kids who like princess-style designs. Choose the index finger or middle finger and draw a small crown near the base of the finger. Use a simple line as the crown band, then add three points on top, finishing each point with a dot like a tiny jewel. Keep the crown small so it stays cute and dries faster. You can add a short dotted line going down the finger to make it feel like a ring design, but keep it minimal so it doesn’t look crowded. This design is great because it’s quick, it looks adorable in photos, and kids love showing it off when they point or wave.
19. Anklet Dots and Bells
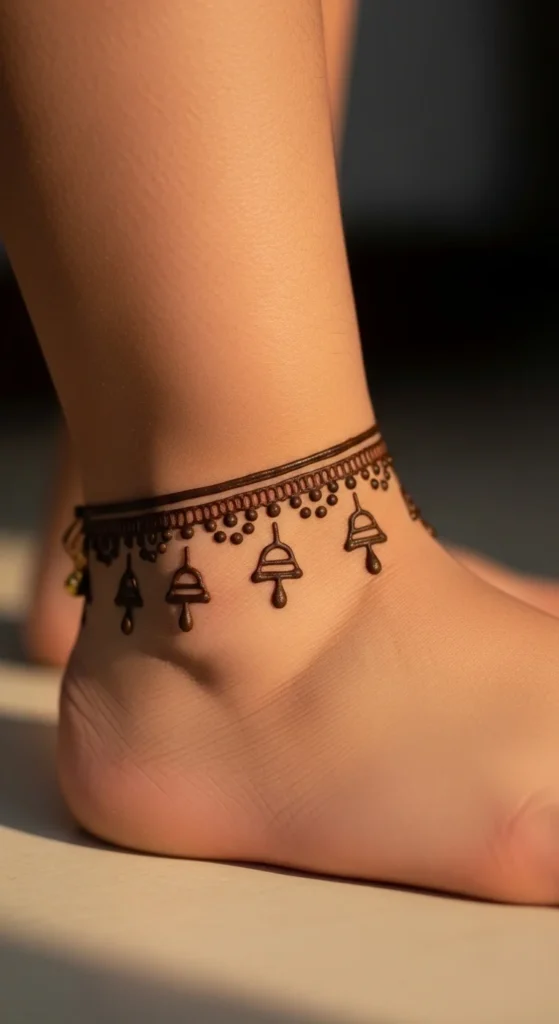
An anklet design is a cute option when the child doesn’t want mehndi on the hands, or when you want something different. Draw a thin line around the ankle like an anklet band. Under the band, add small teardrop shapes spaced out like tiny hanging bells, and place dots between each bell to keep the pattern light. Keep everything small and evenly spaced so it looks neat and doesn’t turn into a heavy block of henna. This style looks festive with sandals or dress shoes, and it feels special without taking long. Because it’s a simple band-and-hang pattern, it’s easy to finish quickly while still looking like a complete design.
20. Easy Mandala Coin
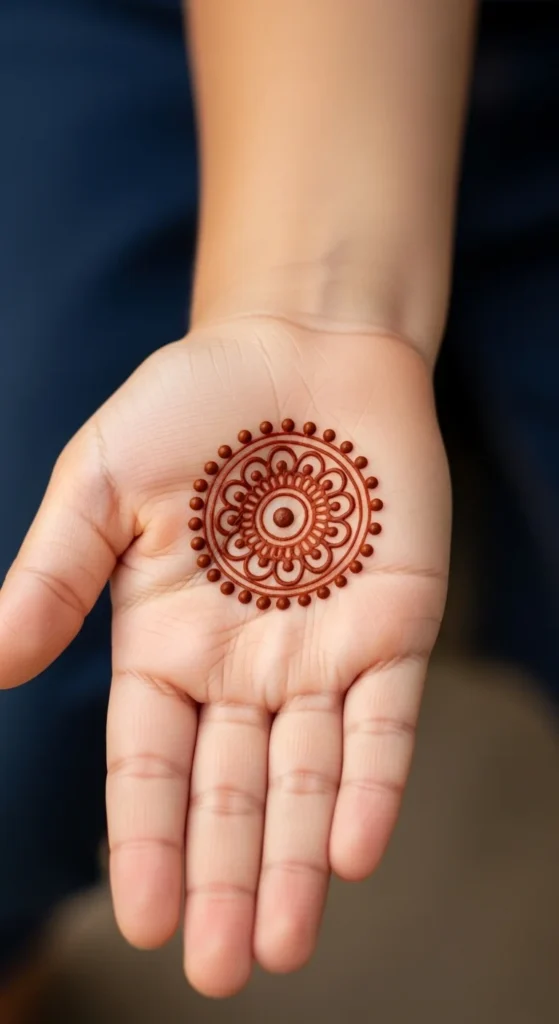
An easy mandala coin is a small circular design that looks traditional but stays simple. Start with a dot in the center of the palm. Around it, draw a small ring, then add short rounded petals in a circle. Finish with an outer circle of dots so the mandala looks framed and complete. Keep the mandala coin-sized so it stays quick and doesn’t overwhelm a child’s hand. The circular shape looks neat even with basic strokes, and it photographs beautifully because it sits nicely in the palm. This is a great choice when the child wants “proper mehndi” but you still want something fast and clean. Leaving the rest of the palm open keeps it comfortable and light.
Conclusion
Simple kids’ mehndi can look adorable without covering the whole hand or taking a long time. These 20 ideas keep things cute, quick, and easy to repeat, whether you’re doing one child or a whole group. Pick one style, keep the shapes clean, and enjoy the fun of making tiny hands look festive in just a few minutes.

Lily Summers is a digital artist and creative storyteller who loves bringing colorful characters to life. With a passion for cartoons, fan art, and playful sketches, she inspires others to explore their imagination through art. When she’s not sketching, you’ll find her dreaming up new ideas for CraftedWizard.com to spark creativity in every artist. 🌈✨


