

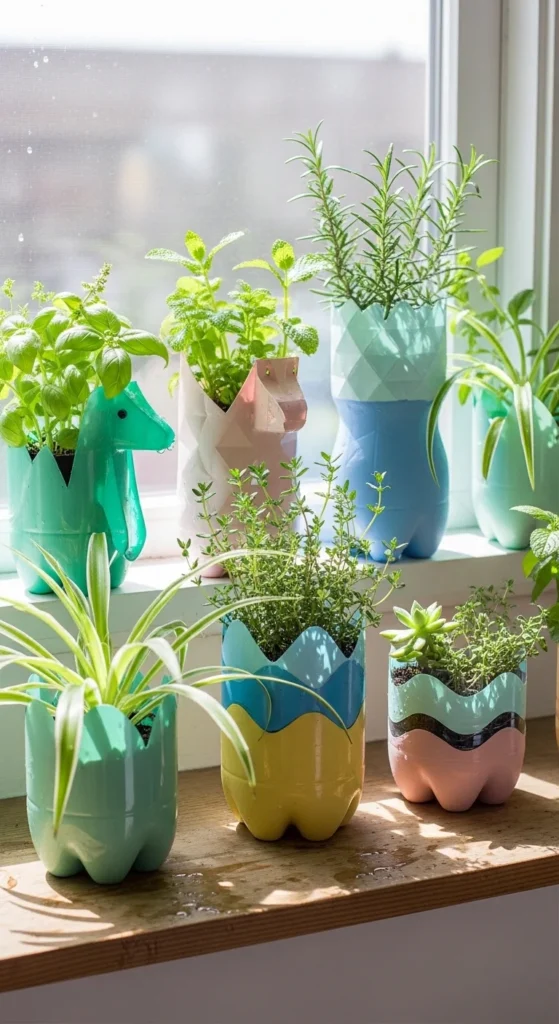
Plastic bottles have a way of piling up fast water bottles, soda bottles, cooking oil bottles… and suddenly your trash bin is full again. But here’s the fun twist: those “throwaway” bottles can become cute, practical planters that look genuinely stylish on a windowsill, balcony, or kitchen counter.
This is one of those DIYs that feels almost too easy… until you realize you just made a mini garden from something you were about to toss.
Choose the Right Bottle Style (So It Matches Your Plant)
Not every bottle makes the same kind of planter. Pick based on what you want to grow.
Best bottle types
- Small water bottles (500ml): starters, succulents, small herbs
- 1–2 liter soda bottles: bigger roots, leafy greens, pothos cuttings
- Wide juice bottles: easiest to plant into (more surface area)
- Tall bottles: great for self-watering designs
Quick plant matching
- Succulents/cactus: shallow planter, lots of drainage
- Herbs (mint, basil): medium depth, consistent moisture
- Pothos/ivy cuttings: water planters or self-watering planters
- Green onions: shallow + frequent watering
Tip: Clear bottles are fine, but for some plants, roots don’t love constant light. You can wrap or paint the bottle for a cleaner look and healthier growth.
Supplies You’ll Need (Simple + Budget-Friendly)
You can keep this super basic, or make it look Pinterest-perfect.
Must-haves
- Clean plastic bottle(s)
- Scissors or a craft knife
- Marker (for cut lines)
- Nail/awl/skewer (for drainage holes)
- Potting mix + plant or seeds
Optional upgrades
- Acrylic paint or spray paint (plastic-friendly)
- Jute twine or ribbon
- Pebbles for the bottom
- Chalk-free matte sealer (for durability)
- Command hooks (for hanging planters)

Basic Planter Method (Fastest and Perfect for Beginners)
This is the simplest way to make a bottle planter that works well and looks neat.
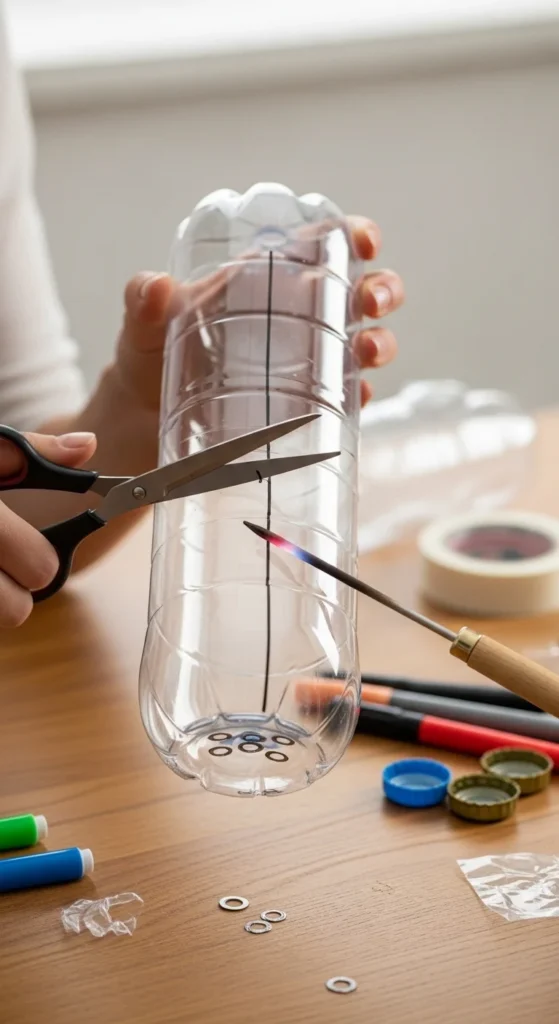
Step 1: Clean and label your cut
- Wash and dry the bottle.
- Remove stickers (warm soapy water helps).
- Use a marker to draw a cut line:
- Halfway cut for a deeper planter
- 1/3 cut for a shallow planter (succulents love this)
Step 2: Cut the bottle safely
- Use scissors for thin bottles.
- Use a craft knife to start a small opening, then switch to scissors for control.
Step 3: Add drainage holes
- Poke 4–8 holes in the bottom.
- If you’re adding pebbles, you can do fewer holes—but don’t skip drainage entirely.
Step 4: Fill and plant
- Add a thin layer of pebbles (optional).
- Add potting mix.
- Plant your seedling or cutting.
- Water lightly and let it settle.
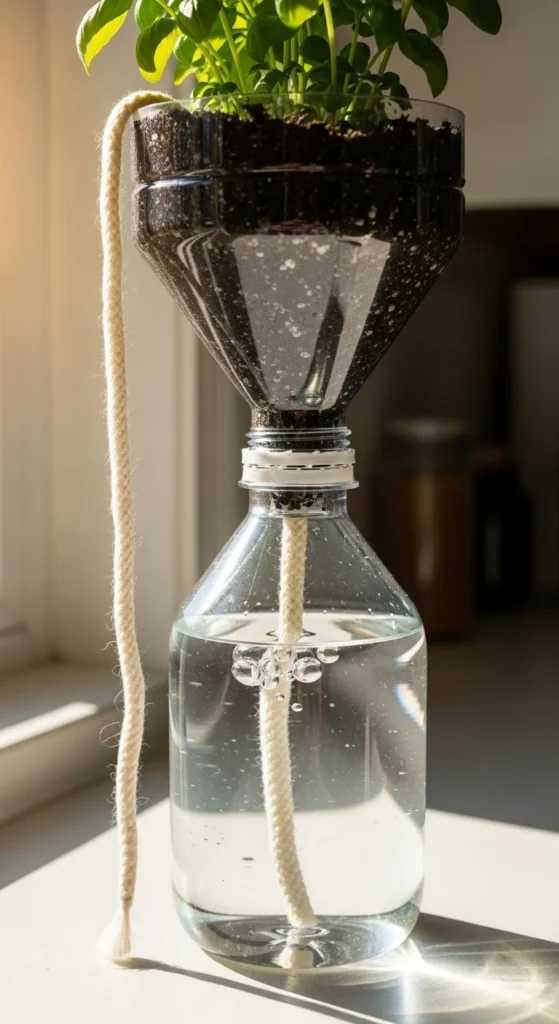
Make a Self-Watering Bottle Planter (Great for Busy Days)
If you forget to water plants (no shame), this method is a lifesaver.
How it works
The top holds soil and the plant. The bottom holds water. A wick pulls moisture upward slowly.
Steps
- Cut the bottle in half.
- Poke a hole in the bottle cap.
- Thread a cotton string or fabric strip through the cap (this is your wick).
- Flip the top half upside down and place it into the bottom half.
- Fill the bottom with water, then add soil + plant in the top.
Best plants for self-watering
- Mint, basil, parsley
- Pothos cuttings
- Lettuce starters
Tip: Don’t let the wick be too thin. You want it to actually carry water, not just sit there.
Make It Look Stylish (So It Doesn’t Scream “Trash Bottle”)
This is where the magic happens. A little finishing goes a long way.
Easy aesthetic upgrades
- Paint the outside in matte white, beige, sage green, or terracotta
- Wrap the middle with jute twine for a cozy look
- Use contact paper (marble, linen texture, muted patterns)
- Add a simple rim detail with washi tape (sealed after)
Pro tip for painting
- Lightly scuff the bottle surface with fine sandpaper first.
- Use thin paint layers.
- Seal with a matte spray sealer so it doesn’t scratch.
If you prefer a clean minimalist look: paint the outside and leave a small “window” unpainted so you can see moisture levels.
Hanging Bottle Planters (Perfect for Balconies and Small Spaces)
Want plants without using counter space? Hanging planters are the move.
Quick hanging method
- Cut a side opening (like a “boat” shape).
- Add drainage holes underneath.
- Punch two holes near the top edges.
- Thread rope or twine through and tie knots.
Best hanging plants
- Pothos
- Spider plant
- String of hearts (if you have bright light)
- Trailing ivy
Safety note: Use strong cord and don’t overload. Soil gets heavy when wet.

Care Tips (So Your Planter Actually Works Long-Term)
A DIY planter is only cute if it stays healthy.
Keep your plants happy
- Don’t overwater—plastic holds moisture longer than clay
- Check drainage holes monthly (soil can clog them)
- Rotate your planter weekly for even light
- If algae forms in clear bottles, wrap or paint the bottle to block light
Quick fix for soggy soil
- Add more drainage holes
- Mix in perlite or sand to loosen the soil
- Water less frequently
Final Takeaway
Turning plastic bottles into planters is one of the easiest ways to upcycle while making your space feel greener and calmer. Start with the basic cut-and-plant version, then level up to self-watering or hanging styles when you’re ready.

Lily Summers is a digital artist and creative storyteller who loves bringing colorful characters to life. With a passion for cartoons, fan art, and playful sketches, she inspires others to explore their imagination through art. When she’s not sketching, you’ll find her dreaming up new ideas for CraftedWizard.com to spark creativity in every artist. 🌈✨


